Can warm-ups be too long? Is there an upper limit? Sarah Walls discusses some limits and special considerations for great warm-ups.
Coaching the Forearm Wallslide
A deceptively simple exercise, the forearm wallslide delivers a huge ROI:

Off-Season Training: Overhead Athletes

kiss
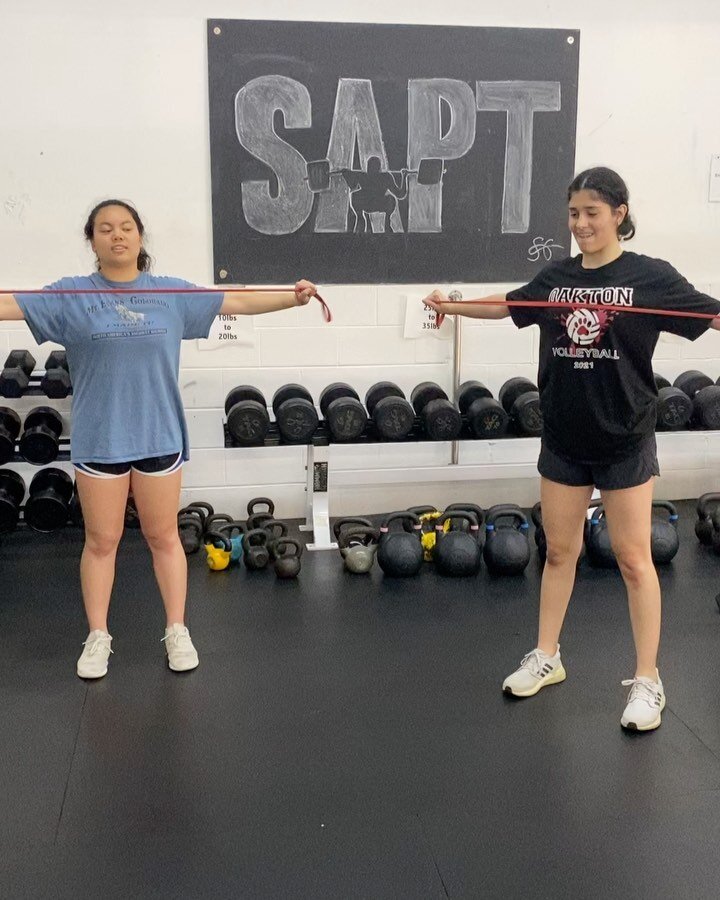
Last week, we laid out some general guidelines for athletes heading into their off-seasons. You should read it, if you haven't already. Today, we'll delve into some specifics for overhead athletes (i.e. baseball, softball, javelin, shot put, swimmers (though it seems as if they never have an off-season), etc.). Shoulders are rather complicated and annoyingly fickle joints that can develop irritation easily which is why proper attention MUST be paid to shoulder mechanics and care during the off-season. There is nothing "natural" about throwing a heavy object (or a light one really, really fast) and shoulders can get all kinds of whacky over a long, repetitive season. I'm going to keep it sweet and simple.
1. Restore lost mobility and improve stability
- Hips: they get locked up, especially on athletes that travel a lot during the season (helloooo long bus rides). Restoring mobility will go a long way in preventing hip impingements, angry knees, and allow for freer movements in general. Locked up hips will prevent safe, powerful throws and batting, thus, now is the time, Padawans, to regain what was lost!
- Lats: Usually tighten up on the throwing side and create a lovely posture that flares the rib cage and makes breathing not-so-efficient. Loosen up these bad boys!
- Breathing patterns: Those need to be re-trained (or trained for the first time), too. Breathing affects EVERYTHING. Learning proper breathing mechanics will do a lot to restore mobility (T-spine, shoulder, and hips), increase stability (lower back and abdominal cavity), and create a more efficient athlete (more oxygen with less energy expended to get it). I've written about it before HERE.
- Pecs and biceps: These guys are gunky and fibrotic and nasty. Self-myofacial release is good, finding a good manual therapist would be even better, to help knead that junk out! One caveat: make sure that as you release these two bad boys, you also add stability back into the shoulder. This means activating lower and mid-traps and the rotator cuff muscles to retrain them to work well again. Why? Most likely, the pecs and biceps are doing a LOT of stabilization of the shoulder (which they shouldn't be doing so much) so if you take that away through releasing them, one of two things will happen: 1) injury will occur since there's nothing holding stuff in place, 2) no injury, but the pec and/or bicep will tighten right back up again as your body's way of producing stability. So, mobilize then stabilize!
2. Improve scapula movement and stability
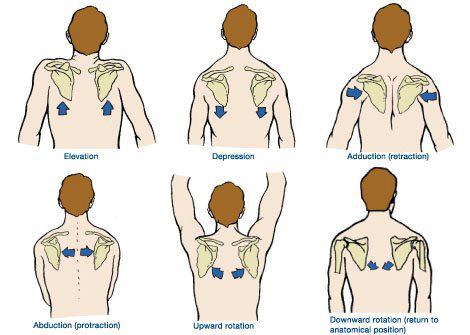
Along the lines of restoring mobility everywhere, the scapula need particular attention in overhead athletes as they are responsible for pain-free, overhead movements. Below is a handy-dandy chart for understanding scapula movements:
shoulder-scapular-motions
Now, over the course of the season, an overhead athlete will often get stuck in downward rotation therefore at in the early off-season (and throughout really) we want to focus on upward rotation of the scapula. Exercises like forearm wallslides are fantastic for this.
Eric Cressey notes that the scapula stabilizers often fatigue more quickly than the rotator cuff muscles. This means the scapula doesn't glide how it should on the rib cage, which leads to a mechanical disadvantage for the rotator cuff muscles, which leads to impingements/pain/unstable shoulders.

We need a freely gliding scapula to get overhead pain-free.
As we increase the upward rotation exercises, we want to limit exercises that will pull the athlete back into downward rotation, i.e. holding heavy dumbbells at their sides, farmer walks with the weight at sides, even deadlifts.(whoa now, I'm not saying don't deadlift, but limit the volume on the heavy pulls for a few weeks, and like I said in the last post, training speed work will limit the amount of load yanking down on those blades.) Instead, athletes can lunge or farmer carry in the goblet position (aka, one bell at their chest).
There is more to be said, but let us move on, shall we?
3. Limit med ball work
At SAPT, we back off on aggressive med ball throwing variations for the first couple weeks post season as the athletes have been aggressively rotating all season. Instead, we'll sub in some drills that challenge the vestibular such as single-leg overhead medicine ball taps to the wall. (I don't have a video, sorry.)
Or, stability drills such as this:
If we do give them some low-intensity throws, we'll have them perform one less set on their throwing side than on the non-throwing side.
4. Limit reactive work
We don't usually program a lot of sprint work or jumps the first few weeks. If we do program jumps, we'll mitigate the deceleration component by adding band resistance:
5. Keep intensity on the lower end
As mentioned in the last post, instead of piling on weight, we enjoy utilizing isometric holds, slow negatives, and varying tempos to reap the most benefit from the least amount of weight. We also maintain lower volumes over all with total program.
There you have it! Tips to maximize the off-season and lay a strong, stable foundation for the following season!
A Prerequisite to Lifting Heavy Things: Stability
In my last article, I talked about the need for correct mobility in your exercises and workout. Mobility is extremely important and should always be addressed early on to ensure good positioning and a full range of motion in your lift. Mobility, however is only one part of the puzzle. There’s another aspect that the yogis don’t like to talk about and many people get confused with a BOSU ball: Stability
Mobility and Stability are the two components that provide the frame-work of movement. Mobility is the ability of a joint to move through a given range of motion, whereas stability is the ability to resist being moved. From a biomechanics stand-point they are like yin and yang, positive and negative, peanut butter and jelly. One cannot exist without the other. They are both equally important in training, however the body will always choose stability over mobility for safety and compensations.
Dr. Perry of Stop Chasing Pain is known for his saying, “stability rules the road.” What he means by that is that your body will always give up mobility in whatever joint it needs to create a stable environment if there is dysfunction(muscles not working properly). Will that cause pain and compensation patterns? Probably, but not always. If muscles aren’t working right, then they will not be able to control the motions in joints, and your body doesn’t trust that, so it will lock it down. It’s very similar to walking on ice. When you’re on the ice, you naturally stiffen up, and you consciously will keep your legs in and tight, not using big strides.
So essentially, if you lose stability, you will lose mobility somewhere else. It follows the joint by joint approach just as mobility did in my last article. This is why it doesn’t make sense to just stretch or just to weight train. When I talked about how to create proper mobility, step 4 was ACTIVATE. This is where stability is created, in the hopes that it will start to become automatic when used with movement.
The Misconceptions:
Stiffness is the Same as Stability
Many people confuse this notion of creating stability with creating stiffness. For an area to be stable, you want it to be tense/active during the appropriate movement and yet supple when not in use.
If you’re doing 50 reverse hyperextensions a day to keep your low back, “stable,” then you’re just creating stiffness by overusing the muscles and there for doing it wrong. If you want to create true stability in a particular area, then you must train that muscle/area as a stabilizer.
Stability training is done on bosus and wobble boards
Creating true stability in a joint DOES NOT need to be done on an unstable surface. It is done by creating mobility and then using a particular area as a stabilizer to hold a particular position. This is not to say that using a BOSU or wobble-board is always wrong. They do have their time and place for rehab, but that’s another topic for a blog post.
Anyway, an example of using a muscle as a stabilizer that I like is using the ½ knealing position for variations on exercises to help create some glute stability and open up the front of the hips. What about the guy doing the 50 hyperextensions? Well how about just try some simple plank variations or maybe even a kettlebell halo instead.
Strength: You're Doing it Wrong! Part 2
In the first installment of this series, we dived into a couple of the fundamental errors many folks tend to make while on the quest to become stronger. In case you missed it (shame on you), you can check it out with the link provided above; otherwise, let's get right to it and pick up where we left off!
"You're Doing It Wrong" #3 - Overkill
In case you're wondering what overkill looks like within the context of a strength and conditioning program, Dan John once gave a fantastic illustration of it: "If jumping off a box helps my vertical, then jumping off of a building will help that much more."
People often make the mistake of taking an idea, or something that may be good either in moderation or a specific context, and carrying it to the extreme:
- "I've heard that focused periods of training with loads of 90%+ will augment my one-rep max, so I'll employ them all the time, every day." - "Since a few sets here and there of isolated bicep curls may develop connective tissue quality of the biceps tendons, I'll do thirty sets a week!" - "Strong lifters use bands for accommodating resistance, so I should use them, too." - "Three sets of heavy squats will make me stronger, so doing twelve heavy sets must have four times the effect."
Here's a tip. Always do the least required - be it intensity, volume, or using "secret powerful" methods - to incite the desired adaptation. This way, you can save the higher intensities, volumes, etc. for later in your training when they become essential for continued improvement. (Note: I discussed this in further detail, via the concept of the minimum effective dose, HERE.)
"You're Doing It Wrong" #4 - Sacrificing Form for Weight on the Bar
Putting it another way: sacrificing form to stroke your ego.
How many times do you see "that guy" deadlifting with a rounded back, squatting with the knees wobbling all over the place, or bench pressing with the bar bouncing off his chest like a trampoline?
Sure, sometimes it can be a simple lack of education - he (or she) hasn't been coached correctly on the ability to perform fundamental human movement. But other times, and this is more often the case (at least with males), is that people don't wish to take the time - and by extension refuse to exercise patience and discipline - to learn the various movements correctly. They don't care that adding fifty more pounds to the bar causes complete breakdown in form, as long as it means they can satisfy their egos by lifting fifty more pounds.
Dr. Kelly Starrett summed this up quite nicely: "Sacrificing good form will cannibalize your potential benefits."
Be it training to get stronger, run faster, jump higher, or simply improve your quality of life, lifting with poor form does absolutely nothing for you. Well, other than eventually showing up on your doorstep to exact payment by means of pain or injury.
(Note: for those of you who think one can't lift any appreciable weight with good form, check out the video below with Jeremy Frey.)
You can do pushups with your low back sagging toward the floor and your elbows flared, deadlift with a flexed (or hyperextended) lumbar spine, bench with your shoulders protruding forward, squat with the knees collapsing, overhead press with all sorts of compensation patterns, until one day....you can't.
Who cares who is around you or who may be watching. Recognize that you are in this for life, that a lot of small improvements add up to quite a bit, and that greatness isn't achieved in a day. Exercise the patience and discipline of a true professional.
"You're Doing It Wrong" #5 - Adding Too Many "Finishers"
Confession: I have a slight masochist streak in me, which loves to push my body to the brink of destruction on occasion. And I think it's evident that quite a few others do, as well, which is why sports such as CrossFit are so popular.
However, constantly pushing our body's limits - either as the training session itself, or as a "finisher" at the end of the strength training - will undoubtedly hinder strength gains.
You can only chase so many goals at one time, and it's easy to fall into the "I want it all! Now!" trap. More strength, more endurance, more flexibility, more hypertrophy, etc. Attempting to achieve all these things, concurrently, is akin riding multiple horses with one saddle: rarely does it end well.
Using myself as an example: back when I discovered the "wonderful" world of metabolic circuits and Tabatas, I'd throw them in at the end of every strength training session thinking that it would automatically turn me into a lean, mean, fighting machine. My primarily goal was strength improvements (I was following a powerlifting-centric program at the time) but me, in all my intelligent greatness, thought it'd be wise to throw in crazy finishes at the end of each session to improve my work capacity and keep body fat at bay.
Did I become pretty decent at doing a lot of squat thrust + tuck jumps in a short period of time? Sure....but to what end? Did I get stronger throughout the course of the program? Not so much.
At least, not nearly as much as I could have had I not committed such wanton foolery at the end of each strength training session. Our bodies can only handle so many competing demands; you can only get so far by trying to simultaneously train for both strength and the anaerobic lactic system.
Keep the goal.....well, keep the goal, the goal! If your goal is strength, then your actions should reflect this. 20-rep deadlifts in a circuit, for time, is not strength training.
I'm not poo-pooing on those who enjoy circuit training or want to add a "metabolic boost" to each training session. To each their own. But I do feel many miss the mark when it comes to choosing a goal and seeing it to the end. If you want to get better at circuit training, then do circuit training. But if you want to get stronger, then, well, do things that will make you stronger, and focus on those things alone.
Now, just because strength may be your primary goal, this doesn't necessitate you allowing yourself to fall so far by the wayside that you become winded from climbing a small flight of stairs. In fact, smart cardiovascular activity will only aid you in your quest to carry, push, and pull heavy objects. Just follow these rules with any conditioning you do:
- If you're worried about increased bodyfat levels, do your due diligence in the kitchen. A rule we use with our athletes at SAPT is that training should NEVER be used to make up for irresponsibility in the kitchen.
- Don't be an idiot.
- If you do need to develop your work capacity, go about it in an intelligent manner. Monitor your heart rate, employ joint-friendly modalities, and track your strength gains to ensure you're still moving in the right direction.
Examples for the Strength Enthusiast
- For some examples of joint-friendly conditioning options, check out the series I put together HERE and HERE.
- Hill sprints are another great option.
- Todd Bumgardner also put together a solid article at T-Nation, A Practical Guide to GPP, in which he lays out some good options, along with providing advice on when to put focused periods of GPP (general physical preparedness) into your program.
- Tim Henriques wrote a great article, Cardio for Strength Athletes, that discuss and provides awesome guidelines for....well, I think the title is self-explanatory.
"You're Doing It Wrong" #6 - Training at Too High of a Percentage Relative to Your One-Rep Maximum
I tell you truly, it really is incredible how strong one can become by lifting with submaximal loads. While yes, there certainly are times to push it and incorporate periods of lifting close to your max, there's much to be said for maintaining solid bar speed and keeping the load low(ish) in training.
Yes, I am biased, as I work predominantly with athletes and I'm always seeking ways to make them stronger and faster with minimal risk of injury, but many successful powerlifters have (successfully) utilized this approach, as well.
Two quick examples of student-athletes at SAPT. Here is Carson, now at UVA and competing in powerlifting, who we helped take his deadlift max from 410lbs to 445lbs, never using loads higher than 365lbs in training!
And here is Red Dowdell (now playing Division I baseball at VMI) who trained at SAPT in-season during his senior year of baseball. I kid you not, we never had him lift anything higher than 275lbs during his in-season training, and yet he was able to pull 405lbs post-season. (His previous best was 325lbs.)
That's a 35lb and 80lb improvement, all accomplished while using loads well less than 90% of what they were actually capable of doing in training.
It's amazing what you can accomplish by ceasing to obsess over weight liftedin training as your sole benchmark for improvement, rather than improving rate of force development, honing technique, and judiciously manipulating frequency, volume, and other training variables to make yourself stronger and more powerful.
And the stronger you become, the more imperative it becomes to astutely plan and cycle periods of higher loading, given that your nervous system is more efficient and you recruit more higher-threshold motor units than you did as a beginner. While a beginner may be able to get away with regularly training close to their max, stronger individuals become absolutely fried from doing this too regularly. What may be 90% for a 700lb deadlifter (630lbs), will have a much different impact/effect on the human animal than 90% for a 200lb deadlifter (180lbs).
"You're Doing It Wrong" #7 - Failing to Train with Purpose
Even though, in the points outlined above, I touched on concepts of good form, not going too heavy, and never doing more than is required, this doesn't mean that you can expect to become stronger without training with conviction, purpose, and intent to succeed.
Those who constantly check their cell phones for texts and Facebook or Twitter updates, and those who converse with others while the bar is on their back, will always see sub-par results compared to those who train with some freaking purpose.
Don't just go through the motions! Put the magazine down, grab the bar as tight as humanly possible, and move it like you mean it!
When you walk on to your respective training grounds - be it your garage, a commercial gym, or an awesome performance institute like SAPT - let go of everything that was plaguing you outside the facility walls. Traffic, girlfriend/boyfriend problems, co-workers driving you nuts, celebrity news tempting you to read the magazine on the shelf, it all doesn't matter.
Focus on the task at hand, and then be amazed as you reach new heights.
A Prerequisite to Lifting Heavy Weights
Ahhh how exciting, my first blog post as a coach at SAPT. I’ve got my cup of coffee, The Best Around playing on loop and I’ll be doing hip mobilities throughout writing this blog entry. Why? Because The Best Around was originally supposed to be for a Rocky III montage, but was replaced by Eye of the Tiger and I think Joe Esposito deserves more credit for the inspiration it brings…. Why am I doing the hip mobilities every 30 minutes while at a desk? Easy, because I want to squat later. Mobility: A Prerequisite to Lifting Heavy Weights
If you’re reading this blog, then it’s obvious you want to get strong, build muscle, and improve fitness in each and everyone of your workouts. You’re the type of person who sees exercises like deficit deadlifts, deep squats and overhead presses and gets as giddy as a little schoolgirl at the thought of trying it in your next workout. You look up the technique, take a few mental notes, begin with light weight for a warm-up, and then finally drop butt-to-heels into that heavy squat.
But what happened? You thought you would drive up out of the hole like superman initiating his flight takeoff, but instead you feel your lower back light up like Iron Man’s arc reactor.
You didn’t check your mobility prerequisites for that exercise did you?
Position is Power
Every exercise requires a certain degree of mobility in particular joints in order to execute the movement safely. If the mobility is not there, then the body will look for a way around it to accomplish that movement. By doing this you are putting yourself into a compromised position, and what’s worse is that if you’re doing it with training, you are reinforcing a compromised motor pattern. Practice doesn’t make perfect; practice makes permanent.
Not only are you actually weaker in these compromised positions, but you are more likely to injure yourself. This needs to be fixed before you can get strong. You can only squat so much weight with a Hyena Butt. You must work on gaining enough mobility to get into whatever position a given exercise/movement requires, WITHOUT compromise, and then you can become strong.
I’m sure you’re probably wishing I’d just shut up and tell you how to get mobile, right? Well too bad! Because first it is more important to understand WHAT needs to be mobile.
Understanding Mobility
Joint mobility is the degree to which a joint can move through a range of motion. When a joint becomes less mobile, it becomes more stable as it can’t move. (Note: Stability is not a bad thing! You just need it in the right places.)
Though it’s not black and white, many of our joints are meant to be mobile while others are stable. Sometimes, due to activities (or lack thereof) in our daily life, injuries or even the shoes we wear, joints that should be mobile become stable and throw off our body’s movements. When these joints that should be mobile are then locked down, joints that are stable then become mobile to compensate for the lost motion. This relationship is constant throughout the entire body and it’s the reason you will see lots of errors in movements that can’t be fixed with simple queues.
The Joint-by-Joint Approach outlines this mobility-stability relationship between the joints and how it could affect movement. Essentially it conveys that the following joints need more mobility or stability:
Arch of Foot – Stability
Ankle- Mobility
Knee- Stability
Hips- Mobility
Lumbar spine- Stability
Thoracic spine- Mobility
Scapula- Stability
Gleno-humeral(shoulder) joint- Mobility
Does anyone else see the pattern here? Our body alternates the needs of our joints from head to toe. So what do you think happens if one of these is thrown off? Then the pattern is broken and they all get thrown off to some extent. If someone is flat footed, they will probably have poor foot stability and it will cause their feet to collapse in movement. This results in a loss of ankle mobility over time, and their knees will almost always cave in when they squat. The reason for this is because their knees are now looking for mobility. The same can be true for losing stability. Lets say Yoga Sue starts stretching out her lower back more and more because she’s been having back pain. By creating more mobility in her lumbar spine through stretching, she is reinforcing her body to move through her lower back rather than hips and will eventually lose hip mobility. I’ll touch more on the stability component in my next post.
If the stability/mobility pattern is thrown off, then it will compromise your movements and thus jeopardize the intended benefits of lifting heavy things and your training sessions will look like poop.
Fix It!
So I’m sure you’ve spent the past few minutes form checking your squat depth in a mirror and are now begging for the answer of how to become a mobility master. Have patience grasshopper; first you must find your weakness.
Step 1. Find your limiting factor
This step will most likely need a coach or knowledgable training partner. You must determine what joint is immobile and causing the issue in your movement. You can use a movement screen for this or you can informally just breakdown the movement to see when the poop hits the fan.
Step 2. Determine WHY it’s your limiting factor
Joints can become immobile for several reasons. More often then not it is because your joint is stuck in one position for a long period of time due to your lifestyle. If you find this to be the culprit you’re going to need to make some changes before you can start seeing results. You may have to stop wearing those 5 inch heels or you may have to start getting up and walking from your desk every 20 minutes.
Sometimes a joint can become immobile due to overuse in a certain range of motion. You will see this a lot in runners or any other athlete that goes through repetitive motion. If this were the finding, you would just go straight to step 3.
Occasionally you may find that a joint is immobile because it is protecting something. This will take a more educated diagnosis, but if that is the case, then DO NOT MOBILIZE IT. If muscles aren’t firing right or there is a structural issue causing instability, the body’s natural response is to lock that joint down to keep it from being unstable and causing more damage.
Step 3. Soft Tissue Work
You now know what’s immobile and why. You’re about to start training, now it’s time to mobilize it. Foam rolling is one of the fastest ways to increase mobility of a certain joint. Simply roll on the muscles that influence that joint and try to workout the super-happy-fun knots you find. If you’re new to this use a foam roller, if you’re one bad dude, try a PVC pipe or lax balls. If it’s your thoracic spine, try using a t-spine peanut.
Step 4. Mobilities
You’re going to have to lengthen the tissues holding down the joint at some point. I find it most effective to do in the warm up, right after foam rolling and even throw a few into the workouts. If it’s pre or intra-workout, then you will want to use dynamic movements to accomplish this. Otherwise feel free to do the good ol’ fashioned static holds.
Step 5. Activate
If you take one thing away from this process, I want it to be this: Mobility will not stick, unless stability is created somewhere else. If you’re trying to loosen up your hip flexors, do some glute work after you stretch them. If you’re trying to improve ankle mobility, do some dorsiflexion exercises after you stretch the calf. If you’re trying to improve adductor length, do some core stabilization exercises right after loosening up the adductors. I think you get the picture.
Step 6. Use It
In order to keep your joints mobile, you must consistently use the full range of motion in them when you train. This means going to full depth in a squat, locking out that deadlift and overhead press and really grinding the lateral lunges. If you want to get fancy with it, you can even use exercises that are known for creating excessive range of motion like Bulgarian split squats, windmills and arm bars. Whatever you decide to do, don’t cheat yourself and use the full range.
Step 7. Dominate
If you consistently follow the previous steps, you should be in a good position to rip some weight off the floor. Some issues will take longer to fix then others, but be religious with your mobility work and it will pay off to help you feel and perform better.