Deadlifts

Powerlifting Training for Sports

You must clearly understand the difference between basic training and special physical preparation. [SPP] is different for everybody; one beats up on a tire with a sledgehammer, another does figure eights with a kettlebell, and someone incline presses. Basic training is roughly the same in all sports and aims to increase general strength and muscle mass. Powerlifting was born as a competition in exercises everybody does.

— Nikolay Vitkevich

Don't you want to know more?

I wrote a guest post over at Concentric Brain you can read it HERE.

Rate of Force Development: What It Is and Why You Should Care

No, sorry, this is not a post on how to become a Jedi by increasing your rate of using the Force. Shucks.

The Rate of Force Development (RFD) we're going to talk about is that of muscles and is *kinda* important (read: essential to athletic performance). Today's post will enlighten you as to what RFD is and why one should pay attention to it. Next post will be how to train to increase RFD. So grab something delightful to munch on (preferably something that enhances brain function, like berries.) Caveat: There is a lot of information and other stuff that I’m not putting into this post, sorry, this is just a basic overview of why RFD is important for everyone.

What is RFD?

It is a measurement of how quickly one can reach peak levels of force output. Or to put it another way, it’s the time it takes a muscle(s) to produce maximum amount of force.

For example, a successful shot put throw results when the shot putter can exert the most force, preferably maximal, upon the shot in order to launch it as far as humanly possible. She has a window of less than a second to produce that high force from when she initiates the push to when it's released from her hand. Therefore, it is imperative that the shot putter possess a high rate of force development.

Where does RFD come from?

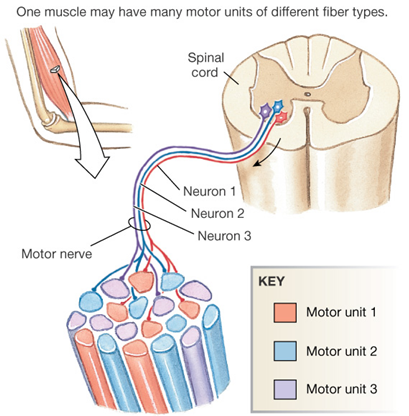
motor unit
motor unit

Well, let me introduce you to a little somethin’ called a motor unit. Motor units (MU) are a motor neuron (the nerve from your brain) and all the muscle fibers it enervates. It can be anywhere from a 1:10 (neuron:fiber) ratio for say eyeball muscles, which have to produce very fine, accurate movements. Or 1:100 ratio of say a quad muscle which produce large, global movements.

There are two main types of MUs: low threshold and high threshold. The low threshold units produce less force per stimulus than the high units. For example, a low unit would be found in the postural muscles as they are always “on” producing low levels of force to maintain posture.  A high unit would be in the glutes, to produce enough force to swing a heavy bell or a baseball bat (even though the bat is light, the batter has to move that thing supa fast in order to smack a home run).

Also note the different stimuli required for the different units: small posture adjustments vs. a powerful hip movement. A low stimulus activates low threshold units and a high stimulus activates the high units.

Now, MUs are not exclusively low or high; MUs throughout the body are more like a ladder, low MUS at the bottom, with each successive rung being a higher threshold MU than the one below. And, like a ladder, you can just all of the sudden find yourself at the top of the ladder without having to climb the lower rungs. Unless of course, you’re a cat:

High MUs rarely (if ever) activate without the lower MUs activating first. So, the rate of force development is dependent upon how quickly the lower rungs of the MU ladder can be turned on to reach the highest threshold units (which produce the most force per contraction)… Not only that, but all those units working together produce more force than just the higher ones by themselves, so it's a good thing that the lower ones must activate too. The muscular force produced is the sum of all the motor units.

Why Care About RFD?

Since those higher threshold units won’t be active until the lower ones are on, force production will remain low until the higher ones can get their rears in gear, therefore, going up the MU ladder faster will result in more force produced sooner in any sort of movement.

Let’s take the example of two lifters, A and B. Both are capable of producing enough force to deadlift 400lbs. However, lifter A has a higher RFD than lifter B. Lifter A can produce enough force to get the bar off the ground in about 2 seconds and lock out (complete the lift) in about 3-4 seconds. Lifter B takes 3 seconds to get the bar off the floor and another 5 to get it near his knees. For those who don't know, a deadlift should be roughly 4-5 seconds TOTAL (typically, most people's muscles give out around then if the lift hasn't been completed). B-Man is going to fail the lift before he gets that bar to lock out and will hate deadlifting forever. Bummer.

Or, utilizing a Harry Potter for my analogy for this post, it is analogous to the rate of spell development; how quickly and how powerfully a wizard's spell is performed. In a duel, the faster and more forceful wizard will win. For example, when Professor Snape totally pwns Gilderoy Lockhart:

Hence, if one wants to get stronger, increasing the rate of force development is essential! Moving heavy weights is good (and high RFD helps with that as we saw with Lifters A and B from above); moving heavy weights FAST is even better when it comes to stimulating protein synthesis aka: muscle building. Possessing a high RFD is vital in order to move those bad boys quickly.

Next post, we’ll delve into training methods that can help increase the RFD so you won’t be these guys and skip deadlifting because your rate of force development is less than stellar…

Why Train In-Season?: Strength and Power Gains

Hopefully by now, you've read about the signs and reversal of overtraining. Now let's look at why and how to train intelligently in-season. A well-designed in-season program should a) prevent overtraining and b) improve strength and power (for younger/inexperienced athletes) or maintain strength and power (older/more experienced lifters).

First off, why even bother training during the season?

1. Athletes will be stronger at the end of the season (arguably the most important part) than they were at the beginning (and stronger than their non-training competition).

2. Off-season training gains will be much easier to acquire. The first 4 weeks or so of off-season training won't be "playing catch-up" from all the strength lost during a long season bereft of iron.

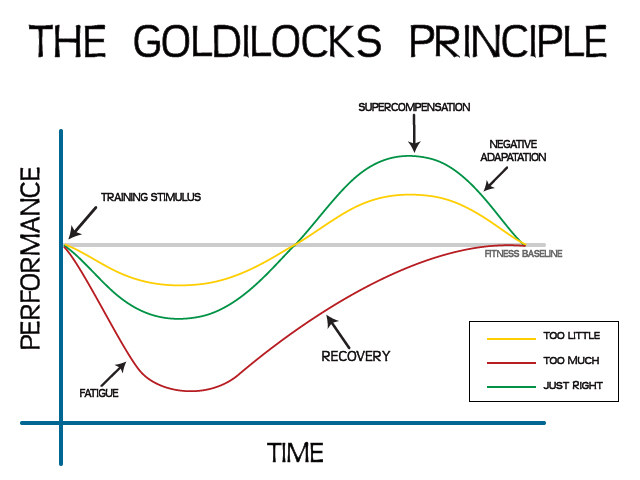
I know that most high school (at least in the uber-competitive Northern VA region) teams require in-season training for their athletes. Excellent! However, many coaches miss the mark with the goal of the in-season training program. (Remember that whole "over training" thing?) Coaches need to keep in mind the stress of practice, games, and conditioning sessions when designing their team's training in the weight room. 2x/week with 40-60 minute lifts should be about right for most sports. Coaches have to hit the "sweet spot" of just enough intensity to illicit strength gains, but not TOO much that it inhibits recovery and negatively affects performance.

Goldilocks-Principle-640x480

The weight training portion of the in-season program should not take away from the technical practices and sport specific. Here are a couple of things to keep in mind about the program, it should:

1. Lower volume, higher intensity-- this looks like working up to 1-2 top sets of the big lifts (squat or deadlift or Olympic lift), while maintaining 3-4 sets of accessory work.  The rep range for the big lifts should be between 3-5 reps, varied throughout the season. The total reps for accessory work will vary depending on the exercise, but staying within 18-25 total reps (for harder work) is a stellar range. Burn outs aren't necessary.

2. Focused on compound lifts and total body workouts-- Compound lifts offer more bang-for-your buck with limited time in the weight room. Total body workouts ensure that the big muscles are hit frequently enough to create an adaptive response, but spread out the stress enough to allow for recovery. Note: the volume for the compound lifts must be low seeing as they are the most neurally intensive. If an athlete can't recover neurally, that can lead to decreased performance at best, injuries at worst.

3. Minimize soreness/injury-- Negatives are cool, but they also cause a lot of soreness. If the players are expected to improve on the technical side of their sport (aka, in practice) being too sore to perform well defeats the purpose doesn't it? Another aspect is changing exercises or progressing too quickly throughout the program. The athletes should have time to learn and improve on exercises before changing them just for the sake of changing them. Usually new exercises leave behind the present of soreness too, so allowing for adaptation minimizes that.

4. Realizing the different demands and stresses based on position -- For example, quarterbacks and linemen have very different stresses/demands. Catchers and pitches, midfields and goalies, sprinters and throwers; each sport has specific metabolic and strength demands and within each sport, the various positions have their unique needs too. A coach must take into account both sides for each of their positional players.

5. Must be adaptable --- This is more for the experienced and older athletes who's strength "tank" is more full than the younger kids. The program must be adaptable for the days when the athlete(s) is just beat down and needs to recover. Taking down the weight or omitting an exercise or two is a good way to allow for recovery without missing a training session.

A lot to think about huh? As a coach, I encourage you to ask yourself if you're keeping these in mind as you take your players through their training. Athletes: I encourage you to examine what your coach is doing; does it seem safe, logical, and beneficial based on the criteria listed above? If not, talk to your coach about your concerns or (shameless plug here, sorry), come see us.

A Prerequisite to Lifting Heavy Weights

Ahhh how exciting, my first blog post as a coach at SAPT. I’ve got my cup of coffee, The Best Around playing on loop and I’ll be doing hip mobilities throughout writing this blog entry. Why? Because The Best Around was originally supposed to be for a Rocky III montage, but was replaced by Eye of the Tiger and I think Joe Esposito deserves more credit for the inspiration it brings…. Why am I doing the hip mobilities every 30 minutes while at a desk? Easy, because I want to squat later. Mobility: A Prerequisite to Lifting Heavy Weights

If you’re reading this blog, then it’s obvious you want to get strong, build muscle, and improve fitness in each and everyone of your workouts. You’re the type of person who sees exercises like deficit deadlifts, deep squats and overhead presses and gets as giddy as a little schoolgirl at the thought of trying it in your next workout. You look up the technique, take a few mental notes, begin with light weight for a warm-up, and then finally drop butt-to-heels into that heavy squat.

But what happened? You thought you would drive up out of the hole like superman initiating his flight takeoff, but instead you feel your lower back light up like Iron Man’s arc reactor.

You didn’t check your mobility prerequisites for that exercise did you?

Position is Power

Every exercise requires a certain degree of mobility in particular joints in order to execute the movement safely. If the mobility is not there, then the body will look for a way around it to accomplish that movement. By doing this you are putting yourself into a compromised position, and what’s worse is that if you’re doing it with training, you are reinforcing a compromised motor pattern. Practice doesn’t make perfect; practice makes permanent.

Not only are you actually weaker in these compromised positions, but you are more likely to injure yourself. This needs to be fixed before you can get strong. You can only squat so much weight with a Hyena Butt. You must work on gaining enough mobility to get into whatever position a given exercise/movement requires, WITHOUT compromise, and then you can become strong.

I’m sure you’re probably wishing I’d just shut up and tell you how to get mobile, right? Well too bad! Because first it is more important to understand WHAT needs to be mobile.

Understanding Mobility

Joint mobility is the degree to which a joint can move through a range of motion. When a joint becomes less mobile, it becomes more stable as it can’t move. (Note: Stability is not a bad thing! You just need it in the right places.)

Though it’s not black and white, many of our joints are meant to be mobile while others are stable. Sometimes, due to activities (or lack thereof) in our daily life, injuries or even the shoes we wear, joints that should be mobile become stable and throw off our body’s movements. When these joints that should be mobile are then locked down, joints that are stable then become mobile to compensate for the lost motion. This relationship is constant throughout the entire body and it’s the reason you will see lots of errors in movements that can’t be fixed with simple queues.

The Joint-by-Joint Approach outlines this mobility-stability relationship between the joints and how it could affect movement. Essentially it conveys that the following joints need more mobility or stability:

Arch of Foot – Stability

Ankle- Mobility

Knee- Stability

Hips- Mobility

Lumbar spine- Stability

Thoracic spine- Mobility

Scapula- Stability

Gleno-humeral(shoulder) joint- Mobility

Does anyone else see the pattern here? Our body alternates the needs of our joints from head to toe. So what do you think happens if one of these is thrown off? Then the pattern is broken and they all get thrown off to some extent. If someone is flat footed, they will probably have poor foot stability and it will cause their feet to collapse in movement. This results in a loss of ankle mobility over time, and their knees will almost always cave in when they squat. The reason for this is because their knees are now looking for mobility. The same can be true for losing stability. Lets say Yoga Sue starts stretching out her lower back more and more because she’s been having back pain. By creating more mobility in her lumbar spine through stretching, she is reinforcing her body to move through her lower back rather than hips and will eventually lose hip mobility. I’ll touch more on the stability component in my next post.

If the stability/mobility pattern is thrown off, then it will compromise your movements and thus jeopardize the intended benefits of lifting heavy things and your training sessions will look like poop.

Fix It!

So I’m sure you’ve spent the past few minutes form checking your squat depth in a mirror and are now begging for the answer of how to become a mobility master. Have patience grasshopper; first you must find your weakness.

Step 1. Find your limiting factor

This step will most likely need a coach or knowledgable training partner. You must determine what joint is immobile and causing the issue in your movement. You can use a movement screen for this or you can informally just breakdown the movement to see when the poop hits the fan.

Step 2. Determine WHY it’s your limiting factor

Joints can become immobile for several reasons. More often then not it is because your joint is stuck in one position for a long period of time due to your lifestyle. If you find this to be the culprit you’re going to need to make some changes before you can start seeing results. You may have to stop wearing those 5 inch heels or you may have to start getting up and walking from your desk every 20 minutes.

Sometimes a joint can become immobile due to overuse in a certain range of motion. You will see this a lot in runners or any other athlete that goes through repetitive motion. If this were the finding, you would just go straight to step 3.

Occasionally you may find that a joint is immobile because it is protecting something. This will take a more educated diagnosis, but if that is the case, then DO NOT MOBILIZE IT. If muscles aren’t firing right or there is a structural issue causing instability, the body’s natural response is to lock that joint down to keep it from being unstable and causing more damage.

Step 3. Soft Tissue Work

You now know what’s immobile and why. You’re about to start training, now it’s time to mobilize it. Foam rolling is one of the fastest ways to increase mobility of a certain joint. Simply roll on the muscles that influence that joint and try to workout the super-happy-fun knots you find. If you’re new to this use a foam roller, if you’re one bad dude, try a PVC pipe or lax balls. If it’s your thoracic spine, try using a t-spine peanut.

Step 4. Mobilities

You’re going to have to lengthen the tissues holding down the joint at some point. I find it most effective to do in the warm up, right after foam rolling and even throw a few into the workouts. If it’s pre or intra-workout, then you will want to use dynamic movements to accomplish this. Otherwise feel free to do the good ol’ fashioned static holds.

Step 5. Activate

If you take one thing away from this process, I want it to be this: Mobility will not stick, unless stability is created somewhere else. If you’re trying to loosen up your hip flexors, do some glute work after you stretch them. If you’re trying to improve ankle mobility, do some dorsiflexion exercises after you stretch the calf. If you’re trying to improve adductor length, do some core stabilization exercises right after loosening up the adductors. I think you get the picture.

Step 6. Use It

In order to keep your joints mobile, you must consistently use the full range of motion in them when you train. This means going to full depth in a squat, locking out that deadlift and overhead press and really grinding the lateral lunges. If you want to get fancy with it, you can even use exercises that are known for creating excessive range of motion like Bulgarian split squats, windmills and arm bars. Whatever you decide to do, don’t cheat yourself and use the full range.

Step 7. Dominate

If you consistently follow the previous steps, you should be in a good position to rip some weight off the floor. Some issues will take longer to fix then others, but be religious with your mobility work and it will pay off to help you feel and perform better.

Lifting & Running = Monster Benefits - An Intern Post!!!

This week we're going with one theme: RunFAST. This is the new program we've been developing that we'll officially take the lid off of on Friday. I have to acknowledge, we're offering something totally new, so we're gonna take it slow and start with a post a bit more traditional in terms of the usual SAPTstrength banter. But check the blog every day this week. We've got 5 killer posts lined up.

For the first RunFAST post, one of our interns has written a fantastic post describing in detail the benefits of lifting for ALL TYPES OF RUNNERS (yes, you distance folks can enjoy this, too!).

Why should you listen to this guy who I just admitted is an intern, well, he's a special intern. His name is Gustavo Osorio (or Goose from here on out) and he just graduated from George Mason. Goose was a member of the track team and a stellar decathlete who very recently repeated as CAA champion! Pretty cool, right? This guy knows his stuff. I learned a few things myself and, given that I was his strength coach, that means he really knows some awesome details about high-performance.

I opened up comments again, so please post your thoughts and share with friends. Here we go:

Lifting And Its Benefits For Runners!

“Strength is the foundation for excellence,” this is a mindset I’ve come to respect and adopt for myself after my short time here at SAPT. When you think about it a strong body is a health body, one capable of efficiently moving in any way and letting a person’s athleticism truly shine. Strength is without a doubt the foundation for speed and agility. This concept that may seem foreign to many runners because of all the myths regarding resistance training and running. Many runners and even some running coaches are under the impression that hitting up the weight room once in a while will only result in injury, getting “bulky”, and losing that speed they’ve worked so hard to achieve. When, in reality, a well-structured resistance training program can make the body bulletproof, make your muscles more efficient without bulk, and boost the training effects of your running workouts (aka make you faster).

Myth #1: Lifting (squatting and deadlifting) is bad for your back. Don’t do it!

When performed correctly and with the appropriate assistance work squats and deadlifts can help you build a bulletproof back, glutes, and hamstrings. All three of these muscle groups also happen to be three of the most common sites for sprains and injuries on runners. Coincidence?? I think not! When running you’re lower back acts as a shock absorber, while the glutes and hamstrings are used for force production to propel the body forward. If an individual doesn’t strengthen these muscle groups and continues to constantly hammer them with more running eventually the muscles breakdown from overuse and an injury occurs.

On the other hand, if an individual strengthens these muscle groups they reduce their chances of injury and increase the work load their body can handle. This means they’ll be able to put in more work on the track during practice and, when meet day arrives, fast times will be run!

Fun fact about elite runners, whether it be a sprinter or a distance runner, is that they have some type of year around resistance training program implemented into their training. When you get to the Olympic level and everyone is tenths of seconds away from each other, keeping your body healthy through resistance training makes the difference between being an Olympic medalist and not making the final.

Myth #2: Lifting will make you bulky and slow

A big fear amongst runners is that resistance training will put on too much “useless” muscle for them to carry around. Truth is, a resistance training routine will make you bulky and slow ONLY if you completely stop running and if you have no idea of how to make it sport specific. Just because you’re lifting weights doesn’t mean you’ll turn into the hulk overnight (or ever... let's be real here) but it can make your muscles more efficient at what they do. By training your energy systems through lifting you’re running can be exponentially enhanced. Think of your body as a car and that the energy systems providethree different types of fuel it runs on. These BIG 3 are: the phosphagen system, the anaerobic system, and the aerobic system.

The phosphagen system provide the equivalent of jet fuel for the body. It gives you tons of energy but it burns out super fast! How fast you ask?? Well it gives you enough for 6 to 10 seconds of all out exertion. It provides the energy for the beginning of every race and it is the most dominant energy system during short running event, 60 meters to 100 meters. It is also involved in any sport that requires any sudden bursts of speed and explosion such as basketball, baseball, football, and volleyball. This system is primarily trained through plyometrics and lifts that require high force production at high speeds.

The anaerobic system gives you a mix between jet fuel and regular gas, it still yields a high amount of energy and manages to last a bit longer, between 1 to 3 minutes depending on the intensity of the event. This system is the most dominant for the 400-800 meter distances.It is also involved in sports that require prolonged bouts of speed and some endurance such as boxing, wrestling, lacrosse, and soccer. This is a tricky energy system to train because it requires a mix of power training, muscular strength training, and some muscular endurance training.

The aerobic system gives the body the same effect gas would in a car, it doesn’t let you go blistering fast but it give you a constant stream of energy to keep you going for miles. This is the dominant system in athletes who compete in endurance events such as triathlons, marathons, long distance swimming, and cross country skiing. This energy system can be trained through circuit training and low weight/high rep/low rest lifting.

**WORD OF CAUTION: Train a certain energy system through lifting does not mean you’ll necessarily get faster. When you integrate a lifting program on to a running program correctly the two can complement each other quite nicely. However if all you do is lift aerobically and then expect to go run a marathon you most likely won’t finish.**

Myth #3: Lifting has no positive transfer to running.

Another great benefit of resistance training is the improvement in something called your Rate of Force Development (RFD). [Side note: Kelsey did an amazing job of going into great detail on RFD, if you haven’t read her posts I strongly recommend them! Part 1 and Part 2.] Basically what that means is how fast your muscles can produce a high amount of force. This is beneficial to runners and all athletes because producing higher amounts of force at a faster rate enable you to move faster. Through training this can help optimize your stride length (amount of distance covered per step) and increase your stride frequency (how fast your feet hit the ground) both of which will also make you faster.

This last bit is something most people often neglect, but it makes a world of difference in their running. Aside from improving energy systems and Rate of Force Development lifting can be used to improve running posture. When performed correctly the squat and the deadlift teach people to brace their core and to properly align their back so it’s in the neutral position. A lot of people can go through an entire running career (like myself) without ever realizing that this has a massive positive transfer to running.

The two pictures above demonstrate how the body should be aligned during the deadlift and squat. If you take a side picture of yourself you should be able to draw a straight line from your hips to the base of the head.

Let’s take a look at Tyson Gay coming out of blocks. You can make a straight line from his hips to his head, JUST like a squat or deadlift! Coincidence?? I think not!  By keeping his back in a neutral position and bracing his core he is getting the most propulsion out of the power he is putting on the ground. By keeping his core rigid (not tense) all the force being placed on the ground is not lost or being absorbed by an arched or hunched back. Same thing would happen if you lifted with a rounded back, the spine would absorb a lot of the force going up (deadlift) or down (squat) instead of letting your legs and glutes do the work.

Now take a look on the right at Carl Lewis, he is in the Maximum Velocity phase of the 100 meters which means he is trying to maintain his top speed for as long as possible. The line from the hips to the head is still there which means he is getting the most out of the force production. But that’s not all! Notice how his hip are neutral and not anteriorly rotated, his butt isn’t sticking out. This allows him to get a higher knee drive, cover more ground with his stride, and keeps him from kicking his leg too far back. A great way to teach this to people is the finishing position in the squat and the deadlift often referred to as the “lock out”. And like the squat/deadlift lock out phase if his hips were too posteriorly rotated, too far forward, he would put his back out of alignment and sacrifice kick back range of motion.

Rate of Force Development Part 2: Training to Increase RFD

Last post, I went over some of the terms and definitions of rate of force development (RFD). I also mentioned motor units (MU) and if, at this point, you have no clue what I'm talking about, go back and read it. It's right here. Why should you care about increasing your rate of force development? Because power sports (which is every sport to some degree) is dependent upon the ability to produce high levels of force at any given moment, like running away from a T-Rex.

Good motivation for increasing rate of force development.

There are two main ways research and experience backs up to train RFD: explosive strength training (Newton et al. Med. Sciences Sports Exer. 1999) and maximal load training, i.e. picking up heavy stuff. (McBride et al, J. Strength and Conditioning Research 2002). It should be noted that most of the research has been done with isolated muscles/movements (it's a lot easier to test the quadriceps muscle in a leg extension machine than the various muscle groups in a deadlift) and so it can be a little tricky to apply to real life. However, where science has holes, the experience of coaches fills the gap!

First: force = mass x acceleration Keep this in mind...

Explosive training (speed work) is taking a sub-max load (say, 50% of your one rep max) and moving it as fast as possible, with good form obviously, for 1-3 reps per set. That's key- as fast as possible. Those high threshold motor units, the ones that produce the most force, are recruited to move that weight fast by contracting quickly. Even though the load is light, the acceleration is high. By challenging your system to move loads quickly, we increase the force production by increasing the acceleration part of the equation. This is one way to increase RFD. Typically at SAPT, we program 1-3 reps for 6-8 sets with a strict :45-:60 rest period. Why the rest parameters? We want to keep the nervous system "primed" and if the rest period is too long, we lose a bit of that ability to send rapid signals to the muscles.

Maximal load training, aka picking up some freakin' heavy weight, will typically be above 90% of your one rep max, also we keep the rep range between 1 and 3 (mainly because form can turn to utter poo very quickly under heavy loads if the volume is too high). This untilizes the other part of the force equation, mass. If the acceleration is low, the mass has to be high in order to have high force production. Once again, neural drive is increased and those high threshold MU's get activated. The threat of being crushed beneath a heavy bar can do that.

Recruit! Recruit! Recruit!

Bottom line: As the RFD increases --> the recruitment threshold of the more powerful motor units decreases --> more force is produced sooner in the movement --> heavier weights can be moved/athlete becomes more explosive in sport movements.

Think back on poor lifter B from last post who had a really low RFD during his 400lb deadlift attempt. Being the determined young man that he is, he trained intelligently to increase if RFD through practicing speed deadlifts (to get the bar off the floor faster) and maximal training, (to challenge the high threshold units to fire). Pretty soon, instead of taking 3 seconds to even get the bar off the floor, it only takes 1 second of effort and instead fo straining for 5 seconds just to get the bar to his knees, he's able to accelerate through the pull and get it to lock out in just under 4 seconds. Success!

Conquered.

For sake of the blog post, we could assume he always had the capability of producing enough force to pull 400lbs, but could produce it fast enough before his body pooped out. Now, with his new and improved RFD, 400lbs flies up like it's nothin.'

Another thing to keep in mind is the torque-angle relationship during the movement. Right... what?

All that means is the torque on the joints will change depending on their angles throughout the movement, thus affecting the amount of force the muscles surrounding those joints have to produce. For example, typically* the initial pull off the floor in a deadlift will be harder than the last 1-2 inches before locking out due to the angle of the hip and knees (at the bottom, the glutes are in a stretched position which makes contracting a little tougher than at the top when they're closer to their resting length.) Same concept applies to the bench press, typically** the first 1-2 inches off the chest are more difficult than the last 1-2 inches at lockout. The implication of all this being  the muscles will have different force-production demands throughout the exercise.

Knowing this, we can train through the "easier" angles and still impose a decent stimulus to keep those higher threshold motor units firing the whole time. How?

With chains and bands! Yay!

Aside from looking totally awesome, chains provided added resistance during the "easier" portions of the exercise to encourage (read: compel) muscles to maintain a high force output throughout the movement. Watch Conrad, The Boss, deadlift with chains:

At the bottom, when the torque-angle relationship is less favorable, the weight is the lightest and as he pulls up, the weight increases as glutes must maintain a high  level of force output to complete the deadlift. No lazy glutes up in hea'! Bands produce a similar effect. Check out the smashingly informative reverse band bench post Steve wrote here.

There are other ways, but quite frankly this blog post is reaching saga-like proportions so I'm going to cut it here. And remember kids:

*unless your name is Kelsey Reed and you have a torso 6 inches long... but can't lock the pull out.

** unless your arms a crazy long.