50/50 Video Highlights: American University Wrestling and Georgetown Prep Lacrosse
Over the past couple months I've had a tremendous opportunity to partner up with mental coach Brian Levenson through providing day-long "camps" for athletic teams looking to take it to the next level with respect to their physical AND mental performance. These camps are appropriately titled "The 50/50 Challenge," as they encompass a grueling combination of physical and mental challenges to help teams improve cohesion and learn to handle and overcome adversity. Brian is extremely good at what he does - he has a tremendous track record with amateur and professional athlete alike - so these events are particularly rewarding for me, being a "physical preparation specialist," as I get to work right alongside an accomplished mental coach to help athletes improve not only the physical component of their sport, but the mental element as well.
In general, what we've been doing with the teams thus far is pairing up series of physical challenges with mental ones, and sitting down to "debrief" after each pairing in order for the athletes to see how what they just learned/accomplished can help them improve in their sport, both as a team and as individuals.
The primary themes we focus on are:
- Focus and Concentration
- Team Cohesion
- Preparation/Routine
- Energy Management
- Controlling Controllables
Just yesterday Brian decided to get his Quentin Tarantino on and compile some video highlights from two of the teams we've worked with: American University Wrestling and Georgetown Prep Lacrosse. It was super enjoyable to work with both these teams as each team was made of not only athletic, but also intelligent and extremely driven individuals. Enjoy!
American University Wrestling Team
Georgetown Prep Lacrosse Team
**Note: If you'd like to schedule a 50/50 Challenge for your team, please don't hesitate to contact either Brian (Brian@capeperformance.com) or me (Steve@studentathletept.com)**
For the Overextended Part II
A few months ago I wrote a post on warming up for those with a chronically overextended lumbar spine. Since then I’ve gotten a few requests for a sequel post, so... Without further adieu…
For the Overextended Part II: The Lift
In my first post I discussed “prepping” for the lift for those with exaggerated lordosis. I babbled about targeted stretching, mobilizing, and activation exercises used in conjunction with the idea that it would help “tuck” the hips under a bit more and reduce that ridiculous curve in the lower back that ails us.
For many that'll do the trick. After the warm-up they can feel their abs and glutes engage a bit more throughout their lifting session and they feel much more secure about their lower back health.
However, there are those that need more than a 15 minute warm-up to relieve them of their discomfort caused by the overextension. These might be the people with hip flexors that refuse to let go, erectors in constant spasm, and glutes that seem to have tragically passed away from years of desk work.
For these people with symptoms a bit more severe than the rest, some careful consideration should be taken into not only their warm-up but the structure of the lifting program itself. Here are a few exercises I like to use to fight against the overextension apocalypse.
Lower Body
Front Squats
For improved posture I tend to favor front squats over back squats mainly because it really helps to emphasize t-spine extension. Like I mentioned in my previous post, a hyperlordodic posture is often accompanied by significant kyphosis in the upper back. By focusing on keeping the upper back tight and the elbows up and in, front squats basically become a good way to practice good posture under resistance. (Practice makes permanent!)
Split Squats
Remember to do your split squats with all of the knee health rules in mind (keep the knee tracking straight ahead, try to keep a vertical shin), but add this one: squeeze the glute of your rear leg HARD the entire time. If you really flex that rear buttcheek you will feel a good stretch in that hip flexor as you descend to the bottom position.
Pull-Throughs and Glute Bridges
Keep hammering away at your posterior chain strength and emphasize the “tuck under” with your hips. Pull-throughs with a band or cable column is a great way to train the backside while avoiding any compression on your spine. Also throw in some glute bridges into your actual lift! They shouldn’t be reserved for just the warm-up.
Glute bridging variations are endless:
-Double Leg -Single Leg -Double Leg Concentric with Single Leg Eccentric -With a Barbell -With Chains -With a Barbell AND Chains -Back Elevated -Feet Elevated -Back AND Feet Elevated
Get to 'em!
KB Swings
Same idea as above: POSTERIOR CHAIN WORK. Perfect the hinge and develop incredible hip thrusting power. I recommend getting Kelsey or another well-qualified coach to supervise if you haven’t done them before. A correctly performed swing session can do wonders for your posture, but a bad swing sesh can wreak havoc on your lower back!
Upper Body
½ Kneeling Work
Do standing overhead presses and barbell rows make your lower back cranky? Fear not, and enter the ½ kneeling realm of pushing and pulling. Getting into the ½ kneeling position does a great job of positioning overextended spines back to neutral. Replace some of your pressing movements with single arm ½ kneeling landmine, kettlebell, or dumbbell presses. Then make sure to get your pulling in and grab a band or a cable column to do some ½ kneeling rows as well.
Push-Ups and Inverted Rows
Easy enough right? If you take away the movement from the upper extremities, these exercises become a plank or an isometric glute bridge, respectively. What I mean by that is you MUST make sure you keep your abs tight and your hips (NOT lower back) locked in extension as you do your push-ups and rows. When you feel like you’re starting to arch, call it a set or reset your hips.
Benching…?
Bench pressing can help improve my overextended posture?! No, I doubt it. However, I’m throwing it on here for a couple reasons 1) A lot of us are probably going to bench anyway. 2) It may be part of your team’s strength program for high school, college, or beyond.
Many trainees (including myself) prefer to bench with an arch. It helps to get into a position of better leverage and feels a bit smoother on the shoulders. When setting up to bench with a significant arch there is going to be some extension in the lower back, but you should try your best to emphasize the arch coming from the thoracic spine. If you cannot get into an arched back position on the bench without discomfort you still have options. You can simply bench with less of an arch, and by elevating your feet on weight plates you will be able to get a flatter back posture more comfortably. Another option you have is... don't bench. What?!
Floor Press
Take it to the floor! Bring your feet in and keep your back flat against the ground. That should quench your thirst for supine barbell pressing.
Anterior Core Work
Always throw in some work for your abs. Stronger abs will help pull that pelvis up in the front and decrease that anterior tilt. Anti-rotation presses, reverse crunches, roll-outs with a stability ball or an ab-wheel, and stir-the pots are all good options. One of my favorites is a plank. Boring you say? Load it up! Start stacking plates on your back and try to PR every time.
Fin That’s it for now. Can’t guarantee a part III, but you never know!
Lights Out
Lights Out As the lights went out in the 2nd half of the Super Bowl, many began asking how the players would maintain their focus. When uncontrollable distractions throw you off your game-plan what do you do? Do you start thinking about disadvantages? Do you start buying into the idea of momentum? Do you start thinking about the outcome rather than the process? Do you lose control of your energy?
The key is to make sure that you continue the same controlled routines that you use in any other breaks--pre-game, timeouts, halftime, etc. Routines help us direct our attention to a purposeful approach rather than useless distractions. Whether it's a 1 minute timeout or a 35 minute delay, go back to your routine so you are prepared for when the lights come back on.
How to Warm-Up in a Hurry: Lower Body Edition
Ever find yourself in a time crunch where have to "get in, get out" of the gym quickly and efficiently?
Yeah, me too. Probably more than I'd like.
Those of us enlightened folk know that a proper warm-up - consisting of self-myofascial release, dynamic flexibility and mobility work, along with a few acute corrective drills, to name a few - goes a long way toward ensuring a higher-performing body and stronger lifts.
But if you're crunched for time, how do you prepare?
Do you spend thirty minutes on foam rolling, glute bridging and spiderman-ing (yeah, I made that last one up), only to leave a mere five minutes for strength training?
Or, do you just hop under the bar and start squatting it like there's no tomorrow?
Do you skip the weight room altogether?
None of the above is ideal, so I thought I'd lay out what I personally do before a lower-body-focused session when pressed for time. In fact, after performing the warm-up I'm about to share, I've had some of the best training sessions of my life.
Enter the most economical warm-up you've ever seen:
1. Pushup to Yoga Stretch Complex
Note: I usually go 10 pushups --> 5 Downward Dog --> 2 Spiderman to Glute Mob/side
2. Walking Knee Hug to Warrior Lunge Stretch (x5/side)
3. Side Plank Series (x :10 each)
(Note: For those who aren't ready for a single-leg+feet-elevated side plank, just do a normal side plank)
4. Goblet Squat (x8)
5. Kettlebell Swing (2x10-20)
6. Pick Up Something Heavy
----
For those of you who care about the "what" and "why" of the warm-up, here are just a few of the benefits you receive from each exercise.
As you'll see below, it's possible to hit a TON of good things in a matter of minutes when we pick some choice warm-up drills.
Pushup to Yoga Stretch Complex
- Core stability, scapular stabilization, and blood flow to the upper body (during the pushups) - Scapular upward rotation, some ankle dorsiflexion, and a slight stretch for the hamstrings (during the "downward dog") - Adductor length and hip flexion ROM for the front leg, hip flexor length for rear leg, T-spine extension+rotation, and some pec length (during the spiderman w/overhead reach) - A nice stretch into hip flexion+external rotation (during the glute mob at the end)
Walking Knee Hug to Warrior Lunge Stretch
- Hip flexion with neutral spine (during the knee hug) - Hip flexor length, core stability, and shoulder flexion ROM (during the warrior lunge) - Separation of the left and right hip - Ankle proprioception and hip+glute stability of the ground leg (during the knee hug)
Side Plank Series
- This will wake up the core musculature, not to mention frying the abductors and adductors when you transition from double-leg to single-leg support
Goblet Squat
- If you aren't aware of the myriad benefits this bad boy provides, I encourage you to step out from under the rock you've been living under.
KB Swing
- Glute, glute, and glute. - Gets the heart rate going - Some excellent "waking up" of the posterior chain. I always feel incredibly charged up and ready to go after doing some swings. - Not to mention receiving a bit of hamstring length and priming the hip hinge pattern in general.
There you have it, all in about five minutes time required. There are of course many other drills one could employ to get the juices flowing and correct postural flaws, but those are my current favorites.
Pullin' It Up
So, today I'll be spending the better part of the morning in the dentist chair... so fun right? Anyway, in an effort to NOT disappoint the faithful SAPT readers, I posted an old blog post of mine from Strong Girls Win. I wrote this last year around this time. Apparently there was an article in the Washington Post recently about how women can't do pull ups... to that I say, "Poop on you." Clearly, they've never been to SAPT or come to a Buttkamp class. ---------------------------------------------
**Before delving into the wonderful pull up let's make sure we're clear: chin up is when your palms face you and a pull up is when your palms are away.**
Pull ups! The nemesis of so many women but, hopefully, this post will help you get a hang of them and perhaps, even like them. I've grown to adore pull ups, mainly because I stopped thinking negatively about them ("I'll never be able to do them!" ... Stop it. Stop that thinking right now.) and approach them as a challenge I can, and will, conquer.
Don't let pull ups intimidate you.
Here is a quick overview of the muscles involved:
Latissimus Dorsi- aka, the Lats, yes I capitalize them because they are awesome enough to earn a capital "L." These are your money makers when it comes to pull ups. The Lats' are powerful shoulder adductors and extensors which is the exact movement the humerus (upper arm) goes through in a pull up. Adducting and extending the humerus = pulling your elbows to your rib cage.
Biceps Brachii- aka, your "guns," flex the elbow (like when you do curls).
Rear Deltoids- their role is more stabilization so I'm going to leave it at that.
Unfortunately, and I include myself in this category, we tend to focus on the biceps doing all the work as we try to "curl" ourselves up to the bar. Instead, we should be focusing on firing the lats, shoving our shoulder blades into our back pockets and pulling our elbows to our rib cage. The lats are by FAR a more powerful muscle and can generate enough force to pull our chins over (yes, over) the bar. If we rely on the biceps we look like Demi Moore in GI Jane (before she figured out how to fire her lats):
look familiar, minus the shaved head?
So how do we go about unleashing the Pull Upping Power buried deep inside? Here's a couple methods I've tried and found them to be quite effective:
1. Banded pull ups- we do them here at SAPT.Find a band tension that will allow you to do 2-3 sets of 6 reps. Gradually decrease the tension as you get stronger.
2. Negatives- jump up and slowly lower yourself down in 5-6 seconds. 2-3 sets of 4-6 reps should be plenty.
3. Iso-holds - using a band or jumping up hold the top of the pull up (chin OVER the bar) hold for 4-6 seconds for 2-3 sets of 3 reps.
Choose one of these methods and stick with it for 4 weeks then try another for 4 weeks. I recommend working on pull ups at least twice a week but no more than four times. Though if you're doing pull ups more than twice/week, choose 2 methods and alternate between the two. I've found that females tend to respond well to higher frequency and volume when training the upper body.
Few quick pointers before wrapping it up:
In the above methods, really focus on pulling your elbow to your rib cage. Try to pull yourself through the bar.
Pavel Tsatsouline talks about "greasing the groove." Essentially, practice doesn't make perfect, it makes permanent. Therefore, practice perfectly. The more you train the movement, the more efficient your body becomes at producing that movement.
Don't grind your reps. Steve wrote an excellent post on this. Grinding only fries your nervous system and teaches you bad habits. Learn from my mistake!
DON'T GIVE UP!!! Strength gains take a while so be patient with yourself.
Go forth and CONQUER!!
15 Variations of the Side Plank
The side plank is one of those exercises I find myself frequently tossing out of my quiver of training options, only to find myself continually coming back to it saying, "Why did I stop doing these again?" Or, "Tell me why I stopped giving these to my athletes?" It's a fantastic exercise that I feel should be imperative in every single beginner program - to teach them core stability, resisting lateral flexion, etc. - but can also be extremely useful as a warm-up or "filler" exercise for more advanced trainees.
Bottom Line: You are never either too novice or too advanced for the side plank, it's just a matter of finding the right fit for you personally.
Here are 15 variations of the good ol' fashioned side plank, be you a beginner or an advanced trainee.
Oh, and don't be a fool like I was during these photos with the extremely grody head positioning. Apparently I didn't want to look Tadashi in the eye as he snapped these; either that, or I felt like looking off into the horizon. The chin should be neutral, or "packed." Geeze, why did that guy in the red demo these, anyway?
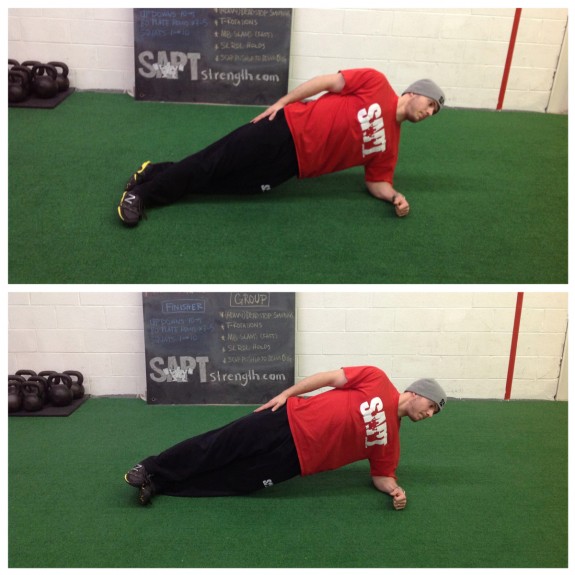
Level 1: Short Lever and Torso-Elevated
I personally find the knees bent, or "short lever," variation MUCH better suited for those who are new to training and/or are dealing with low back pain. For whatever it's worth, I've found that, in some cases, elevating the torso even seems to make it harder then doing it on the flat ground.
If I'm working with someone on their first day, and I'm doubtful that they can do a normal side plank without collapsing in the first 5 seconds, I'll usually go with the short-lever first to set them up for success, and then progress accordingly if they feel good.
Level 2: Staggered-Feet and Standard
(Note: Staggering the feet is typically easier than stacking them)
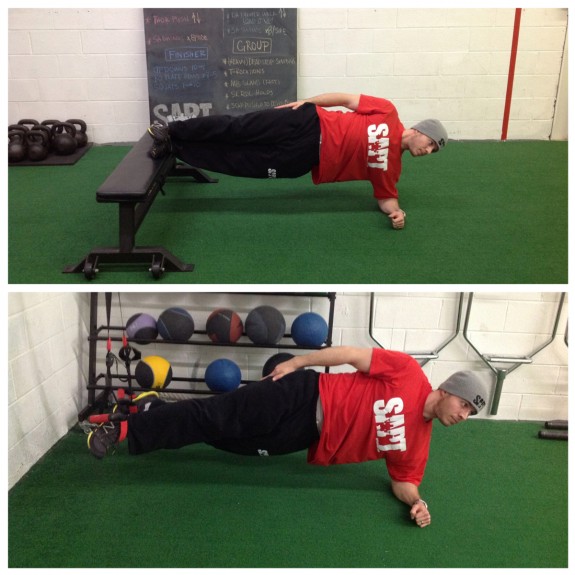
Level 3a: Feet-Elevated Side Plank, Stable Surface or Suspension Straps
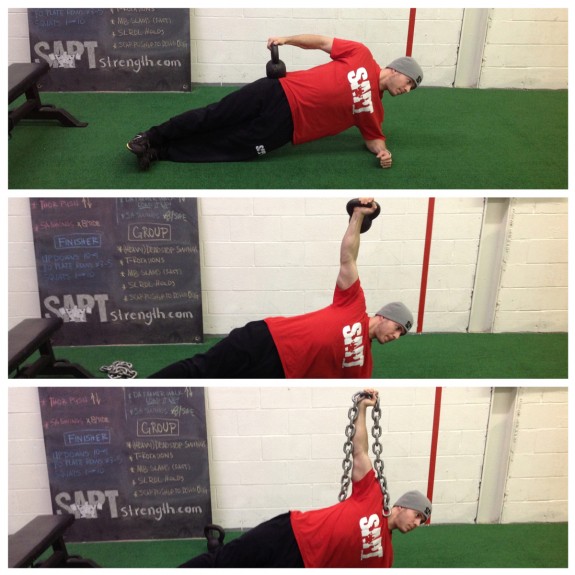
Level 3b: Weighted Side Plank w/Weight On Hips, or Weight Held Overhead)
You can certainly use a dumbbell (or even a weight plate) instead of a kettlebell on the hips, but I find the kettlebell feels much more natural when holding it overhead. The overhead chain hold adds a nice stability challenge, since it will want to sway on you.
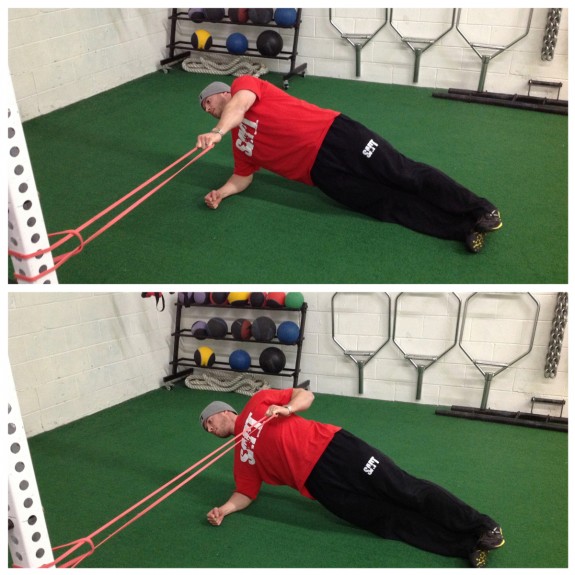
Level 4: Side Plank + Band (or Cable) Row
This is one of those "fun" ones as it's less boring than remaining static, but it also provides all the benefits of horizontal pulling.
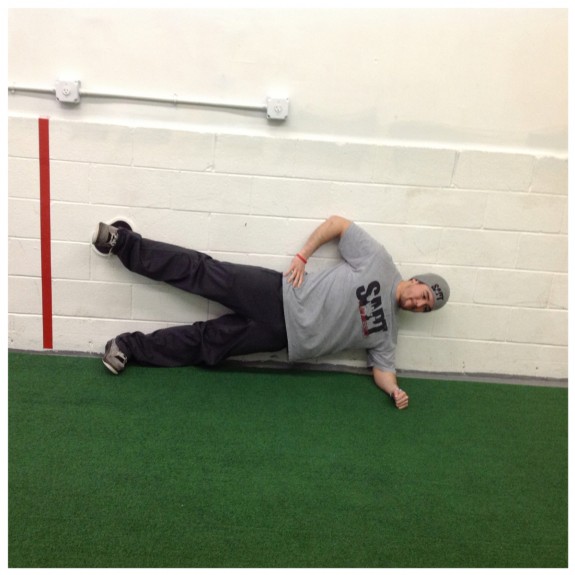
Level 5: Side Plank w/Wall Slide
This variation is downright miserable, which is why I had Tadashi demo it for me. To keep yourself honest, place a furniture slider under your heel. Start with the feet stacked, then slide your heel up the wall, trying your best not to make a pain face as your glutes light on fire.
Level 6: Weighted + Feet-Elevated
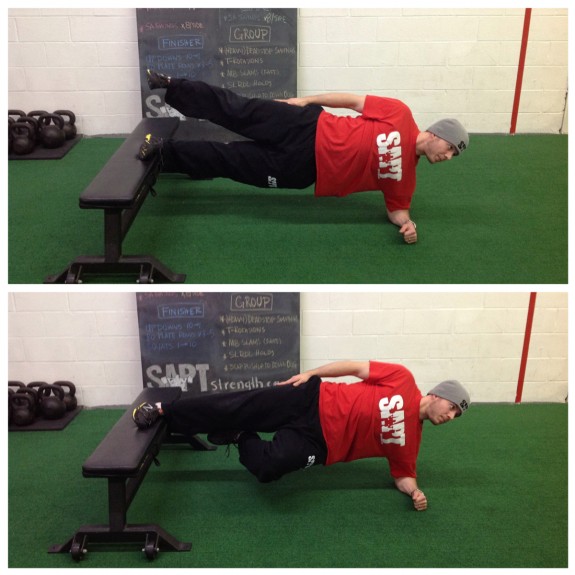
Level 7: Single-leg + Feet-Elevated with Top Leg Support, Single-Leg +Feet-Elevated with Bottom Leg Support
These are pretty advanced, and definitely shouldn't be just handed out to anyone and everyone. When the bottom leg is supporting it will fry the abductors of that leg (assuming you are actually keeping your hips up), and when the top leg is supporting, your adductors will be screaming for mercy.
I generally like prescribe two to three sets of :10-:40 (depending) per side. If you can't hold a variation for at least :10 then it's probably too advanced, and I personally feel that anything longer than :40 per side is overkill for most. With the band row and wall slide, I recommend sets of 8-12/side reps for the row, and 5-8/side for the wall slide.


