Part 8: The Competition Period – In-Season Strength Training
The Triathlete Strength Training PrimerPart 8: The Competition Period – In-Season Strength Training
We’re back! I hope everyone had a fantastic Thanksgiving week, and enjoyed reading the fantastic blog posts written by our interns. If you haven’t read them yet, you can read them here, and here, and here. This week we’ll be discussing the competition season for triathletes, and going over the importance of maintaining a consistent strength training schedule. Most triathletes drop the weights as soon as spring rolls around, and suffer unwelcome drops in their total body strength and stability as a result. Don’t be one of these people! Keeping up with a consistent strength training plan is vital for maintaining these performance attributes, as well as fighting off injuries that can creep up from tens of thousands of foot strikes and hours hunched over your aerobars. Let’s get to it!
In-Season Training Goals
Maintenance
It’s very important to understand what our goals are when it comes to strength training during the triathlon season. We’re not looking to build muscle. We’re not looking to make huge gains in strength. We’re not looking to develop massive amounts of anaerobic power. These were the goals of the off-season. We then used the pre-season to focus more on muscular endurance and anaerobic capacity, effectively teaching our body to demonstrate strength over longer periods of time and exhibit high amounts of power consistently and continuously. Now that the in-season has rolled around, we want to maintain the fruits of our labor so that we can perform to the best of our abilities during competition.
Injury Prevention
There’s a concept called the Speed-Strength Continuum, and, in this video, Eric Cressey does a fantastic job of explaining how it applies to training. Triathlon sport training (running, biking, and swimming) would fall on the far left under the “Speed” category. You’re not working against a significant external load during these movements, and the involved muscles are moving at relatively high velocities (even if you may feel like you’re being passed by every runner under the sun).
During the season, when our mileage is at its highest and you’re putting the most time into your sport training, you’ll inherently be working on the far left (high-speed) for the majority of your training. It’s important to balance out this “speed-work” with some strength work in the weight room. Spending the majority of your time training “speed” is going to cause a loss of stability at your ankle, knee, hip, and shoulder joints. Dedicating some quality time strength training is going to go a long way towards maintaining that stability that you’ve gained in the off-season, preventing injuries that result from unstable joints, and protecting your body from the rigors of the season. As an added bonus, being vigilant with your in-season training is going to put you ahead of the game once you enter the next off-season. You’ll need to dedicate much less time to fixing your problem spots, and have the luxury of jumping into a strength phase that much quicker.
Next time…
Now that we know the goals of our in-season training plan, we’ll take next week to go a little more in-depth and lay out an example of what an in-season strength training template should look like. Now get your butt off the couch and go lift some heavy weights! '
The Triathlete Strength Training Primer
Part 1: An Intro to Periodization - Seeing the Bigger Picture Part 2: The Repetition Maximum Continuum Part 3: The Preparatory Period a.ka. the Off-Season Part 4: Off-Season Periodization Part 5: Off-Season Periodization, cont. Part 6: The First Transition Period Part 7: The First Transition Period, cont. Part 8: The Competition Period - In-Season Strength Training Part 9: In-Season Template Part 10: Post- Season Training
Bench Press Prep for Combines
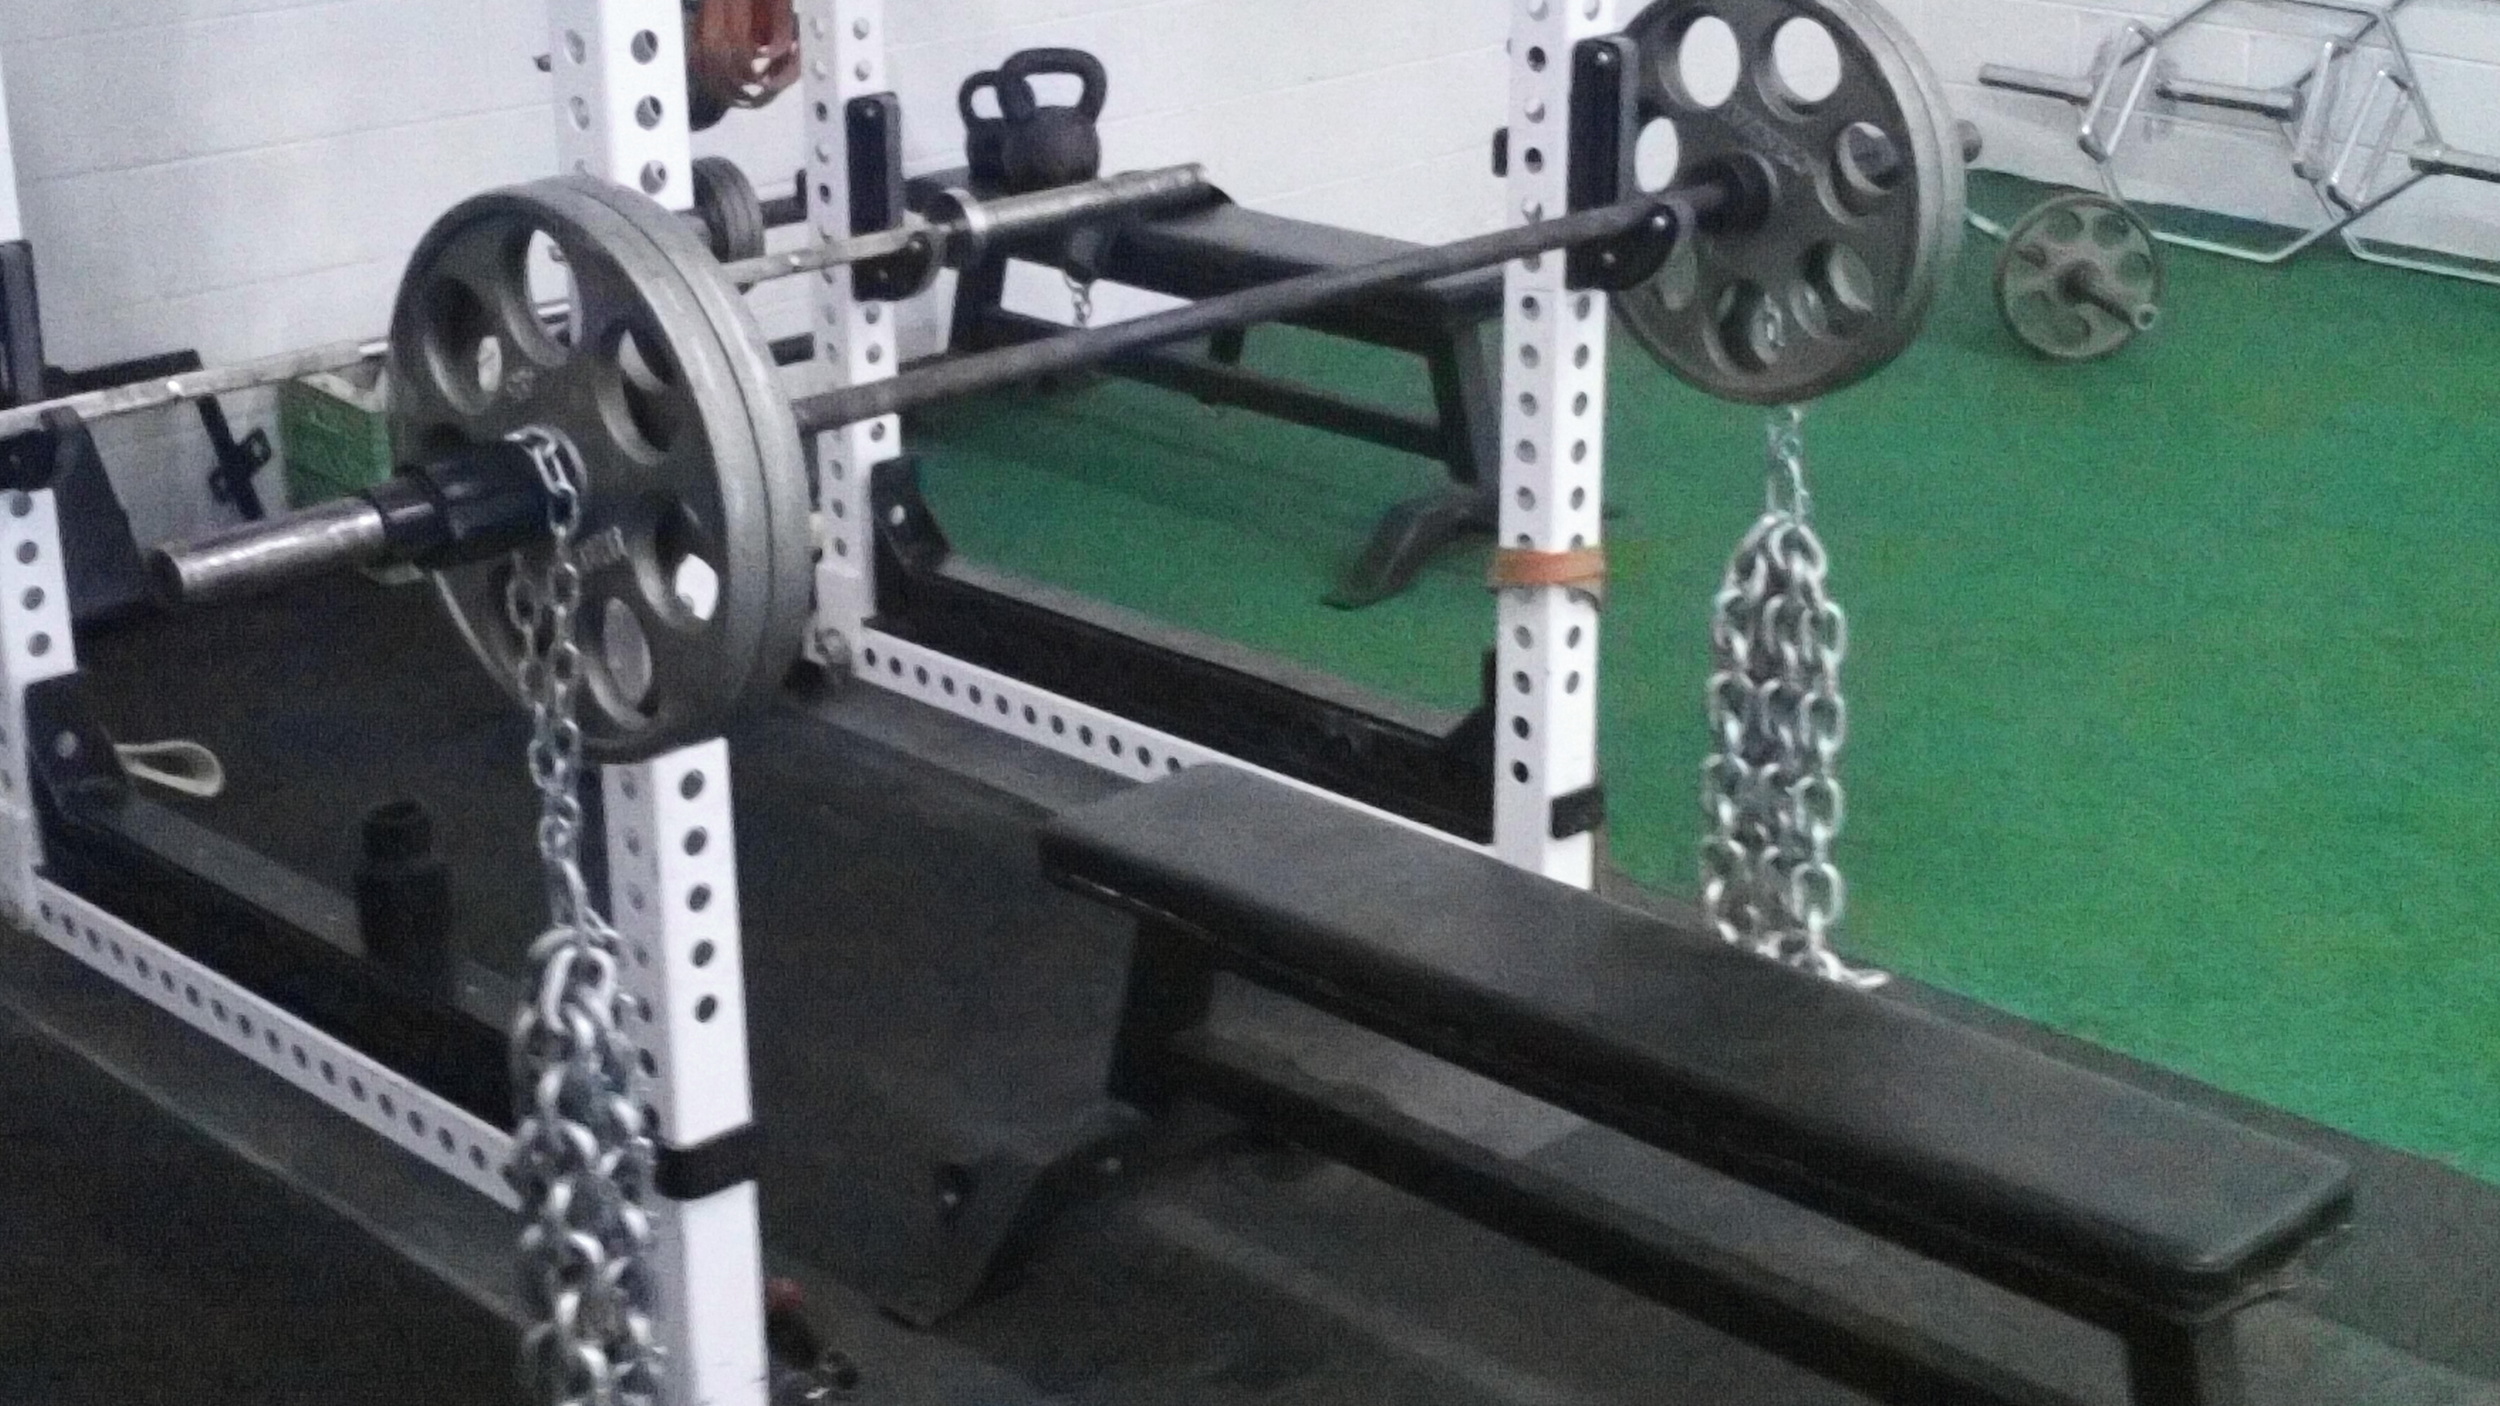
This week we are going to take a look at the bench press. The bench press is solid test of upper body strength and muscular endurance, depending upon the load. Bench pressing for reps is a common test in the football combine setting. Will the bench press make you a better footballer? I don’t see an obvious direct correlation to many of the sports’ activities but being weak sure won’t help your chances of getting on the team or field. Typically maximum strength is measured via a one repetition (1RM) max but in the combine setting a specific weight is applied to a barbell and pressed for as many full repetitions as possible. This saves time from having to find every athletes true 1RM. The athletes and coaches can then use the projected 1RM to calculate max strength. To sum things up according to the combine standards, whoever can complete the most reps is the “strongest”. Here are a few tips to squeak out more repetitions with heavier loads when combine time comes around.
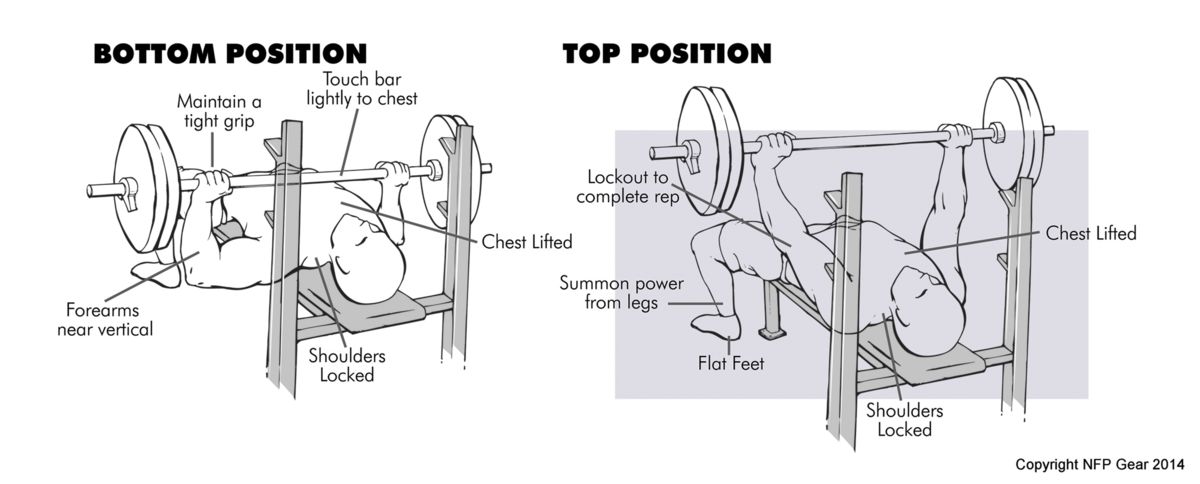
Set Up and Technique
- Keep your feet flat on the floor with your hips, shoulders, and head on the bench
- Tuck your shoulder blades back into the bench and prevent your elbows from flaring out which can lead to shoulder injuries. Keeping your back tight throughout the lift and “pulling” the bar down to you will help in preventing this.
- Place your hands comfortably apart on the bar so that your forearms align in a vertical position
- Inhale as you lower the bar to your chest at a controlled tempo
- Exhale as you forcefully extend the arms back to the starting position
- Click here to check out solid bench press form from the front and side.
Regardless of the test weight, it is important to refrain from constantly training with that weight. Your performance in this assessment will not improve without increasing your overall strength in the bench press. Because of this it is important to spend time training strength with high weights for a lower number of repetitions. Due to the high-rep nature of this test (hopefully), another layer of complexity to training is athletes must also have high rep training days to become comfortable performing under fatigue and the onset of lactic acid.

Although this is an upper body pushing assessment, it is imperative to incorporate rows and pull ups into your training to help with muscle balance, posture, and injury prevention. A great tool to add some spice to these training days would be to use Fat Gripz or another grip strength tool so that when you return to a normal size bar you can crush it.
There are literally a ton of different bench press variations so try them all. The modifications with boards, bands, incline/decline angles, and grips widths open the door to many options. The bench press with some sort of incline is great for athletic performance as many pushing movements in competition will not be straight ahead but as long as the flat bench press is the standard for football and other sports testing it’s important we train for it as intelligently and efficiently as possible. In this throwback blog post (circa 2011) Sarah lists’ 40 bench press variations and 40 push up variations to add some strength to your life.
Hamstrings and Harry Potter Part 2: Injury Care and Prevention
Last week's post was about the potential reasons for “tight” hamstrings. Armed with that information, let us dive into the second part: hamstring injury care/prevention. I should make a note that I am NOT a doctor, therefore do not use this post to diagnose anything. If you suspect an injury please consult a doctor! Also, this advice should not supersede any licensed therapist’s recommendations. This is just lay-man’s stuff.
Ok, so let’s talk prevention. Hamstring pulls often occur because of a) a previous pull (number 1 reason!) or b) hamstrings are required to do something they can’t handle on their own (like sprinting full tilt with form resembling poop). The latter is like Neville Longbottom in Potions class: imposing demand that produces in disastrous consequences.
So how do we prevent hamstring pulls in the first place? In no particular order:
1. Soft tissue work- stay on top of it, literally, jump on that foam roller and lacrosse ball! Work out the nasty, gunky tissue that tends to form in the adductors (especially near the insertion points on the pelvis and knee joint), hamstrings, calves (specifically the gastronemius since it crosses over the knee joint), and of course, the glutes. If the glutes are gunked up, they’re not going to fire properly or contract with full force thus leaving an increased burden on the hamstrings to extend the hip. For example, if the glutes aren’t firing properly during a sprint, guess who has to extend the hip? Yup, the hamstrings. And as I’ve mentioned before, the hammies are strong hip extensors but they’re woefully under qualified to handle the brunt of it without the neighbors to the north. Gunky muscles = dysfunction = potential injury.
2. Strengthen your glutes- as mentioned above, the hamstrings need help extending the hip. The glutes are MUCH better at doing so and are at a more advantageous position, mechanically, to do so anyway. Check out this diagram:
See how LONG the hamstrings are compared to the glutes? Also note the fibers: hamstrings have long, parallel-to-the-femur (thigh bone) fibers whilst the glutes’ fibers are short and diagonal to the femur. The glutes can produce more force because they’re shorter and can do so with less stress to the fibers. Every hear about anyone tearing their glute? Didn’t think so. Anyway, all that to say, GET YOUR BUTT STRONGER, and you’ll be half way there to hamstring ouchie prevention. (I could also go into activation, teaching your glutes to fire sooner during the movement, but this post will get too long if I do so).
3. Don’t be stupid- don’t jump into do intense exercise without warming up or without working up to it. If you haven’t sprinted in a while, probably not a good idea to go out and do 100 m sprints all out. Use your brain.
There you have it, simple yet rather effective preventive measures.
But what happens if you’ve already pulled it? Couple of methods that we use with our athletes:
1. Don’t be stupid- This is a common one isn’t it? Don’t do anything that irritates the injured hamstring. It’s already pissed off at you, no point in angering it further and prolonging the recovery period. Seriously, if it hurts, don’t do it. We tend to take a very conservative approach with out athletes and we’ll replace any exercise that might hurt it.
2. Soft tissue work- Oh look, this one is back too! It’s almost as if we turned the Time-Turner and are reading the prevention methods.
Be careful with this though. Sometimes the injured tissue should NOT be touched, but this doesn’t mean you can’t work on the surrounding areas. Depending on the severity of the injury, a good ART or massage therapy session might be in order. Gently working on the tissue can aid in the healing process. Perhaps some gentle stretching is in order, but be careful with that too.
3. Rest- Lay off of it. It’s not going to heal if you keep aggravating it. This is often the hardest part of recovery for athletes; they want to jump back in too soon. One day pain-free does NOT mean the hamstring is healed. Sorry. Give it a couple weeks and ease back into your regular activity with pain as you guide.
There you have it. Hamstring injuries are usually not terribly complicated, thus prevention and care should not be either. Honestly, if you follow the given rules, particularly Number 3 on the first list, your hamstrings should be safe!
Intern Blogs Part 3
Today's blog comes from SAPT intern Nick Allevato. Nick is in ROTC at Mason and brings us a great post about the state of the physical training requirements of the Army.
The Immobile Army:
Why the Army Fails at Fitness. Why it needs to change.
As I read through past blogs and noticed Mike’s Navy post, I feel compelled to rep the Army (Go Army, Beat Navy). However, I am going to focus on a major issue I perceive in our Army; it’s the Army’s physical fitness testing and it’s failing our troops. In fact, when Army fitness specialist Dr. Edward Thomas tested Soldiers on the World War Two era Army Physical Fitness Test (APFT) in 2000, the results showed that even the current APFT “studs” could not keep up with Greatest Generation fitness. So, why has such a decline occurred in Army fitness? Why are our Soldiers looking like this guy?
Well, it’s all about the “standard” and they’re actually meeting it.
How could that guy be meeting the Army’s standard?! An institution who is supposed to be ready for combat 24/7! Well, the current APFT involves timed push-up, sit-up, and a two-mile run tests. Soldiers are to do as many repetitions as possible and run the two-miles as quickly as they can. It replaced the old APFT in 1992 and has not been modified since. The events are scored on a point scale, with “60” in each event as "passing" and “100” being "maxing". So, a minimum of 180 points are needed to pass the test and a solider can achieve up to 300 points. The point system is scaled to age and gender and is based off repetitions and the run time. To provide you some perspective of the required “standard,” take a look at the required passing scores for 17-21 year-old males and females:
Gender
Push-ups
Sit-ups
2-Mile Run
Male
42
53
15:54
Female
19
53
18:48
Just to briefly interpret the table, which is based on 17-21 year olds (prime fitness age); males only need to do 1 push-up every 3 seconds for 2 minutes; females only need to complete 19 push-ups in TWO MINUTES; females can average nearly a 9:30 minute per mile pace for the 2-mile and males only need to average around a 8:00 minute per mile. While it may seem somewhat sad, these are the standards for the world’s greatest fighting force! Regardless of job description, for example an infantryman or a doctor, all Soldiers train for the same test; this test is the Army's interpretation of proper fitness.
But is this an effective and relevant standard? Is it accurate to evaluate a doctor stationed in a hospital on the same test as a paratrooper? Perhaps not, seeing as that would be like taking Spongebob and Squidward both taking a clarinet test when Spongebob’s job is to be a fry cook. Not to mention that the event techniques aren’t even taught properly! Just take a look at the push-up image to the left, which is the exact standard from the Army PRT Manual; the elbows flair out, the lumbar spine is in hyperextension, and the hands are not underneath the shoulders. This poor education of proper technique only makes an irrelevant fitness standard even worse. See for yourself here as Army Drill Sergeants grade a Best Warrior Competition APFT:
Soldiers are simple individuals. Not as to be interpreted as "stupid," but simple in how they perform, train, and execute. Give a Soldier is a task with a standard to meet and they will do everything they can to meet and exceed that standard (standard=success). This is especially true in today’s Army where downsizing occurs regularly. Adherence to the standard, and only the standard, is how Soldiers ensure they still have a job. Since the current APFT involves timed push-up, sit-up, and the two-mile run test, Soldiers are going to work solely on improving those scores.
Interestingly, the current Army Physical Readiness Training (PRT) program, which is the physical training doctrine, calls for Soldiers to perform certain crawling movements, hip stability work, and proper techniques. But as mentioned earlier, Spongebob going to practice his fry cook skill if he is clarinet performance? Of course not, because he would fail, then lose his job and his pineapple house. In the same way, Soldiers are going to do push-ups, sit-ups, and running every training session because that’s their test; to them, doing anything else doesn’t make sense.
The result of this terrible standard of fitness is an immobile, unfit Army that doesn’t even realize how bad it is. In fact, even the Army Master Fitness Trainers seem to lack understanding of how the body should move.
They are supposed to be the “coaches” of their units, yet they do not even understand a basic hinge pattern.
A change in the Army’s fitness standard is long overdue and the Soldiers are suffering as a result. We are developing weaker, injury-prone Soldiers. Who knows how many cases of low-back pain are due to the monotonous torque of the spine in the sit-up test? Or how many ACL tears could be with proper agility training? Or how much money the Army could save in rehabilitation costs by simply developing proper movement patterns in Soldiers?
The Army needs to change to a job-relevant, comprehensive APFT that reflects Army PRT and evaluates the basic principles of fitness (muscular strength, endurance, flexibility, etc.). Recommendations could include an obstacle course, a timed ruck march or step-up test, an agility T-test, a sled push, pull-ups, and shuttle sprints. These performance tests would be much more reflective of a properly moving, combat-ready Soldier. At this point, the semantics of scientifically choosing one exercise over another is not as crucial as a simple step in the right direction. In the words of General George S. Patton, “A good solution applied with vigor now is better than a perfect solution applied ten minutes later.” An overhaul of the Army’s PT is needed, and it is needed now.
Useful References:
-“Army Physical Fitness Test is not effective for measuring a soldier’s ability to function effectively in today’s battle space”
http://cgsc.cdmhost.com/cdm/ref/collection/p15040coll2/id/3024
-“World War Two Army Physical Fitness Test”
http://www.ihpra.org/1946%20(World%20War%20II)%20Army%20Physical%20Fitness%20Test.htm
-“The Old Army, It Turns Out, Was the Fitter One”
http://partners.nytimes.com/library/national/science/health/062500hth-men-fitness.html
Intern Blog Posts Round 2:
Today's post comes from SAPT intern Dalton Barker.
Resistance training in children (for purposes of this article, let’s say 8-14 years old) has always been a tough subject to approach. I use the term “resistance training” to define a wide range of both body weight and external weight-bearing exercises. There are still remnants of old myths whispering to parents and trainers that warn them of the “dangers” when working with children in the gym setting.
One such myth is that resistance training in children will stunt their growth: the thought behind this was that their bones would compress and growth plates would not be able to align correctly. This has proved fairly effective in convincing the community that children should not train at all. Understandably, inexperienced children should not train as an elite or high-level athlete should. However, early resistance training and proper instruction of those movements can lead to a treasure trove of benefits. These benefits can include: better movement patterns, increased strength, flexibility, stronger bone growth, and increased athleticism in children. This primes them to excel in sports and everyday activities.
The early developmental years, when the brain is young and neural pathways are growing, are the most opportune time to properly ingrain movements such as the hip-hinge, the squat, and push-up that will soon become conditioned into the child's movement map. These basic movements help strengthen muscles and prime the child’s body for more complex and sport-specific exercises later on in their life. These exercises, when taught correctly will help the body program the right muscles to “fire” in the correct sequence, which in turn, helps improve overall force production of the body. Additionally, the child develops a better sense of body awareness. That alone will help them in all stages of their journey to adulthood as the children begin to enter sports or other activities. With this fundamental training, a child’s risk of injury while performing sports is greatly reduced and sets up a strong foundation for more complex movements in the future.
In regards to the “growth stunting” capabilities of resistance training: there is validity to the statement that resistance movement will cause a change in one’s bones. However, this is an adaptation of the body that will only positively benefit the one performing the resistance movements. Wolff’s Law states that the bones will adapt to loads under which it is placed. (Essentially, bones change in density according to what stresses we place on them). The more strain our bones are placed under, the denser it will become, ultimately strengthening the bone to withstand higher and higher force levels. Resistance training is the best way to produce those same results. Because the child is adding increased loads on their bones, the body responds by making the bones denser and stronger which is a huge benefit.
It should be stated however that this is all relative to the weight and ability of the child. This is not meant to approve the use of turning one’s child into a powerlifter or load their bodies with an absurd amounts of weight. Using poor judgement with training children will produce negative results and potentially cause injury. When using the proper programming however, which can be seen in 100% of SAPT’s workout programs, you will begin to see incredible results.
Ultimately there is no reason other than health issues,that a a child should not be exposed to and taught proper movement patterns and starting resistance training. There is a plethora of benefits and will provide the perfect framework for building a healthy and strong future athlete and adult.
Shoulder Injuries Among Firefighters and How to Prevent Them
This week the SAPT interns will be gracing our blog post. First up is Nora Mady. Take it away Nora! As someone who is just entering the world of fire and rescue, I continue to learn new things on a daily basis, as I become more involved. I recently joined the Fairfax County Fire and Rescue Department in hopes of becoming an EMT and providing basic healthcare to satisfy graduate school requirements. However, within a month of being a new recruit, I had my eyes set on a different goal: I wanted to become a volunteer firefighter. One of the first steps the county requires in the firefighting qualification process is to complete a test called the CPAT (candidate physical ability test) It is an 8-event test that challenges the basic physical abilities and movements that a firefighter must perform should they encounter a fire or emergency situation.
Click HERE for more information.
I distinctly remember someone telling me after I had passed CPAT, “Good job. Now keep working out and stay in shape. We don’t want you dislocating any shoulders in fire school.” Now, having already suffered a dislocated shoulder I began to worry. Did people who dislocated their shoulder just not move functionally? Or was the nature of fire school so brutal that only the lucky ones avoided injuries? I decided to do a bit of research on the topic and found that shoulder injuries are suffered by more firefighters than I originally thought.
Now, you may think the upcoming advice won’t apply to you unless you’re a firefighter, right? The shoulder joint is the most unstable joint in the body, and people from all walks of life suffer shoulder injuries and pain for various reasons. Whether you are a firefighter, a first responder, a public safety officer, an athlete, or someone who just wants healthy strong shoulders, these exercises will help you profoundly. Strengthening the muscles of your shoulder girdle and rotator cuff will help stabilize the joint and maintain integrity of what?. When the larger muscles take over for quick, powerful movements (deltoid, pec major, latissimus dorsi, rhomboids, etc.) your stabilizing muscles do not activate efficiently or quickly. I wouldn’t say that, I would stay that they are “over powered” but they’re on. This pattern slowly weakens those muscles over time, and combined with the load that is applied to the joint, makes it easier for them to suffer injuries, pulls, and tears.
Supraspinatus “Full cans"
While standing, and with no more than a 10-lb dumbbell in each hand (I use 4 or 5 pounds in each hand so that should tell you this is not the type of exercise to load up on) raise each arm out so that it is parallel to the ground and at 45 degree angles from your midline. Turn each hand laterally (to the outside)so that your thumbs are facing up and your palms are turned towards you. Slowly lower your arms down to your sides and raise them. Ensure that sure your hands are never higher than your shoulders. Do this for 20 reps (you can break them up into 2 sets of 10). This exercise isn’t supposed to exhaust you and shouldn’t be performed to failure. Your supraspinatus is a very tiny muscle that your prime movers can compensate for when you perform big heavy movements, so isolating it for rotator cuff strengthening purposes can be really helpful in injury prevention or for rehabilitation purposes.
This guy is performing the exercise prone, on a stability ball, as a variation.
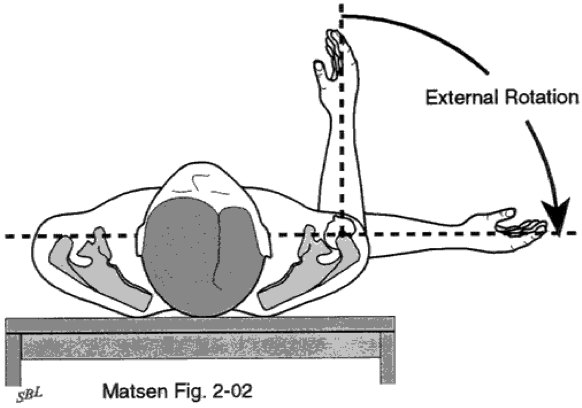
External Rotations
External rotation (a movement at a joint that causes rotation or a limb or part of a limb around its long axis away from the midline of the body) is a movement that is generally a bit more vulnerable than other the shoulder movements . You can perform various exercises that elicit the same movement and work on your teres minor and your infraspinatus (the main external rotators of your shoulder). These exercises can be performed with bands as resistance, a cable pulley machine if you are at a recreational gym, or free weights, as you stand or lie on your side depending on your mode of resistance.Start with your upper arm aligned with your torso, your elbow bent at a 90 degree angle, and your forearm straight out in front of you. Now, with whatever means of resistance you chose to use (dumbbell, band, cable, etc.) internally rotate your forearm a bit so that it is closer to your midline. This will be your starting position, with your thumb facing upwards and the palms of your hands facing your midline. You should pull against the resistance away from your midline. Make sure that this exercise causes no pain, and if it does, stop immediately. You should feel a little burn because these tiny muscles can fatigue very easily. I would suggest sticking a towel between your ribs and your elbow so that you’re constantly aware of keeping it from falling, indirectly keeping your arm from deviating away from your midline.I would choose a weight or resistance level that allows you to perform 2-3 sets of 10 reps for each arm.
Things to Avoidin the Gym
Here are a couple of tips for the average gym-goer to protect their shoulders. Sometimes you need to give up looking really cool and tough in front of your friends at the gym so that you can be really cool and tough and pain free when it’s really important, like fighting fires and saving cats from trees.
Lateral and front deltoid raises: just stop doing them, at least with your palms facing down. This creates a really tight subacromial space (a very tiny pocket between the top of your shoulder and the head of your humerus), and that’s bad. It’s where all of your rotator cuff tendons hang out, and when you compress that space, you irritate them. This is a common cause of a lot of shoulder pain and discomfort. If you must do these exercises, I would recommend turning your hands so that your thumbs face the ceiling. This opens up that subacromial space and gives those tendons a little more room to wiggle. They will be happier, and in turn, so will you.
-Overhead exercises are great, but unless you are an Olympic weightlifterdoing super heavy overhead barbell work is killer on your shoulders, and not in a good way. A splendid alternative is using a dumbbell and performing overhead presses unilaterally (one side at a time). This will give your shoulders a chance to 1) not compensate for one another and 2) really engage those rotator cuff and stabilizing muscles when you have a single dumbbell overhead versus a huge barbell whose weight is distributed over a much bigger area. Still, be very careful with these and start out at a reasonable weight. Also, avoid twisting your hands during these (meaning don’t start out with your palms facing behind you and then end, fully extended, with them facing away from you). You sometimes do this with row variations, but when you are dealing with moving weight in the vertical range of motion, it can place a lot of pressure on your poor shoulders. It’s not nice, and it may feel fine at the moment, but over time your body will let you know that it is not happy with what you’ve been making it to. Stick with a single position (I prefer neutral). Another great alternative is the landmine press, which engages the same muscles as an overhead dumbbell press but whose stable axis provides your shoulder with a bit more stability than a free weight. Remember, if you have poor shoulder mobility to begin with, you shouldn’t bother or risk pressing anything overhead.
-Rows are one of my favorite exercises. Landmine rows, seated cable rows, single arm dumbbell rows, I could go on. However, I see a lot of people mistake rows for big, fast, powerful lifts. Rows should be executed with elegance, grace, control, and proper breathing technique. A row that is done by essentially jerking the weight towards your ribcage and letting it fall back to its initial position without control is dangerous. When thee exercises are done too quickly, your don’t give your stabilizers enough time to react and contract to handle the stimulus or the weight. Mind you, this should apply to all exercises: if you can’t do a full set without compensating by jerking your whole body or making really weird faces, then your weight is probably too heavy.
Five tips for firefighters outside of the gym to avoid hurting their shoulders:
1. Warm up your shoulders en-route to your call destination.
2. Don’t tighten your SCBA straps too much (SCBAs are self-contained breathing apparatuses that look like backpack straps with an oxygen tank attached to the back)
3. While pulling a ceiling (refer to CPAT link above for event 8), keep the pike pole close to your body and instead of pulling with your shoulders, use your core, legs and hips to deliver and absorb most of the force
4. While swinging an axe, keep your dominant elbow closer to you and use your hips in delivering the force, rather than your back and shoulders. Remember to also use short, controlled chops. Big swings can result in missing your target, and missing your target can result the tearing of your rotator cuff.
5. Be safe and smart! Yes, you are in an emergency situation, but if you rush your movements and don’t perform them intelligently, you can hurt yourself, only escalating the severity of your situation.


