Eating During the Holidays: Strategize!

First off, I saw the Hobbit... Most excellent! The reviewers out there who are saying it's not so great (Rotten Tomatoes) Poop on you. I loved it! Any Tolkein fan will love it, go see it!
Onto the topic for today: eating during the holidays. About this time, there are all kinds of "diet" advice, how to manage the holiday weight gain. Magazine covers are inundated with promises of "melting away" pounds and "avoiding the holiday bulge," with articles listing revamped recipes and (in some cases) "quick" workouts to justify the holiday treats.
I'm all for finding alternative, healthier versions of favorite food and I think it's great if a meal can be concocted that is healthy AND tasty! But, majority of holiday meals will NOT be the "healthy" version (or the "Kelsey" version as my family calls it.) So what is one to do to avoid the pounds that tend to accumulate during the holiday season (thus inspiring many New Year's resolution and influx of gym use.)?
How about this: just don't eat as much; obvious statement, I know. I understand that there is a plethora of delicious food, but hey, if you don't want to gain the extra weight, don't eat too much. Or, strategically eat. Meaning, if you know you're going to have cookies/pie/cake or whatever after dinner, don't eat the extra rolls at dinner. Or, if you want to sample all the food, great! Just have a little bit of each instead of a lotta bit.
I know this sounds harsh, or at best, callus, but a little extra will-power now will save a lot of extra work come January. And, saying "no" to the extra helping is not hard. I used to struggle with both anorexia and binge-eating disorder; I know too well the extreme ends of "will-power" (iron-will and no inhibitions). There's no secret recipe or workout that will magically keep you from gaining extra weight throughout the festivities. Trust me, managing caloric intake around the holidays is NOT complicated and with a little work, can be worth the effort.
I should note, that regular exercise, not just frantic after-the-fact workouts in January, is also an excellent tool in the toolbox of good health. Keeping up with your training through the holidays (or at least some semblance of it) will certainly be beneficial.
Anyway, I know this was short and not particularly informative, but more like food for thought (pun intended). Just be smart with your food choices and you won't have to worry about having to "work" it off later.
So What?
A golfer misses a putt. A basketball player misses a shot. A baseball player swings and misses. Often those misses seem like a matter of life and death before, during, and after the moment. But, the truth of the matter is they are not. Your ability to recover is where mental toughness lies. Over the past few days my work with athletes brought discussion on perspective. Perspective on the tragedy in Newtown served as a simple reminder that our misses are not nearly as big of a deal as we make them out to be. A game is a game. Many of us fear failure and the emotions that come with it. Yet, it’s failure that allows us to grow, which allows us to live. Failure is where brilliance is born. It's how we learned how to walk, talk, and read. It's all part of the process of greatness.
So next time you miss, and your thoughts start racing about all of the bad that can happen; give yourself perspective on the situation and ask yourself, so what?
An Overuse of the "Arch Your Back" Cue, and How to Create Better Positioning During Your Lifts
"Pull your chest through.""Stick your chest out." "Put your shoulder blades in your back pocket." "Arch your back....I said, ARCH!"
If you've ever set foot in the weight room, I bet you've heard at least one of the above verbal cues spat out hundreds of times by a coach or trainer in the middle of teaching someone to lift weights.
And for good reason, considering that this is what I usually see when I watch the average gym-goer set up to perform a deadlift or row:

Not pretty, right? And something that should make you want to throw your face into an axe.
We know that lifting with a round back (flexion), at least in the lumbar region, is exceedingly dangerous, large thanks due to Dr. Stuart McGill and his research showing that repeated lumbar flexion, especially under load, is the exact mechanism for disc herniation.
So, what did we do as an industry? We took the stance that if lumbar flexion is bad, then we should keep people as far away from that as possible. If extending (arching) your back is good, then the more the better, right? This thought process lead to us ensuring that everyone "arched their back," or "pulled their chest through" as much as humanly possible anytime they set up to perform a deadlift, row, squat, you name it.
Guess what? Excessive extension is bad, just as excessive flexion is bad.
Overextension in the lumbar region can be just as evil as flexion. What shows up on your doorstep when you do it for too long? Hellooo to low back pathology, to spondy and her cousins. Hello to facet irritation. Hello to an even greater anterior pelvic tilt. Hello to crazy stiff lats and a weak anterior core. Hello to literally cranking on the passive restraints of your back (not a good thing). Goodbye to stronger lifts.
Below is a bevy of comparisons I've put together, showcasing what is commonly seen as good form (sticking your chest out, or overarching your back), alongside a picture of what your back should look like. The pictures on the left show broken, ugly positioning while the pictures on the right display stable and sound positioning.
Instead of performing our lifts with a hyperextended spine, we want a neutral spine. A neutral spine is a happy spine.
TRX Row

Seated Row

Chest-Supported Row

Bent-Over Row

Anti-Rotation Press

Bent-Over Barbell Row

Goblet Squat (Top)

Banded W

Deadlift (Middle)

It may surprise some of you to see what you may have initially thought of as good form, to actually be broken. And knowing how to cue neutral spine is of even greater importance when you're working with someone with extension-based back pain, or even an athlete who lives and breathes in an extended posture.
And it's no wonder why you see so many ugly internet videos of people performing high rep snatches, with the top of each one looking something like this:

When we have crazy stiff lats and a weak anterior core from performing everything in extension, it's no wonder why so many of us look like utter poo poo when we go overhead.
Closing Thoughts
- Telling someone to arch their back or stick their chest out isn't always a bad thing, you just have to use discernment as to when to use it. Some people - i.e. desk jockeys or those with very kyphotic postures - may actually need to extend their back as much as they possibly can, just to get to neutral! These are the folks you may find yourself cueing "chest out," "arch your back" over and over again to help them get out of flexed (rounded) posture into neutral, and, depending on the population you work with, you may in fact find this scenario way more common than the reverse (those who shoot way past neutral into hyperextension).
- For those with flexion-intolerant back pain, it can be O.K. to cue a minor bit of extension during core stability exercises, lunge variations etc. just to drive a bit of intended extension and help them get out of the flexed posture they sit/stand in.
- It's kind of ironic that fitness professionals always freak out about anterior pelvic tilt, and yet the way we we've been cueing exercises have only exacerbated the issue! We bang ourselves against the wall when we stretch our hip flexors into oblivion and then go right into a deadlift or glute bridge with a hyperextended spine.
- The captions "broken" and "fully operational" in the pictures above are references, of course, to the different statuses of the death star ray gun in The Return of the Jedi.
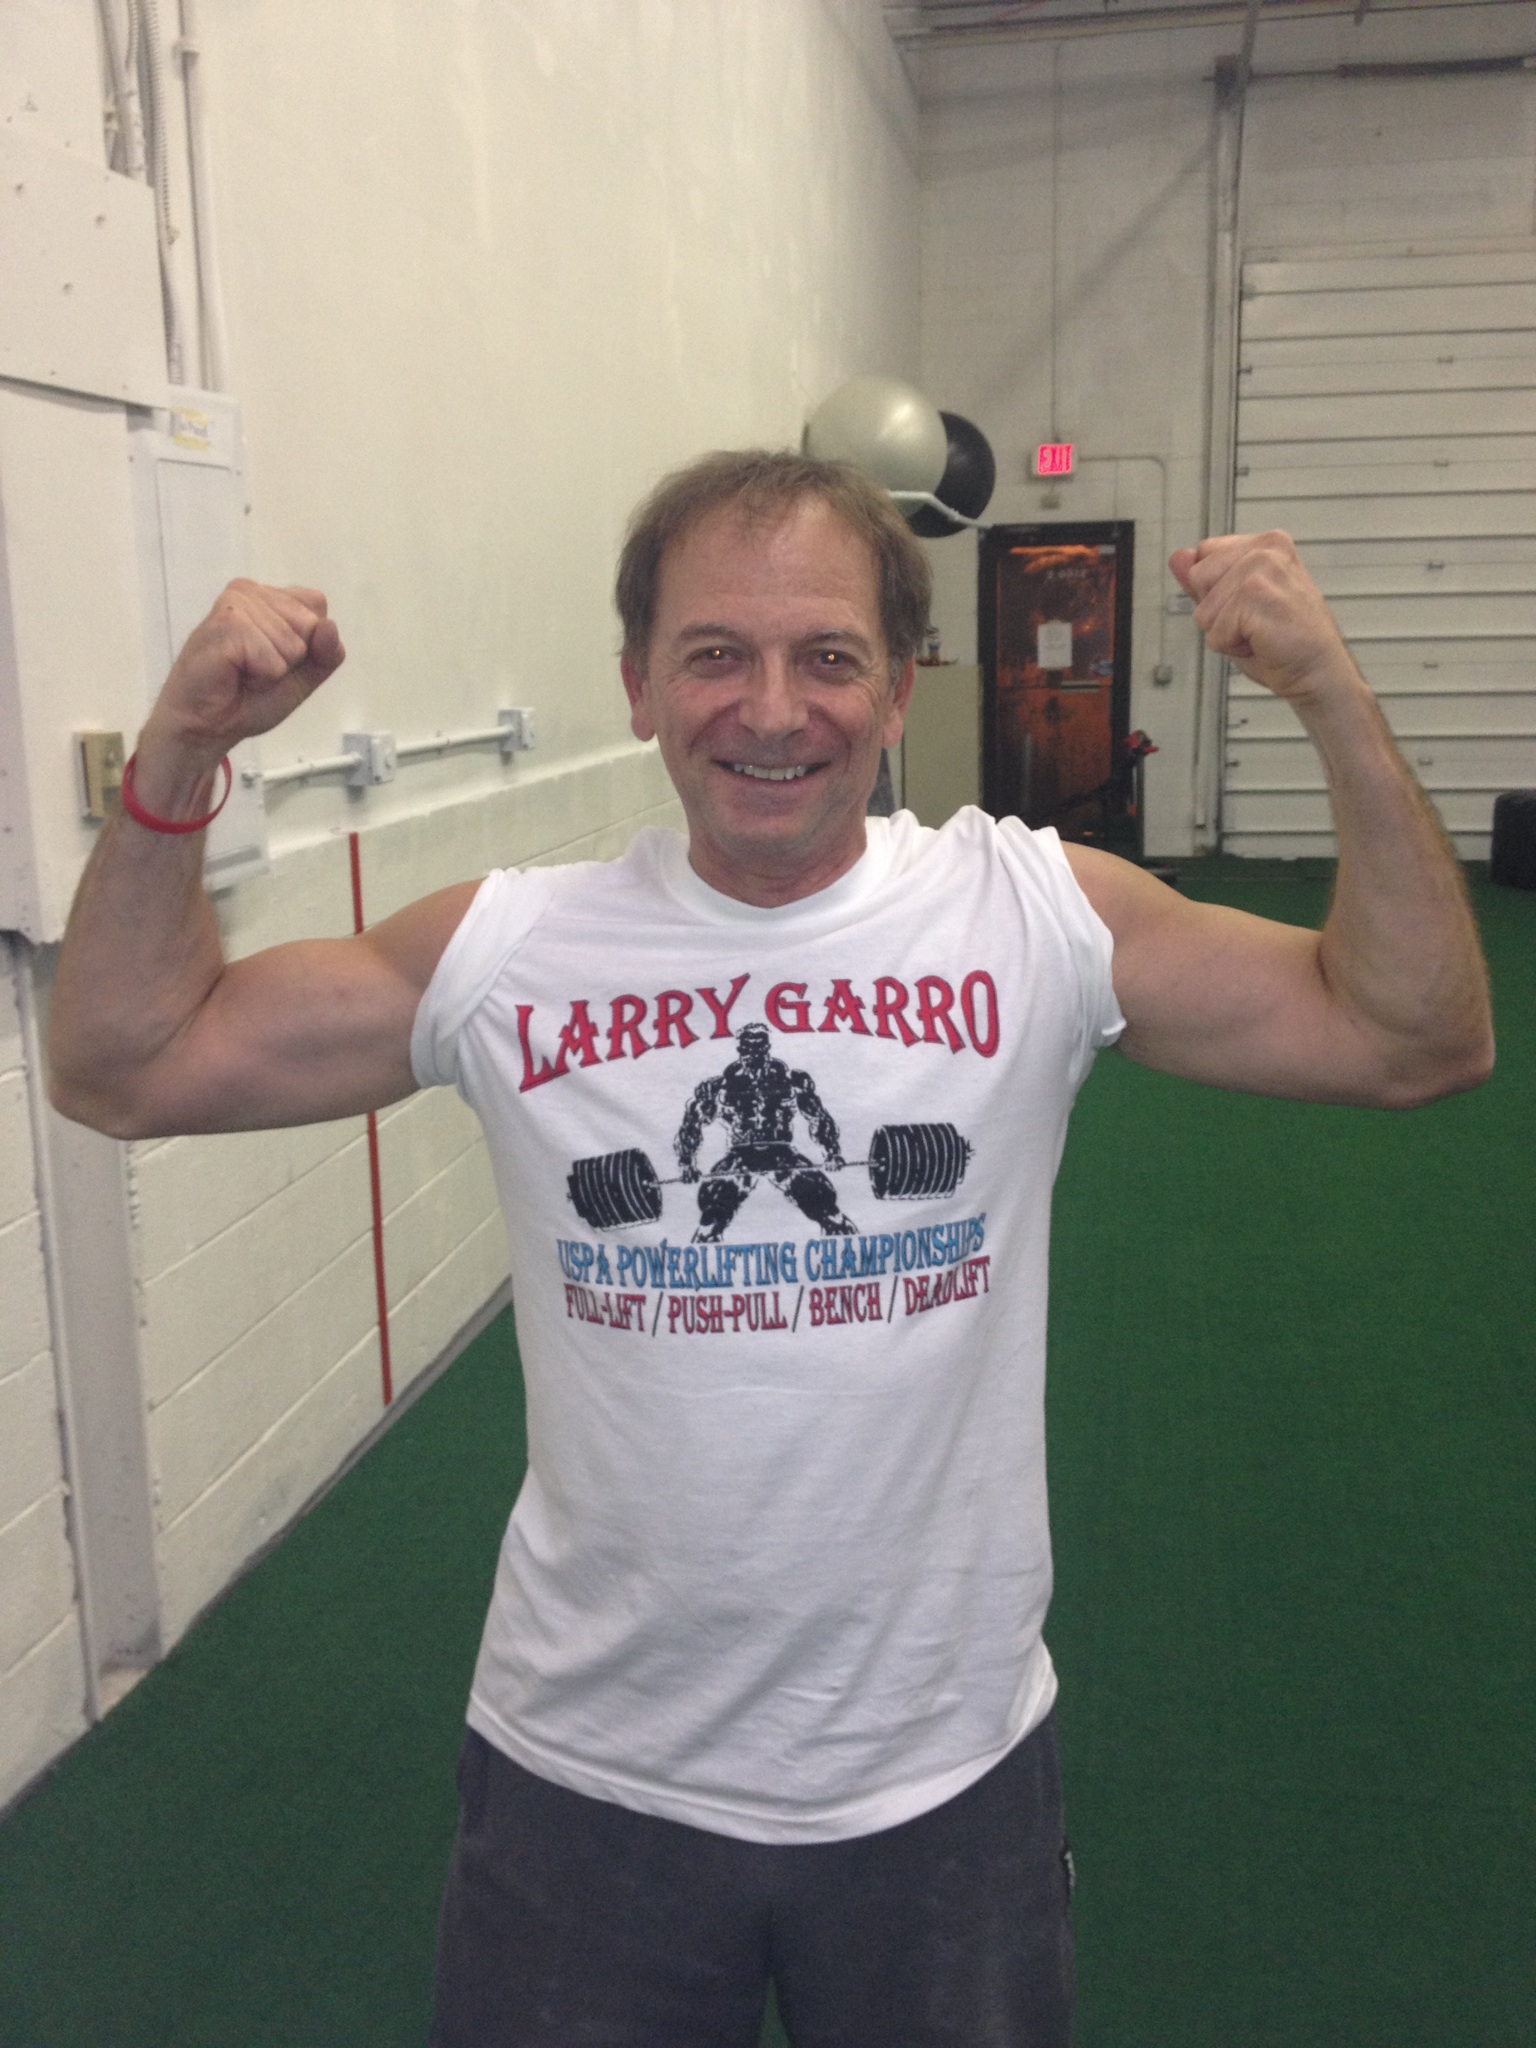
Conrad Mann at the USPA Larry Garro Memorial Powerlifting Meet
Whether it’s a third grade spelling bee or the Superbowl, putting yourself into competition takes a ton of courage. At 64 years young, Conrad of SAPT fame decided that it was time to enter into his first powerlifting meet (why not?). Even a double knee replacement wouldn’t keep Conrad from competing, and he decided to enter into the bench-only meet.
Here’s how it went down.
The Weigh-In
Conrad was competing in the 164.9 weight class. He was concerned prior to the meet that he might not make weight, but ended up stepping on the scale at a whopping 159 pounds. He came prepared, however, with plenty of fluids and snacks to get properly hydrated before he stepped on the platform.
The Wait
The typical sequence of a powerlifting meet is 1)Squat, 2)Bench Press, and 3)Deadlift. The lifters will have 3 attempts at each lift, and with two flights of competitors in the squat, we had plenty of time to relax and watch the squat attempts. We saw lifters of all shapes and sizes squat one after another. It was awesome to see all the different leverages people possess and the different styles of squatting they chose to utilize. High bar, low bar, Olympic shoes, Chuck Taylors, wider stance, narrow stance, long femurs, long torsos- basically every variation of a barbell back squat that you could imagine. Anyone interested in biomechanics should definitely check out a powerlifting meet just to see the infinite variations in the same basic movement pattern.
Towards the end of the second flight of squat attempts we decided it was time to start prepping both body and mind to push some heavy weight.
The Warm-Up
Taking the “if it ain’t broke don’t fix it,” attitude Conrad went through the same general warm-up as he does prior to a session at SAPT. Mobility work, scap pushups, face pulls and external rotations were all part of the ritual.
Just as important as getting physically warmed up for the bench attempts is getting mentally focused. At this point, Conrad’s level of raw strength was out of our control. The strength-building portion came from weeks of hard work on a brilliant bench specialization program designed in the top secret laboratory that is Steve Reed’s mind. However, this was the time where it was critical to take charge over the factors that we can control, of them being 1)Techniqu0e, and 2)Obeying the commands. The head judge gives three commands after unracking the bar (start, press, rack) during each attempt, and failure to obey any of these commands results in a “no good” lift.
Following the general warm-up we got on the bench. We started with light triples and progressed into heavier singles, ensuring that each rep was crisp and clean. The bar touched the same spot on his chest with every press, the elbows were nicely tucked at the bottom, and each command was obeyed as I yelled them out during the warm-up.
Go Time!
Having successfully primed his central nervous system to its fullest capacity, Conrad was warmed up, suited up, and ready to go. He was in the first flight of benchers and stepped on deck for his first attempt in a powerlifting competition.
Conrad opened at 85kg (187lbs). It was a solid opener, and flew up at lightning speed. Undisputed three whites from the judges for a good lift.
http://www.youtube.com/watch?v=7nw78bHsOqI&feature=youtu.be
His second attempt was 92.5kg (203.5lbs). Another easy bench for Conrad and three whites.
http://www.youtube.com/watch?v=D0dQ6bO8x48
Third attempt here was 97.5kg(214.5lbs) for a PR. Again another solid, clean lift that received a well deserved three whites from the judges.
http://www.youtube.com/watch?v=_z-L2EkKSXU
Wrap Up
To sum it up, Conrad walked away from the meet three for three on his attempts, a PR, no torn pecs, and shoulders still in-tact! Can’t ask for much better than that. Congrats Conrad, way to represent SAPT! Big thanks to Ron, Jen, and Sondra being part of the SAPT support staff, and a double thanks to Ron for taking videos of the attempts!
Adductors: Caring for the Unsung Heroes of the Lower Body
This is a two parter blog on how to care for and train the adductors (inner thigh, groin muscles... take you pick of their name). We'll talk about keeping adductors healthy and happy (and hopefully prevent groin pulls/strains, I'm looking at you soccer players...) today and then in the next installment, we'll talk about how to train the adductors (ladies (and guys, I've seen a few!), get off the baby-maker machines...) Part 2 is here.
First, a little anatomy lesson just so you know what the adductors look like:
So these are the major players: Adductor magnus, add. longus, add. brevis, pectineus and gracilis. (there's also a muscle called the satoris, it usually works in conjunction with the gracilis but it's attached to front angle of the hip bone (instead of the pubis bone like the gracilis) and it helps flex the hip and externally rotate the femur: like when you sit and cross your ankle over your knee.)
All of them adduct the femur (brining it closer to the body) but that's not their only function! The adductor magnus helps extend the hip (important in understanding groin strains) along with the hamstrings and glutes. The adductor brevis and pectineus assist in breaking hip flexion (like a little extra umph in flexing the hip). Adductors are the sidekicks of the big guys: quads, glutes and hamstrings.
The adductors are also 1/3 of Team Frontal Plane Stabilization: keeping hips and femurs stable everywhere!
In case you were wondering, as I'm sure you are, the other two players are the glutes (especially glute med) and the opposite side quadratus lumborum. So, for example, if you were to lunge forward, the adductors help prevent your hips from shifting up/down and the knee from collapsing inwards.
Ok, with all the awesome-at-multi-tasking the adductor complex is, it's a area that gets really nasty. It gets clogged with knots and fibrotic tissue so it needs a healthy dose of SMR. While you can use a foam roller on the floor, it's not ideal. You can't apply a whole lot of pressure (due to the angle) and your essentially nose-on-the-floor and again, not very comfortable.
I recommend elevating your leg on a table or a bench to eliminate this issue. You can use a foam roller but I've found that medecine balls work wonders on the nasty gunk up in your adductor trunk. You can apply force over a smaller area, thus making it more effective, and it's easier to pinpoint super-nasty areas. See video below:
Notice how I go along the fibers (from knee to hip direction) as well as across the fibers (front to back). And when you find a angry bit, hang on it for about ten seconds then continue the delightful process of that we know of as SMR.
After that, drills like adductor rock backs, Cressy has a good video of standing rock backs, and static side lunges to bring the rolled-out fibers back to a desirable length.
Now, go forth, roll your adductors and be prepared on Friday to learn some ways to train the Sidekicks of the Lower Body.
Why Train with Chains?
I’ve had a few people ask me recently about the benefits of training with chains. I think chains are a great tool for developing strength and power, and not only because it looks cool. For those that have spent some significant time on solid weight training programs using strictly straight weight, incorporating chains into their regimen can help push their performance to another level.
A Teaching Tool
I think chains are a great teaching tool, but not necessarily for technique purposes (If technique is an issue, make that the priority and reserve the chains for another week, month, or year). I’m talking about teaching people how to be FAST and accelerate the load through the range of motion. Adding chains to barbell movements is one of many forms of accommodating resistance. This basically means that throughout the concentric portion of the movement, as the leverages improve, the resistance increases. Take benching with chains for example.
When the bar is touching the chest the weight is deloaded because most of the chain weight is sitting on the floor. As you press the weight towards lockout the links come off the floor, making the load heavier with each inch of concentric range. So imagine that the weight on the bar is 135 pounds, and we added 80 pounds of chain weight. At the bottom of the bench press, if you used the minimal amount of effort needed to press 135 pounds, the chains will reveal themselves to you during the lift as if to say, “nope.” This is when the learning occurs, and you know that you need to drive hard and fast into that 135 pound bar touching your chest because it is going to grow into a 215 pound load at lockout.
Overload Stimulus
The chains as accommodating resistance will also allow you to use greater loads than you may be used to at the end range of a movement. You can get a similar overload stimulus by using partial movements, such as rack pulls for deadlifts, but with chains you can overload while still practicing the full range of the exercise.
Recovering from an Injury
Often times the bottom of a movement is when some of the joints are the most vulnerable. Those who are recovering from a grouchy lower back can benefit from the decreased load at the bottom of squats and deadlifts while building their strength back up. Similarly, those making a comeback from a shoulder issue can start progressing into bench and board press variations with chains to add a little more security.
Convenience
Chains are also an extremely useful mode of resistance for more than just barbell movements. Throw them across your hips during glute bridges, drape them across your back for push-ups and planks, or around your neck for pull-ups, dips, and lunges. Obviously it’s of the upmost importance to look hardcore and throw a bunch of chalk covered chains onto a barbell, but they should not be used haphazardly.
If you don't have access to chains don't stress it, straight weight should make up the meat and potatoes of your program anyway. However if you have been training for a while and have access to them they can be a great addition to your toolbox and provide you with a cool new stimulus. Try them out!


