Why Floor Press? It's Not a Bench Press...But It Can Help Improve It!

Everyone knows that Monday is International Chest Day. Granted, today is Wednesday, but hey, you might read this on ICD, so let's unpack the floor press and why it's worthy of throwing in your bench press rotation. 

What is a Floor Press
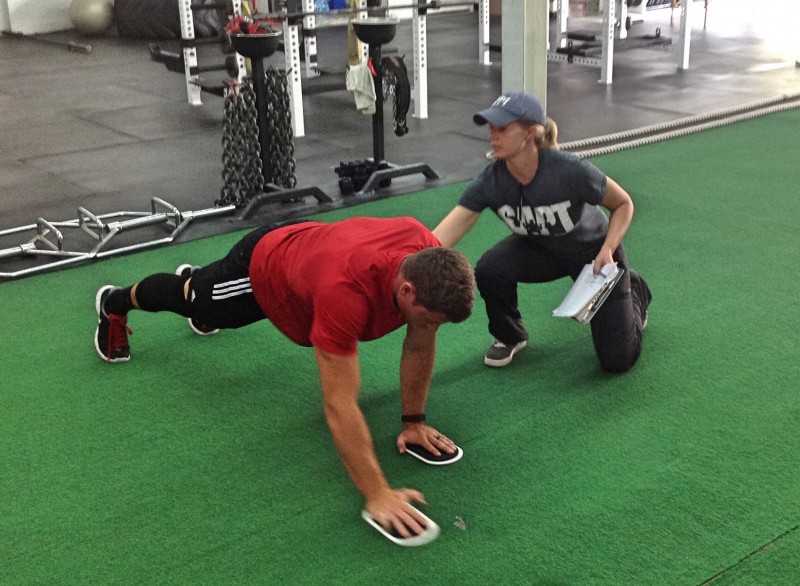
Behold!

Or, if you prefer dumbbells...

Most of the same coaching points apply as it would to a regular bench press: keep the upper back tight, try to bend the bar as you lower it, drive your back into the floor as you press away, and make sure you have a spotter. The main difference is the floor stops your elbows at 90 degrees. This has three main training benefits.

No Stretch-Shortening Cycle

This is a fancy way of explaining the reactive concentric contraction (shortening) that happens when a muscle is quickly stretched before returning to its original length (here is the Wikipedia page if you want to delve into that more). It's why you see people bouncing a little at the bottom of a squat or bench press: the muscle reactively contracts and this provides an extra "umph" of power during movement. Floor press takes out the SSC at the bottom because the elbow run into the floor before the pecs are stretched out to the point of creating a SSC. This challenges the triceps, and to a lesser degree the pecs, to really kick in to press the bar back up. So, if triceps are your weak link, try a floor pressing for a while and see how that impacts your regular bench. 

Less Risky for Shoulders

In a traditional bench press, when the bar hits the chest (hopefully not crushing it...) most people's humeruses (upper arm bones) will naturally glide forward in the socket. Depending on the extent of this humeral glide, the tendons that cross the shoulder joint can get irritated and inflamed and then you wind up with a pissed off shoulder. If you've already created an angry shoulder, floor pressing is a great way to still press, but provide relief to the front of your shoulder while it recovers.*

Heck, even if you want to avoid shoulder injuries down the road and you're not married to bench pressing- meaning you're not competing in powerlifting or you don't particularly care about your bench press numbers- you can floor press exclusively and still reap the upper body strength benefits pressing heavy things provides. (Bonus: and you get double the shoulder safety if you use dumbbells and a neutral grip.)

No Bench Required

Ok, this is kind of a long shot, but let's say you go to the gym (on Monday, no less) and it is packed and there are no available benches. Well, floor pressing, either with barbells or dumbbells requires no bench so you can do it just about anywhere you can find floor space (obviously the barbell version will need some sort of rack, though if you can bench at least 135, you could conceivably floor press with a barbell anywhere too.)

There you have it, three compelling reasons to toss the floor press into your training repertoire. I also have to say this is my first bench press related article on SAPT's blog. Wow, it took me a while... 

This has nothing to do with floor pressing but I thought it was funny. from knowyourmeme.com

This has nothing to do with floor pressing but I thought it was funny. from knowyourmeme.com

* If you have shoulder pain and pressing aggravates it, don't you think it'd be a good idea to not press for a few weeks? Just sayin'... However, I won't leave you out in the cold, if you want to keep pressing around the pain, here's a great article on tips of how to do that and, hopefully, rehab your shoulder in the process. 

Slow Down for Strength Gains

It seems that despite how long I’ve been strength training there are certain exercises that never fail to make me sore. One would think that after 10+ years of training soreness (at least the make-you-walk-funny level of soreness) would be a thing relegated to new trainees.

No such luck.

Here are a few of the most offensive culprits:

Bulgarian split squats

RDL (single or double leg)

Slow tempo pushup

Ab wheel roll outs

(Caveat: I would be remiss to mention soreness is NOT the primary indicator of a workout. Training for to get sore for the sake of soreness is not a productive method for strength gains. Just because you're not sore doesn't mean that you're not making progress.)

The commonality among these exercises is a loaded emphasis on the eccentric, or negative, portion of the exercise.

Quick primer: Concentric muscle action is the muscle shortening while contracting, think of this as the curling up part of a bicep curl. The bicep muscle is contracting (producing force) as it shortens. Eccentric muscle action is the muscle lengthening while producing force, this would be the lowering portion of the bicep curl. The bicep is still producing force by controlling the weight downwards so your arm isn’t jerked out of socket.

It’s easy to think of the concentric phase as the most “important” part-- pulling the barbell off the floor in a deadlift or getting up out of the bottom of a squat-- which they are if you’re trying to complete a lift, but from a strength building standpoint, we actually want to focus a little bit more on the eccentric phase.

Concentric Strength Potential < Eccentric Strength Potential

If you could boil down strength gains to an equation it would look like this:

Eccentric gains + isometric gains + concentric gains = total strength gains*

In this equation the eccentric gains have the potential to yield the highest contribution to the overall increase in strength. The relative weakness of the overcoming (concentric) portion of an exercise prevents and limits the complete overload of the negative (eccentric) portion to its full capacity. What does that mean? A practical example would be an athlete is unable to perform a full pushup on the floor, but can knock out 5-8 negative-only pushups (just the lowering portion). This demonstrates the principle of strength in the eccentric exceeding that of the concentric. Got it, so why do we care?

Eccentric Stress is a Superior Stimulus for Strength Improvements

Training programs that include both eccentric and concentric exercises, especially when the eccentric is emphasized, appear to yield greater gains than concentric exercises only*. Why? Adaptation to stress is the name of the game, my friends.

  1. Greater neural adaptation in the eccentric- as we know, strength is not just the size of your muscles, but the speed at which the nervous system fires signals to the muscles. The nervous system directs the muscles therefore the more efficient the neuromuscular connection is, muscles produce force all the more quickly and more powerfully. Nerves + muscle fibers = motor unit. More on that below...
  2. Muscles produce a higher force output in maximal eccentric because you can use a higher load- this results in a higher stress/stimulus per motor unit. The central nervous system (CNS) recruits less motor units in an eccentric action than in a concentric action so each motor unit (again, nerves + muscle fibers) has to work harder.
  3. There is some evidence that eccentric actions will preferentially recruit fast twitch (over slow twitch) fibers, which are more responsive to growth and adaptation.
  4. Eccentric movement causes a higher level of micro-trauma (why you’re sore) and that leads to higher rate of repair, which is the reason muscles grow bigger and stronger.

Essentially, what this means is that if you’re not utilizing eccentric training (even simply focusing on controlling the negative portion of exercises) you’re missing out on a powerful tool to increase your strength.

Eccentric Training Techniques

What kind of help would I be if I didn’t offer some ways to incorporate soreness-inducing negatives into your training? For reference, I will denote a tempo such as 1-2-3 with the first number corresponding to concentric part, second to the isometric (usually the top of the movement before returning to starting position), and the third to the eccentric part.

  • 2/1 Technique

The concentric uses 2 limbs, the eccentric uses just 1 limb. For example, a standing cable row:

Note that the load should be light enough to accelerate through the concentric phase but heavy enough to make a slow eccentric difficult.

Tempo: 0-1-5

  • 2 Movement Technique

Concentric portion using a compound movement with the eccentric portion an isolation-type exercise. For example, a dumbbell bench press to dumbbell chest fly.

Tempo: 1-1-5

  • Super Slow Negatives-- use a percentage based on a 1 rep max of a lift
  • Negative Only Training-- note that you’ll need to do this with spotters to help move the bar/weight because the goal is to have the load heavy enough to actually tax the eccentric potential of muscles, which means that it will exceed the concentric strength. The following numbers are a percentage of a 1 rep max.

110-115% → 10 sec lowering

115-120% → 8 sec

120-125% → 6 sec

125-130% → 4 sec

If you use this method, only perform single repetitions per set since this a pretty CNS-intensive method and you’ll need to rest in between to allow that to recover between sets.

Good luck fellow iron-lovers! Embrace the DOMs and let the gains begin!

from quickmeme.com

from quickmeme.com

*Much of this information was adapted from Christian Thibaudeau’s Theory and Application of Modern Strength and Power Methods.

**There are very, very few exercises that would be considered “concentric only” but I would argue that anytime the eccentric phase is uncontrolled (such as just ripping through a set of rows like you’re cranking a chainsaw, or simply letting gravity take over during the lowering portion of a squat) then the exercise turns into a more concentric-only lift.

Insights from sarah: How to Find your niche

Sarah Walls, owner and president of SAPT, wrote a pretty fantastic article over on elitefts.com about being a strength and conditioning coach who, in her words, "happens to be a female." I (Kelsey) have railed against the "special" stuff that is marketed to women (not on this blog too much, but spend some time with me, I assure you it will come up...) and I very much appreciated Sarah's article is applicable for both females and males. Anyway, that's a rant for another day.

Sarah writes both about her experiences in the field as well as offers advice to up-and-coming coaches. I would argue that her advice could apply across most industries. I highly recommend you read it! Check it out HERE.

Training Thoughts For Beginners and Veteran Lifters That Never Grow Stale

I thought about writing a blog post geared towards new trainees, but the more I thought about the main points, I realized that most of what I wanted to convey applies to not-new trainees as well. These are the same concepts I need to preach and reiterate to myself constantly.

Like so many things in life, the fundamental lessons we learn when we’re younger are just as applicable 5, 10, 20+ years later. (Isn’t there some sign or motivational poster that says, “Everything I needed to know I learned in kindergarten”? It’s the same concept.) Therefore, this post is for all trainees, not just the newbies.

from here

from here

Get Out of The Comparison Game

We live in a comparison culture (I would argue all of human existence has been that of comparing ourselves to others, but that’s a philosophical rabbit-hole I’ll leave to my husband to travel) and now that we’re even MORE connected through the ever-growing social media sphere, it’s nearly impossible not to compare ourselves with others. There is a very small window in which comparison can be healthy- it can motivate improvements- but let’s be honest, that window is minuscule and most of time spent scrolling through the Insert-Social-Medium-Here feed causes feelings of anxiety and even depression because we’re not as good as So-and-So on Instagram. This can even lead us so far as to want to give up training because we’ll never be “good enough.”

My friend, weight training isn’t between you and So-and-So; it’s between you and the bar. Keep your eyes on your training and progress (and OFF other people). I’ll say it again, it’s between you and the bar.

Sacrifice is Needed to Make Progress, but Sacrificing Form is Rarely a Good Idea

Performing crappy reps with a heavy load is a) going to improve your ability to perform crappy reps, b) probably result in some sort of injury sooner or later and c) hinder progress either through said injury or because crappy form will always catch up with you, and well, physics happens. The most important point is that poor form increases the risk of injury, obviously, but things like shortening the range of motion or losing optimal joint alignment, only curtail the force production potential of muscles so you end up just cheating yourself out of the gains you could make with good form. Like I tell my athletes, I’d rather so 3 almost-perfect reps than 8 poopy ones.

from here

from here

Be Consistent and Patient

I don’t need to rehash consistency. Patience is a virtue for a reason. Without patience it’s tempting to lose interest because you’re not seeing the progress you expect (realistic or not, more on that below). Without patience it’s easy to justify adding more weight than you can reasonably handle with good form because, well, you just want to do more weight. Without patience training becomes about the result not the process.

Spoiler alert: the “result” will be fleeting and even if you achieve what you originally set out to do, you have to continue to train to maintain it…that’s how people “slip back” to where they were: they don’t have practice of the process of training. Embrace the process.

Strength Gains are Not Linear

As I hinted above, the strength gains and performance improvements are rarely linear. Sure, a new trainee can expect rapid growth and new PRs every week (lucky…) but once you hit a certain point, about 6 months in, that progress slows down noticeably. And if you’ve been training for a couple of years, improvements come at a glacial pace. And you know what? You’re not always going to be stronger today than you were last training session. Sometimes you stall or even backtrack for a bit, and that’s ok. Progress is not linear day to day, but the overall trend should be upwards. That’s why we need to be patient.

It’s Ok if You’re Not Sore or Tired

This is another one that I need to remember every training session. Soreness and/or fatigue are terrible indicators of an effective workout. Long-term training success rests on the pillar of sustainability. If your workouts are not sustainable- meaning they leave you too wrecked to recover- you’re not going to be able to maintain your training or progress. Believe me, there is a time and place to push it hard. Fatigue and soreness are ok, but it shouldn’t be the end goal of every training session. Leaving some gas in the tank 99% of the time allows your body to recover and grow stronger.

Those are some of the principles of training that never grow stale, no matter how long you’ve been training.

Paused Deadlifts: How To Bust Up Plateaus

Deadlifting is pretty fan-freaking-tastic when it comes to building up overall strength and particularly posterior chain (the backside). Whether you're a competitive strength athlete or a self-competitive trainee with a deadlift number that won't budge, try cycling in some paused deadlifts. 

Paused work is a common technique for overcoming plateaus in the bench and squat, but it's often not used in deadlifting. The main reasons are a) it can be riskier than the other two lifts because of the position in which you are pausing (at the bottom), b) due to the risk, one must have consistently solid technique, and lastly c) it's really, really difficult. 

So why perform pause work with deadlifts? 

Everyone has a sticking point (and you probably know where yours is...) that acts as a force-field against increasing weight on the bar. Depending on your individual leverage, that sticking point will range, generally, between 1-4 inches off the floor.

Strength is specific. Translation: training a particular quality, body part, or, as in this case, a particular position within a movement will result in growth in that area. Pausing at that sticking point increases the time-under-tension at that point and thus increased strength to, hopefully, overcome that sticking point at higher loads. 

Another benefit is reinforcing a tight upper back, specifically the lats, as those bad boys have to fire like crazy to maintain bar position close to the body AND allow for sufficient force transfer from the hips to the bar once the pause is over and it's time to accelerate that bar upwards. 

If you don't know how to use your glutes in a deadlift, you'll quickly find out. You should feel them firing like crazy to both hold the position and then explode out of the bottom. 

For those of us (myself) that have not-so-great speed, this is also a great way to work on exploding out of the bottom. 

How To: 

*Note: this is not a "beginner" exercise. A very solid strength (close to 2x bodyweight deadlift) and technique foundation needs to be present in order to reap the benefits and perform it safely. 

  • Start by working at your sticking point, wherever that may be. In the video I demonstrated a few different heights. 
  • Work with 50-70% 1RM; no need to be a hero on your first try. Start with 50% of 1RM and go from there. 
  • Hold the pause anywhere from 2-5 seconds. I recommend using an actual timer (instead of counting in your head) as it will keep you honest. Again, don't be a hero, I started with just 2 second pauses and that was p-l-e-n-t-y of time. For example: 
    • 3x4 w/ :02 hold at 50%
    • 4x4 w/ :02 hold at 50%
    • 5x3 w/ :02 hold at 60%
    • 4x4 w/ :02 hold at 60%
  • Sets of 3-5 reps is sufficient and anywhere from 3-4 sets. I don't recommend performing these after a heavy set of deadlifts. These would be much better suited to train on a day where either squat or bench is the main focus on the lift. 
  • There isn't a hard rule for this kind of work, as long as you're progressing (either in weight or time) that's the key. 

I incorporated paused deadlifts for about 8 weeks and noticed a difference in my speed off the floor over time. If you've tried other avenues to increase your deadlift numbers, this could be a game-changer for you. 

Only remember, these suckers are difficult, just wanted to repeat that warning. :)

SAPT Exercise of the Week: PUPP with Three-Way Slider to Light Up Your Core

As I've said in the past, who doesn't love a new core exercise? Enter the PUPP with Three-Ways Slider!

I'm almost positive I'm not the first one to come with this type of variation, but I haven't seen it anywhere else, so I'll take the credit for now. This is a variation on the PUPP with alternating hand slide outs (which you can see HERE).

Instead of merely sliding out forward, you add in a lateral and backwards (towards your toes) slide too. 

This is a superb exercise to train the anterior (front) core in resisting extension, rotation, and teaching overall stabilization of the lumbo-pelvic region (lower back and hips). It also throws in a side order of training the shoulder stabilizers (think rotator cuff) and encouraging the shoulder blade to move around on the rib cage. 

Things to Remember:

1. Keep your abs and butt tight. Not simply I'm-kinda-squeezing but seriously crush your muscles together. This will stabilize your hips and spine to prevent errant lateral movement as well as saggy hips. Saggy hips = angry spines. 

2. Maintain some pressure on the moving arm's slider, but not so much that you can't slide it. You can either do all the reps on one arm and then switch or alternate as you go between reps. I prefer to do all one side then the other since you'll have a decent amount of time under tension- thus building up some endurance in the core and shoulder muscles- but I think in the grand scheme, it matters not. 

3. Ensure that your supporting hand is directly under your shoulder. If it's too far in front of your shoulder, you'll likely lose your balance as your hand will slide out from under you. If it's too far behind (in the direction of your toes) you'll end up with a rather cranky shoulder by the end. 

4. If you have trouble stabilizing your hips, spread your legs outside shoulder-width to create a larger base. As you become more proficient, you can scoot your legs closer together. 

Aim for 6-10 reps per side and 2-4 sets.