Fitness Marketing to Females: Don't Be A Victim
I had the privilege of writing up a blog for Tony Gentilcore's site. He's an awesome coach based up in Boston at Cressey Performance. He's had a huge influence on my development as a coach (mostly through reading his blog, but Steve and I have had the chance to learn from him first hand both in Boston and recently at his seminar). If the title intrigued you, CLICK THIS to read the rest of it.
Enjoy!
5th Annual Pre-Gobble Wobble!
Please come join us for our
5th Annual Pre-Gobble Wobble at SAPT in Fairfax
on Thanksgiving Day morning.
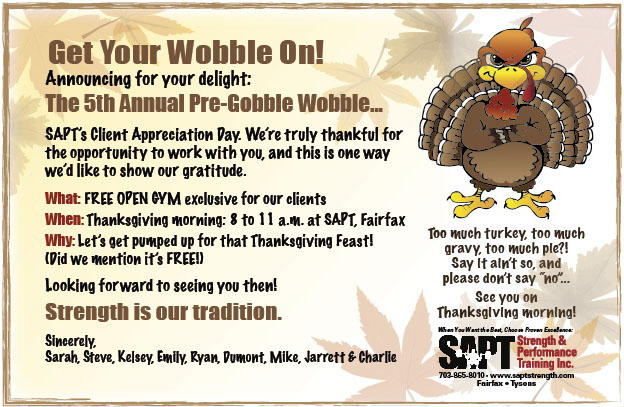
Register TODAY! This event is free for SAPT clients!
Athlete Spotlight: Mark The Mason

Mark is one of our adult clients. His son has trained with us for the past 5 years or so and Mark joined us about a year ago. Mark is a stone mason and is used to working with heavy things like boulders, slabs of granite, and other mason-y things. However, when Mark first started with us, he was in not-so-great shape. Mark had fallen into a hole. He was walking backwards on a job site and fell into a large, deep hole. The fall caused some MAJOR damage to his neck and right shoulder. Discs at C3 and C4 were crushed which translated into terrible nerve pain and weakness in his right shoulder. He spent months on pain medication and in rehab to regain some semblance of function. Mark walked in our doors just under a year after his fall.
When he started, understandably, he was pretty weak. (After 9+ months of barely doing anything, it wasn't a surprise.) His core strength was very, very low and he had difficulty with a lot of the beginner exercises because of it. Planks were his nemesis and he would shake after 10-15 seconds.
We started him out on trap bar deadlifts, with only 65 lbs. He stayed around that weight for at least 2 months while we hammered core strength, single leg movements (oh how he "loved" split squats!), and slowly built up the stamina and strength in his shoulders.
After 2-3 months we tentatively tried pushups. He could do a few with his hands elevated but he tired quickly.
Mark worked hard. He showed up every Tuesday and Thursday morning for his training sessions. He was consistent and steadily Mark grew stronger.
Pretty soon, he was doing pushups on the floor again. (he can knock out about 40 in a session now!) He can now perform split squats and step back lunges without wobbling, and even holding weights! He's graduated to landmine presses with both shoulders (a feat unthinkable during the first 6 months). He's even started crawling (bear and tiger crawls) while dragging chains. (How I wish I had a video of that!) Mark blew past old barriers and is stronger than he was before the fall.
His deadlift inched upwards and we moved him to straight bar, conventional deadlifts. He was a little nervous at first and we worked on his form for a couple months. Then, he was feeling snazzy one day two weeks ago, and decided to increase his weights.
He hit his first PR of 215 for 3:
Then, about 5 minutes later, a second PR of 225 for 3:
http://youtu.be/4ncPVvlICZo?list=UUJljK3-7DrotX_pWpxaYVkA
Up until this point, the most he'd ever done was 195. He was SO excited that he could barely wait to tell his son his accomplishments. He was giddy and practically skipping around the gym for the rest of his session.
Mark works pretty long hours but he says that he has a much easier time making it through the day. He told me he had to crawl up a steep hill last week that would have been nearly impossible a year ago. This is music to our ears since our whole goal was to increase his strength and make daily living a breeze.
We are so grateful to work with Mark. He always has a smile on his face and a laugh that's just waiting to burst from his mouth. His dedication is inspiring to our other clients and we're eager to see what he'll accomplish in 2015!
Much Ado About Hanging
It seems almost daily that I get the privilege to explain many of our methods and exercises to our athletes(I love hearing myself talk, especially when I get to get nerdy with some functional anatomy). I understand the reason for questioning many drills, I too wanted to know why people were doing those seemingly silly primal roll variations at one time. But the one question that I am often surprised to hear asked is, “why am I hanging?”

To me the benefits of just simply hanging from a bar are often overlooked, but very clear when broken down. There is a reason you see several individuals instinctively grab onto the top of a squat rack and suspend themselves for a few moments mid-workout. The body often craves the decompressive stimulus it gives. However, due to the simplicity and ease of the movement, many trainers and/or trainees will sometimes dismiss it as a movement worth training.
That is until a couple months ago when Ido Portal(if you don’t know him, look him up) issued the, “hanging challenge” to the movement community. This challenge was beautifully simple and gave extraordinary results to those that followed it. All you had to do was hang from something for an accumulated time of 7 minutes each day for a month. Individuals started posting before and after pictures and sharing their increases in movement quality. Variations started emerging and a unique training tool was brought to the eye of the training realm.
Just like any exercise, there are special considerations that should be taken before implementation. Shoulder pathologies and special demographics should be heavily debated(think overhead athletes) before being exposed to these movements. Progressions should also be kept strict to ensure full results… NO CUTTING! For those that pass the risk-to-reward ratio and follow through with the progressions, the carryover will be well-worth the effort. Keep in mind that there are several variations out there, each with its own benefits, but for this article, we'll only be exploring the passive, active and arching hang.
Just a few contraindications to consider with these movements:
-Shoulder Pathologies… ESPECIALLY IMPINGEMENT
-excessive kyphosis/ lack of passive ROM in shoulder flexion(can be case-by-case)
-Laxity in the humeroulnar or glenohumeral joints
-Spinal Pathologies(mainly for the arching hang)
The Passive Hang
The passive Hang is the platform of which every hanging progression is built, and for good reason. This variation supplies a very unique affect and actually addresses many typical imbalances when employed at the right time. It’s performed by grabbing onto a bar and then just relaxing the rest of the body.
http://youtu.be/iIVg_KK_Uzs
I’m in love with the training effects that this puts on the individual. It provides a great stimulus to the functionality of the rotator cuff while the shoulder is in a decompressed position. Due to the positive relationship to grip activity and rotator cuff activation, the act of grabbing onto the bar should help to reinforce the reflexive stability within the rotator cuff, the oppertunity of doing this in a decompressed position is rare among exercises.
This movement also provides a unique affect to help counteract a fairly common grip compensation. By having the shoulders in flexion, this puts the pec minor in a lengthened position. It's fairly common to see the pec minor compensating for grip mechanisms via the fascia of the arm line. So with the pec minor out of the picture, this gives you an opportunity to train the grip to help break that compensation.
ANDDDD let's not forget the unique stretch that this is putting on the lats, and serratus anterior. This is an area that is often prone to adhesion and can be a limiting factor in many individual's active flexion ROM. Combine this with the forced t-spine extension and lumbar decompression and you've got quite a nifty tool to put peeps back into alignment or even point out unseen balances. It's not unheard of to notice imbalances in an individuals lateral fascial lines when they're hanging. This can be a pretty crucial find for many manual therapists.
**For more lordotic individuals, you will want to consider coaching tucked hips or forward legs to create the decompression.
The Active Hang
I'd like to reiterate that I never move an individual to active hangs without starting them with passive ones first. The volume/amount of time before I progress them on is all dependent on their shoulder mechanics, posture and general conditioning level. The Active Hang is very similar to the passive hang, except now you create tension and pull your shoulders away from your ears.
http://youtu.be/HoE-C85ZlCE
This movement is great for helping more, "trappy" individuals to find a packed position. Many office-laiden individuals have had great results in cleaning up general shoulder wonkiness through this movement. It also has plenty of movement carryover to things such as OH presses, handstands and, the most obvious, pullups. This has actually become one of my favorite progressions to help a lot of clients to be able to do a strict pull up, correctly. It's far too often that I see athletes pull themselves to the bar and somehow seem to lose their neck in the process. For that reason, I've found this to be the best base to teach the correct prime movers of the pull up.
It even has carryover to the deadlift. Yes, this movement can even help your pulling power. By addressing lats and grip strength, it can be a great addition to the end of your deadlifing day. It puts very little strain on your joints, allows your body to decompress after ripping a heavy bar and still creates neural tension. Plus, it leads into the arching hang, which has the most carryover to your pulling power.
The Arching Hang
The Arching Hang is the most advanced variation of the hanging drills within this article, and one of the more advanced variations period. Though it's called an "arching," hang, the majority of the movement is created from the active retraction of the scapula and trying to point the sternum up. So, yes, there should be an arch, but it should not be the main component of the movement. Because of this, it's a more difficult movement to coach and many individuals will take a while to be able to progress to this.
http://youtu.be/C995b3KLXS4
Now before you biomechanists start swinging your goniometers at me, keep in mind that there really isn't that much load on the spine through this extension. In fact, because most of the active extension is occurring along the thoracic spine and since there is very little sheer force to the lower lumbar area, I would argue that this is less taxing on the lumbar spine then the multi-segmental extension test of the sfma. It's for that reason that I personally would only give this movement to individuals who get an FN on the MSE. Plus, just because it's an extension-based movement, doesn't mean it's bad. It means it's just more appropriate for some than others.
The benefits for this movement are fairly vast. Ido calls this skill, "straight-arm pulling strength" and it translates to a plethora of movements. It can help to improve your bench press mechanics by giving you a stronger base to push from. It can also help to keep your upperback tight during your heavy deadlifts. I know for me, heavy turkish get-ups felt like butter after throwing these in for just one wave.
So there they are. 3 basic hanging variations for you to add to your toolbox. Go give them a try with yourself or your clients and if you feel that you want more, I recommend taking a look at Ido's website: http://www.idoportal.com/
Part 5: Off-Season Periodization, cont.
The Triathlete Strength Training PrimerPart 5: Off-Season Periodization, cont.
Last week we dove into the process of setting up a periodized strength training program for the off-season of a triathlete. We introduced Joe Friel’s concept of utilizing both a General and a Specific Preparation Period, and discussed how we can adapt it to our strength training programs. Let’s dig a little deeper down the rabbit hole that is sport performance training.
The General Preparation Phase
Your last race of the season was 2-4 weeks ago… You did well, but missed your goal time by 3 minutes. You’re endurance was on point, but you just didn’t have the leg strength to cruise up the hills or keep a strong pace during the last couple of miles in the run. You know you can do better and after reading the past 4 parts of this series, you’re convinced taking an intelligent approach to strength and conditioning is what has been holding you back. It’s time to get serious this off-season.
Part 4 introduced the Gen. Prep. Period, and gave a framework on how to approach training during this time. We want to be focus on developing muscular strength and anaerobic power, preferably in muscle groups that we use while cycling, running, and swimming.
Swimming
- The unique aspect of the swim portion is the fact that you can use your arms to propel you through the water. A triathlete with a strong pull can easily navigate the swim while saving their legs for upcoming bike and run legs. Picking weighted pull-ups and row variations will help us build a strong shoulder girdle and upper back that is crucial to developing a strong freestyle. A pull-up motion is very similar to the pull in freestyle, so this exercise will have tons of carry-over to performance.
Cycling
- The forward lean during the saddle-position in cycling shifts most of the work to our hamstring and quadriceps. This prods us to pick knee-dominant lower body movements. You may be tempted to choose a Bulgarian Split Squat with a “short” stance to really nail the quads one at a time in order to be bike-specific, but remember, this is the General Preparation phase, and we really want to focus on building as much strength as possible. A better choice would be the high-bar back squat or the front squat. These options allow for heavier loads to be used, and therefore more gains in absolute strength, while also requiring a more up-right torso angle and less glute involvement.
Running
- The front squat and high-bar back squat would also be great choices to build leg strength specific to running. This improves the value of these exercises as we can use them in order to build leg strength for both sports. Running involves more hip extension then cycling does however, so we want to also pick a movement that will help us build strength in our hip extensors (hamstring and glutes). Both deadlifts and back-elevated glute bridges would serve well in this department. Once we reach the Special Preparation Period, we’ll want to move the bulk of our strength work towards single-leg variations in increase specificity and build more run-specific strength.
Below is a sample week of strength-focused training for the General Preparation Period of a triathlete.


The Special Preparation Phase
Next lets take a look at what a week of training would look like during the “Special Preparation Period.” Remember, we are starting to get more sport-specific during this phase and our conditioning focus will shift from increasing our anaerobic power to increasing our anaerobic capacity.


Wrapping Up
As we get closer and closer to our season, we want to shift our training focus away from developing general adaptations and become more methodical and specific. We need to start programming exercises that will have more direct carryover to our sport, in this case, swimming, biking, and running. The Special Prep week that is posted above would occur pretty early on in that phase. As we near the end of this phase, we would want to shift our conditioning focus to developing aerobic fitness and our strength work would be more focused on slow-twitch hypertrophy. This means utilizing methods such as HICT Step-Ups or the 2-0-2 Tempo Method for strength work.
Always remember, each and every training program you write should be tailored towards the individual athlete. The corrective drills in the example weeks above are specific to that particular individual’s goals and needs, so a program suited for you may look drastically different in terms of exercise selection.
As always, thanks for reading and be sure to post and questions or comments in the section below. Stay tuned for Part 6 next week and keep Tri-ing!!
The Triathlete Strength Training Primer
Part 1: An Intro to Periodization - Seeing the Bigger Picture Part 2: The Repetition Maximum Continuum Part 3: The Preparatory Period a.ka. the Off-Season Part 4: Off-Season Periodization Part 5: Off-Season Periodization, cont. Part 6: The First Transition Period Part 7: The First Transition Period, cont. Part 8: The Competition Period - In-Season Strength Training Part 9: In-Season Template Part 10: Post- Season Training
An Inside Look At The Pro Agility Test For Athletes
It’s football month here on the SAPT blogosphere and because testing is vital, we’ve decided to take a look at a few of the common tests that football players of all levels will likely face at combines or clinics. In this first installment we will take a look at the Pro Agility Shuttle run (AKA the 5-10-5) which is a foundational test used by coaches to evaluate a player’s ability to accelerate, decelerate, and change direction quickly and efficiently. In a game, football plays are constantly evolving and the ability of a player to stop, shift their weight, and accelerate in the opposite direction is very valuable.
The pro agility drill is a fairly simple test to administer because the only equipment needed is open space, cones, and a stop watch. The event is set up with three cones in a line, each separated by 5 yards. To execute this drill, the athlete will begin by straddling the middle cone with the other cones at their left and right. Timing starts on the athlete’s first movement from the center cone. Once started the athlete must sprint 5 yards to the right, sprint 10 yards to the farthest cone, and then sprint 5 yards through the center cone which represents the finish line. This test also has the option to be performed going to the left side. Click here to see video of the pro agility test performed at a very high speed
Probably the largest area that is ripe for improvement in this test is the person’s turning technique, which if sloppy, can cost valuable time along with possible injury. To be the most efficient with each turn, a runner must get low as they make the turn in order to maintain balance and slow down without toppling over. This position also allows the person to keep their center of gravity atop their legs which will be used to propel them to the next cone. An easy scenario to envision this would be to imagine a tractor trailer attempting to make a high speed turn and then, compare that to a high end sports car like a Lamborghini making that same turn at a high rate of speed. Barring any bad driving skills the sports car with its lower center of gravity will have more success in these turns. Would you rather be the big rig or the Lambo?
Another area where time can easily be lost is just shy of the finish line where some testers will try to finish with 3 or 4 really large steps as opposed to keeping their current stride pattern and slowing after the finish line. Correcting this is typically what is asked of an athlete when they are told to “run through the finish line.” Shown below is chart showing the normative scores for NCAA D1 athletes from a variety of sports. Check back next week as we discuss the broad jump and ways to unlock a few extra inches.
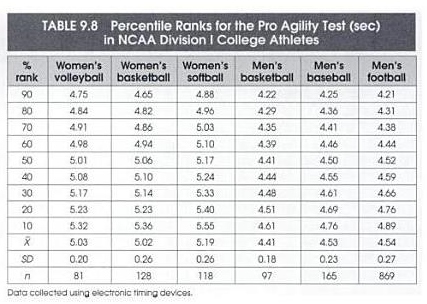
Table: Hoffman, Jay. Norms for Fitness, Performance, and Health. Champaign, IL: Human Kinetics, 2006. Print.


