Common Beginner Mistakes - Part 2
Aaaaand we're back! Today marks the 2nd post in a truly unforgettable series of blog posts. Last week, we discussed a few mistakes that beginners often make, and this week we will be dissecting a few more! But first, let's watch some awesome videos of SAPT athletes and coaches moving some heavy weight.
Mistake #4: Not Having a Goal in Mind
You should always have an end goal in mind when it comes to your training. That goal should be specific to you, and should guide the exercises that you choose, the frequency with which you train, and the importance that training has in your life. Your goal may be to run a marathon, your friend's goal may be to squat 500 pounds, while your mom's goal is simply to stay active and move around more often. These are all very valid reasons to train, and will require vastly different approaches. Your workouts will need to include large amounts of running, while your friend will need to spend much, much more time inside of a squat rack. Your mom, well she just need to get off the couch and exercise a little more often, whatever that means to her.
Not only is it hard to stay motivated when you don't have a target to shoot for, it's difficult to make progress, and it's even harder to measure your progress. You need to know what you want to achieve in order to achieve it, right? At the end of the day, the reason that we train doesn't matter, but it's important to have a reason. Once you understand and are comfortable with your motivation for training, then you can pick a program that will help you achieve that goal. If training simply isn't a priority in your life, then own that decision, and live with it. This just means that your "training plan" will be less frequent than someone who prioritizes physical activity and has a fitness goal that they want to achieve.
Mistake #5: Using an Inappropriate Program
Now that you understand your goal, you need to pick a program that is geared towards achieve it. It makes no sense to jump on Johnnie Walker's Maximal Mass Building Program if your goal is to run a sub 2:30 marathon. That program in no way, shape, or form is going to prepare you to run 26 miles at a 5:45/mile pace, no matter how much effort you put into it.
Specificity is one of the key training principles that dictates physiological adaptation. Specificity simply means that your body will adapt to whatever stimulus you apply to it, whether that be the stimulus of sitting on the couch eating potato chips or squatting with a heavy load on your back. In the first case, you will get very good at eating potato chips and utilizing very low amounts of energy. The second individual will in turn become better and better at squatting with a heavy load. Due to this reality, your training program needs to be specific to your goals. It needs to be structured in a way that fosters intelligent and consistent progression in whatever area of fitness/health that you are trying to achieve. Simply put, if your goal is to run long distances, you need to spend time running long distances. If your goal is to jump incredibly high, you need to spend time jumping and increasing your rate of force production.
Mistake #6: Having Too Many Goals!
Building off of all of this, it's counterproductive to focus on a ton of goals at one time. I find myself making this mistake far too often for my liking. I want to be strong. I want to be fast. I want to have the ability to run 20 miles whenever I want. These goals are all well and good, and may very well be achievable, but it's incredibly difficult (read: almost impossible) to try and achieve all of these things at once. That's not to say don't shoot for the stars. You just need to realize that Rome wasn't built in one day. Instead, it took a series of events, a ton of effort, and the blood, sweat, and tears of thousands of men to create arguably the most formidable and influential empire ever created.
Now, I realize that you are a person, not an empire. What this means in terms of your athletic and fitness goal, is that you need to periodize your training. Develop training blocks that are focused on building maximal strength, then blocks concentrated on improving your power production, then blocks where you're concentrating on increasing your aerobic endurance, not necessarily in that order. It's much easier to make progress this way, and may save you from spending month after month spinning your wheels and making no progress at all. ____________________________________________________
Finally, we'll wrap up this segment with a couple of quotes on the importance of goal setting:
"If you don't know where you're going, you'll end up someplace else." - Yogi Berra
"When it is obvious that the goals cannot be reached, don't adjust the goals, adjust the action steps." - Confuscius
"Give me a stock clerk with a goal and I'll give you a man who will make history. Give me a man with no goals, and I'll give you a stock clerk." - J.C. Penney
Get A Grip
The quest for added grip strength is a never ending battle in life or sports and whether you are looking to catch more balls in a game or just have a handshake that stands out from the crowd training this quality should be considered in your program. In today’s post we will discuss two of my favorite exercises for athletes looking for added gripping strength.
Thick Bar Pull Ups
If you find yourself blasting through sets of pull ups these days try adding a Fat Gripz like tool or a thick bar as a way to concurrently develop the upper back and forearm muscles. Don’t be surprised if you don’t accomplish your usual amount of reps on the first couple times but you will over time build up and feel like a monster when you get back to the standard pull up bar. If you a not good If you can’t do about 5 pull ups on a standard pull up bar I would recommend starting with the towel grip inverted row discussed below.
Towel Grip Inverted Row
I like this exercise because of its simplicity and versatility. The exercise can be progressed and regressed in numerous ways by rather lowering or raising the bar. Shortening or lengthening the lever arm of this exercise by having the athlete bend or straighten their legs can also be done to adjust the difficulty. Along with working the grip I recommend trying to pull the towel apart as you rise for an added challenge.
https://youtu.be/H-8dzDGEEJ4
If you are up for an increased challenge you can perform these with your feet elevated as Steve does in the video. Give these two exercises a try and I'm sure they will help stop any balls that come near your baseball glove.
Improve Performance By Doing Less
Some days it seems that gravity is stronger than others. You know, the weights feel heavier, you feel sluggish, and it's an effort to get yourself through your warm-up.
Or maybe you're in the middle of the season and you have a rigorous game schedule; being tired and worn-out is not an option nor is being sore. You still want to train but what can you do in the gym that's NOT going to set you back?
Dan John calls them "punch the clock" workouts. Get in, hit 1-2 main movements, maybe an accessory exercise or two and get out.
For example:
Deadlift 2x4 or 3x3
Step Back Lunge 2x8/side
Rows 2x8
Pushups 2x10
Or:
Squat 2x5
Bench Press 2x5
Chin Ups 2x5
Step Ups 2x8/side
Swings 2x20
It doesn't seem like much, but it's enough to hit the major muscle groups, train the nervous system without frying it (which is a crucial point and a future blog post), and maintain strength levels. Many people, my past self included, think that if there's not an increase in weight or you're not limping out of the gym, it wasn't a successful work out. Totally not true.
If you're feeling not-so-hot, performing a tough workout is really only going to hurt you more than help. If you're in-season, your main job with training is to maintain strength and stay injury-free. Thus, the punch-the-clock workouts fit the bill!
It's the best of both worlds: you can workout AND you're not thrashed. Humans, unfortunately or not, have a finite amount of energy. If the bulk of that capacity is spent recovering from a grueling workout, there's not much left for anything else (such as performing in practice/games or bringing in all your groceries in one go).
Walking out of the gym feeling better than when you walked in will provide your body the time and the energy to recover.
Give it a try the next time you're feeling run-down or you have a big game coming up. Your body will thank you.
12 Core Exercises to Make You Harder to Kill and Easier to Look At
“Core” training is always a popular topic in the fitness field, but it’s usually as misunderstood as Bill Cosby after a root canal (or in general). Popular fitness divas, whose names must not be said, like to show you the best new crunch variation to hit your “Abz” or your “Luv Handles” and try to pawn it off as core training. Not to burst your bubble, but these aren’t real core exercises. These are usually just isolation exercises that happen to target a muscle or two of the torso.
“But my abs are part of my core”
True they can be considered part of your core, but they aren’t necessarily your core. Your core is a unit of muscles that work together to stabilize parts of your body during movement. Truth be told, it is very hard to define what the core actually is or consists of. Some people define it as, “from your head to your toes and everything in between.” Some people say it’s everything that attaches your pelvis to your rib cage. Coach Charlie had a great post a few weeks ago about how almost any exercise can work your core, but he points out that there’s a difference between working and targeting. In order for us to be on the same page on targeting the core, I feel that I should share my definition.
I define the core as the group of muscles that create a stable base for movement, allowing your limbs to accelerate, decelerate and transmit force through your body or an implement. In this way, the core becomes very relative to the activity or movement. It allows for an easier understanding of how the stabilizing area should be trained for maximal transfer to specific activities. Put simply, the muscles that define your core depend on the movement you're doing.
For Example: Watch above, you’ll notice the actual force generation comes from the hips and is transferred to the bat. You’ll also notice that the torso itself stays locked down as it’s rotated by the hips until his follow-through. The torso stays stable so that the force from the hips can be transferred effectively into the bat. This is the rotary stability (ability to stabilize rotation) function of the core. And for this movement, I’d broadly define the core muscles as the muscles that make the rotary stability for this movement possible: hip extensors/stabilizers, oblique slings, rectus abdominis, rotares/multifidi, scapular stabilizers and so on. By training these muscles to be active as a unit in rotary stability type movements, I should have the most carryover to his swing and a very effective core exercise.
Trying to work these muscles in isolated groupings would be akin to doing team building exercises by yourself. Isolation work has it’s time and place, but it rarely yields the results that most of us strive for. It misplaces much of your effort into one element, rewarding you with a false sense of satisfaction because you can, “feel the burn.” Just because you feel that muscle burning, does not mean you’re going to receive your desired training adaptation.
If you’re trying to look good naked, and you’re limiting your training stress to just one isolated muscle at a time, you might as well be doing HIIT with a shake weight. You need to put the stress over a large quantity of tissue to help elicit a much more potent metabolic stressor. The more fibers that are put under tension, the more calories that are burned and hormones that are released to elicit a training response. There's no better way to do this than through compound core movements.
If you’re trying to become harder to kill, training muscles in isolation has little carryover to movement, ESPECIALLY with core work. Your muscles don’t work in isolation when they are stabilizing your spine, allowing you to run, throw, punch, jump, kick or swing that bat. You need to focus on the sequencing of these muscles and their ability to stabilize and transmit forces effectively. This will allow you to run faster, punch harder, and protect that lower back better.
The main functions of the core can be grossly broken down into rotary stability, anti-extension and anti-flexion (lateral and linear) exercises as these strategies are usually how the muscles fight for stability. I have found that using my definition of the core, in cohesion with these functions, is extremely useful for being objective about what will carry over best for my athletes. It helps me pick the best variation of movement for particular sports and positions. I have also found that the variations that fit this bill, seem to be the most challenging and metabolically demanding exercises to hit your mid section. But, I’ll let you be the judge, here are my 12 favorites sorted from hardest to easiest and by category,
Anti Extension:
Dragon Flags
https://www.youtube.com/watch?v=-Q7l07Pu0HA
My training partner once slapped me in the gut after I did a set of these, his hand is still in a cast. This is probably the most advanced and grueling anti-extension exercise I know other than the Front Lever series. Dragon flags are a great way to include eccentric loading (lengthening phase) of the anterior chain. Just make sure to do them nice and slooooow, while keeping your body straight from the bottoms of your ribs to your toes. Admittedly, this one mainly focuses on the abz and may look like a crunch's foreign cousin, but it's a popular variation for gymnastic style training and strengthens your anterior core very quickly.
Turtle Rolls
http://www.youtube.com/watch?v=E4y3dQSBCEA
Warning: Side effects of turtle rolling may include muscle soreness, strength gains, slight gas, shortness of breath and a sick feeling of satisfaction. This is another great anti-extension exercise that focuses on the anterior chain as a whole unit. Though the limbs do not move, there is still a transmission of force as your partner pulls you up and down. Maintaining this position at a slow tempo is extremely challenging, but can have huge mojo for any grapplers in the crowd.
Bodysaw Planks
http://www.youtube.com/watch?v=RE5xLOZqfMQ
Do you grow tired of normal planks? If you have sliders or a suspension trainer, give these babies a whirl. This is an anti-extension exercise that moves the vector of strain throughout the range of motion, causing different fibers of the anterior core to be stressed more than they would in other anti-extension exercises.
Rotary Stability
Landmine Rotations
http://www.youtube.com/watch?v=upUKXfawkyo
This is a more advanced, standing, rotary stability exercise that will force you to create tension from the ground up. As you can tell from our intern, Mike, the goal is to keep your pelvis square with your hips and not allow any rotation from the spine as you move the barbell from side to side. A little weight can go a long way if you have longer limbs, so really focus on staying tight and increasing it slowly. I’m talking, “grind a pebble into a pearl with you butt cheeks,” tight.
Hard Rolls
http://www.youtube.com/watch?v=8jbQyoeO47k
There has never been a more straightforward name for an exercise. These are freaking hard when you first try them. You want to squeeze your opposite elbow and knee together while trying to touch the walls of the room with the other limbs. You’ll then pick your head up and look to the direction that you’re rolling. NO KICKING OR PUSHING OFF, USE ONLY YOUR INTERNAL TENSION FROM THE ELBOW AND KNEE! It helps to squeeze a basketball or something in between your elbow and knee when first starting out. This is what you see our athlete, Red, doing above. The decreased ROM will make it much easier to recruit the desired fibers. Once you can master this, dump the ball and go elbow-to-knee.
Wide Stance Pallof Press
http://www.youtube.com/watch?v=bA7hdjs-Tno
This one will help get those buns of steel while still hitting your abz and obliques. There are many different variations of the pallof exercise, I just really happen to like the wide-stance for limiting adductor recruitment (they like to help people cheat). Once it becomes easy, you can start moving on to the chop and lift version to help you kick more butt with your Bo staff.
Deadbug with Stability Ball Squeeze
http://www.youtube.com/watch?v=eakh9HKEtvQ
This exercise can be deceivingly brutal due to the constant tension placed into the ball. You’ll quickly feel it working and learn how to recruit the right fibers to resist rotary forces and lumbar extension. It’s a great place to begin as you progress to the harder variations listed above.
Anti-Flexion (Mainly laterally)
Overhead Pallof Press
https://www.youtube.com/watch?v=YWjM-V7PstA
Rotary stability at the bottom with some nice lateral flexion-resistance at the top. Though you can load up the fireman carry way more, I would say this one is more difficult and more directly challenges the lateral system when paused at the top. People will literally go weak in the knees and start hiking through the hip on this, so be tight, stay stable, square and reach for the stars!... Then hold that reach for infinity!
Fireman Carry
http://www.youtube.com/watch?v=XFZe5AgFaeg
Put something heavy on one shoulder and walk. It’s simple and a great way to resist lateral flexion while building up the muscles of your side. There’s a reason Firemen are strong.
2 Point Single Arm Bent-Over Row
http://www.youtube.com/watch?v=kY3H8RMrVlE
This is a great anti-forward-flexion exercise that also has a hint of rotary stability. It’s surprising the amount you will feel this in your anterior core when breathing correctly, despite being in a hinge dominant position. You’ll notice this is the only anti-forward-flexion exercise that I’ve really listed. I find that the back extension pattern is already worked enough in main movements like deadlift and squat variations and rarely needs to be targeted with extra work.
Suitcase Carry
http://www.youtube.com/watch?v=cNvc6_jieaw
There’s no exercise more applied to everyday life than picking up something heavy and carrying it. Doing one side at a time will help you to resist flexing to one side or falling over. Though this one is simpler than the others, don’t underestimate its usefulness in a training program.
My Favorite All Around:
Renegade Row
http://www.youtube.com/watch?v=Q6LPtLxMuv8
This hits a little bit of each of the core functions. I consider these much more of a core exercise than an actual row. The limiting factor is never the rowing strength. It’s always the ability to stabilize on the 3 points of contact, so don’t be an egomaniac and use typical rowing weights. Also, for the love of all that is Holy, please don’t look like a hungry cow when you perform them. I see people attempt them all the time, letting their hips sag way too low while their head nears the ground, like they’re about to graze on some grass. It makes me want to bang my head against the wall until that form makes sense. Keep the hips level with the shoulders and square with the ground as you row. It’s that simple.
Try throwing a few of these variations into your next routine. Remember to progress yourself into them as many are harder than they look. After a few weeks, you'll be punching sharks and turning heads like never before!
Common Beginner Mistakes - Part 1
Today is a great day. The sun is shining, the birds are chirping, it finally looks like we've gotten past the disgusting winter we've had to endure over the past few months. On top of that, I get to deadlift today! Life is good. With that, here's a couple of videos of some of our athletes picking up a couple hundred pounds. No big deal.
Now, on to the blog post at hand. Today will be the beginning of a series of post, all centered around some common mistakes that beginner lifters tend to make. I've fallen for a few of these myself. Life, and lifting, is all about making mistakes, learning from them, and coming back stronger and better than before. Making mistakes is completely normal, and we all make them at some point in our lives. What you should be focused on is what you can take away from each mistake that you make, and how you can use that experience to turn yourself into a better person, and a better lifter in this case. Let's get started...
Mistake #1: Body-Part Split Training
Most beginner lifters, myself included, fall into that "body-building" mindset when they first start out. They read an article on Bodybuilding.com, which oftentimes splits up workouts based on body-parts, and adopt that program as their own because the guy who wrote it sports 16-in biceps and chisel abs. Monday becomes chest day, Tuesday gets assigned back, Wednesday shoulders, Thursday legs, and Friday is arm day. There's a number of issues with this methodology.
Taking the above example week, let's say we have a lifter performing bench press for Monday's main lift, OH Press for Wednesdays main lift, and some triceps extensions/skullcrushers on Friday's arm day. Right there, you're hitting triceps 3 times a week, with probably about at least 75 reps of total volume, on only those 3 exercises. I haven't even really dug into the accessory work you'll be performing. On top of that, only 1 day devoted to legs is simply not enough. Why are we targeting a relatively small muscle, such as the triceps, 3x/week, while only devoting 1 day a week to our back and lower body musculature. It's inefficient, will almost certainly lead to muscle imbalances, and it's simply a poor way to go about structuring a training week.
Here at SAPT, we prefer to program movements. The squat, hinge, push, pull, and loaded carry/crawl are all critical human movements that everyone needs to be able to perform properly. Picking a heavy box up off the ground? You need to know how to hinge at the hips, not the spine, and lift the box with proper form. Do you have a small child who you're constantly holding while performing daily activities? We'll teach you how to organize your spine in order to properly disperse that weight. The SA rack squat is a wonderful training exercise that teaches you the proper way to squat down and pick something up off the floor with a child in your arms.
Mistake #2: Using 3x10... FOR EVERYTHING!
Thankfully, this mistake pops up less often than it used to. Occasionally, we'll get the client who has weight lifting experience, but they've been using the same 3x10 set/rep scheme for every exercise in their program. Now, I love a client with prior training experience, but they don't realize how much they're limiting themselves. 3x10 is a perfectly viable rep scheme, but there's so much more out there and these people are missing out on targeting the other muscular attributes. As you can see by the below diagram, the're focusing solely on hypertrophy with very little regard for strength, power, and muscular endurance. When you periodize a program with a certain goal in mind, you focus on all their properties to varying degrees and they work synergistically to increase performance no matter your goal.

Coach Kelsey wrote a fantastic piece on why 3x10 is not the king of rep schemes. Also, check out my article on the repetition maximum continuum, which dives into why you should use a certain rep scheme over another, and will give you a better understanding when deciding what to use for a given exercise or cycle.
Mistake #3: Thinking that the only way to progress is to add more weight to the bar.
This is a pretty common mistake, and it tends to creep up on you. Adding more weight to the bar should be the end goal of almost any programs, but there are different ways to go about it. At the end of the day, your programs should revolve around increasing the volume (sets x reps x weight) of a particular lift. As you can see by that equation, you can manipulate the number of sets, the number of reps, or the weight. I'll go ahead and list a few other methods below.
- Increasing the number of sets - Increasing the number of reps - Slowing down the eccentric portion of a lift - Adding a pause at the bottom of a lift - Slowing down the concentric portion of a lift - Moving the bar faster each week - Performing the same amount of work in a shorter period of time - Increasing range of motion - Reducing the stability (Don't break out the bosu ball... this means narrowing your grip)
These are all perfectly viable methods to gain strength and increase volume. Let's take a look at a 4 week cycle focused on the squat and demonstrate a few of these methods.
Increasing the weight each week. - Wk 1: 4x4 w/ 200#, Wk 2: 4x4 w/ 210#, Wk 3: 4x4 w/ 220#, Wk 4: 4x4 w/ 230#
Increasing the number of reps each week: - Wk 1: 4x4 w/ 200#, Wk 2: 4x5 w/ 200#, Wk 3: 4x6 w/ 200#, Wk 4: 4x7 w/ 200#
Performing the same amount of work in a shorter period of time: - Wk 1: 4x4 w/ 200#, 3 min rest b/t sets, Wk 2: 4x4 w/ 200#, 2.5 min rest b/t sets, Wk 3: 4x4 w/ 200#, 2 min rest b/t sets, Wk 4: 4x4 w/ 200#, 1.5 min rest b/t sets
Increasing the range of motion each week: - Wk 1: 4x4 w/ 200# stopping well above parallel, Wk 2: 4x4 w/ 200# stopping slightly above parallel, Wk 3: 4x4 w/ 200# hitting parallel, Wk 4: 4x4 w/ 200# dropping below parallel.
As you can see, there's obviously more than 1 way to get stronger. I don't want to dive into why you use certain methods over others in this post, as this post would get extremely long and detailed. I'll save those ideas for a blog post in the future, and if you have a particular question, post it below in the comments section and I'll respond as soon as I can.
That's all for today, folks.
These are just three of the mistakes that beginners may make. I can say that I've personally made every single one of these at some point in my lifting career, and I'm sure I'll make more as I go along. The key is to recognize when something isn't working, find out why, and try and improve during your next cycle. I'll be back next week with a few others, but until then, make sure you check out the rest of the articles on the SAPT blog. We've been writing for almost 5 years, we're currently posting fresh articles 5 days a week. There's a ton we can teach out, you just need to be proactive and utilize the search feature!
Are Your Hip Flexors Holding You Back?
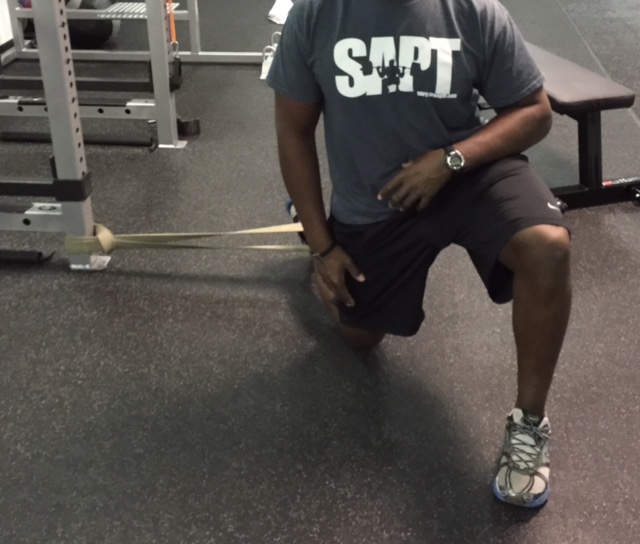
Today’s post will be take a quick look at the hip flexor group and offer a small tweak to your typical bodily maintenance routine to help open up and add length to these often tacked down tissues. Because many of us spend a large amount of our time sitting either at a desk, in the car, or on the sofa these muscles can shorten and overtime cause discomfort. This pain or discomfort often radiates in the low back as the pelvis is forced to tilt forward causing undo stress to the lumbar spine.


Typically to stretch and lengthen these muscles you will see people perform and exercise like the one shown below. Unfortunately many individuals don’t get the desired effect of this movement because they simply extend at their lumbar spine to find the range of motion (ROM). To get the greatest results from this stretch it is important to brace the spine into a neutral position and maintain this throughout the entire range of motion. The photo below on the left shows the person demonstrating the movement while searching for extra ROM with the lumbar spine while the photo on the right shows the person engaging their glutes while maintaining a tall and neutral spine.
To add a quick twist to this common hip flexor mobilization try adding a resistance band to set the hip in just a tad bit of internal rotation like the photos below show. Because these muscles don’t lie in a strictly vertical pattern adding this rotation gives just the proper amount of additional pull many of our muscles need. Don’t be surprised if you initially have to shorten your ROM a bit when preforming this stretch with the band. Hopefully this quick tutorial has brought life and length to your hips and reduced some low back pain at the same time. Check back soon for another post.