5 Core Exercises to Spice Up Your Training
This is a piece I had written last year that was lost with the transition from our old website to the new one. As our readership has grown, I thought this may be of interest to those of you who hadn't seen it yet. Ah yes, with the holidays approaching and everyone merrily chomping away at holiday parties, people will quickly begin thinking about "their abs" as the we round the New Year and begin to prep for Summer. While one can definitely not out-train a crappy diet, these will be sure to spice up your core training.
Most people tend to pay attention whenever I say the word "Core," so I' thought this would be of interest to many reading this. While this is by no means an exhaustive list, (there are many different exercises/variations I'll use depending on the specific scenario), I thought it would be useful to see some "unconventional" exercises that are actually extremely effective.
With the exception of a few of the combat athletes and military folk we train at SAPT, I rarely program sit-up variations for anyone training under our roof. So, what do I normally utilize? Movements that challenge stability of the torso.
If your motive in doing core work is strictly driven by aesthetics, these will help you on your quest. If you're an athlete seeking a stronger core for performance, these will, quite effectively, get the job done more so than the endless crunches and situps you're doing. Not only are these great for those who "have to feel their abs working" to consider something a good ab exercise, but they have remarkable, (dare I say) functional implications as well. Without further ado, here are 5 core exercises guaranteed to light those abdominals on fire.
(Note: The beauty of #1 and #2 is they can even be performed at home)
1. Bodysaw Plank
For those of you who have already investigated training beyond the muscle mags, you know this one isn't anything new under the sun. However, for those of you who haven't tried this, be ready to have your pants blown off.
Once someone has mastered the standard plank, it's time to progress. Rather than simply add time to the equation (ex. making someone hold a plank for two minutes, which does nothing other than cause them to die of boredom), I prefer to make the exercise more challenging by one of two means:
- Loading the exercise (placing a weight on the back)
- Adding a dynamic component
The bodysaw progresses the plank by adding a dynamic element to the standard plank position. This exercise utilizes the "anti-extension" function of our core. In other words, it trains the trunk to resist hyperextension (excessive arching) of the low back. There are 3 variations in the video below, ordered easiest --> most difficult (although some may argue my ordering of #2 and #3). The first one, with the slideboard, I originally saw taught by Mike Boyle. The second - executed by dragging plates along the ground - I actually picked up from Chris, who figured it out when trying to find a way to have the Mason baseball guys do the exercise without use of a slideboard. The third variation is completed by suspending your feet in a TRX (or any suspension system). The TRX variation is quite difficult as you have to fight the "pendulum effect" of the straps wanting to swing you back to the starting point.
I also like it because it adds a nice intermediate stage between planks and rollouts. Or, if you can already do rollouts, it's a way to train the anti-extension core function without quite as much delayed-onset muscle soreness.
**If doing the bodysaw plank at home, all you need is to do is simply place two hand towels on a tiled (probably kitchen) floor and go from there**
2. "Move the Mountain" Plank
Similar to the Bodysaw Plank, this variation adds a dynamic element to the standard plank exercise. You know have to stabilize your trunk as your arms move. You can widen the base of support (your feet) to make the exercise easier. The key here is to have minimal shifting of the torso and/or hips as you move the plates back and forth (I am even shifting my hips a bit too much as I demonstrate this one).
And be careful: this exercise becomes tiring deceptively fast. Hope you enjoy!
**If you want to move mountains at home, you don't necessary need to use weight plates. You could use tennis balls, books, playing cards, your cat, you name it**
3. Offset-Loaded Deadlift (or "shovel lift")
This is a fantastic exercise I picked up from a guy named Steven Morris. You simply load one end of a barbell (I recommend a trap bar to begin with), then pick it up and stand perfectly straight. Trust me: you won't need to put much weight on the end of the bar. You can do this for reps (I'd keep it 6 and below) or hold it for time. Then do the same thing facing the other way. If you don't know where your obliques are prior to performing this exercise, I guarantee you'll figure it out as soon as you try this! It is absolutely brutal, especially with the barbell.
Pointers: as you begin the lift, think about "pushing down" with the hand furthest from the loaded end (like your shoveling dirt) as you initially pull the barbell off the ground. Also, the further you are from the loaded end, the more difficult the exercise will become. This is very tough to get used to at first, but with some practice, you'll get it! Just make sure you're not cheating by shifting your hips toward or away from the plate (have a partner watch to keep you in check).
4. Feet-Suspended Sandbag Walkups
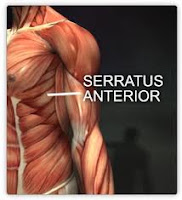
This one I actually made up, when I was coaching a guy who possessed a strong abdomen but needed to improve his shoulder health. I love this exercise, as it's a great "bang for your buck" movement. It trains, simultaneously, core stability and scapular function. More specifically (with regards to shoulder health) it strengthens the serratus anterior, a muscle that is extremely important in aiding proper upward rotation of the scapula (shoulder blade), which has critical implications for overhead athletes (think baseball and tennis players, swimmers, certain track athletes, etc.).
Not to get too sidetracked, but it's easy to - when training overhead athletes - tend to focus exclusively on the rotator cuff when looking to improve shoulder health/function. While this is definitely important, an often over-looked "piece of the puzzle" is the scapula. If the scapula doesn't track properly when the arm moves into an overhead position, it compromises health of the shoulder joint. Quoting physical therapist and strength coach, Bill Hartman: "Any altered scapular muscle function, weakness, or inability to position the scapula and then stabilize it results in a direct affect on the shoulder joint with dire consequences. These include glenohumeral instability leading to arthritis, impingement, rotator cuff tendonitis/tendinosis, rotator cuff tears, labrum injuries, and so on."
You will immediately find that you have to remain very tight during this, or your legs will very quickly begin to sway side to side in the straps. Think "glutes tight, abs tight" as you walk up and down the sandbag (you could easily use an aerobics step, thick book, etc. in place of a sandbag).
Anyway,one has to possess quite a strong trunk in order to do this, so I wouldn't recommend throwing it to a rehab client unless you're sure they're physically ready to do it.
If you don't have access to suspension straps, no sweat. Simply perform these with your feet on the ground, or even elevate the feet (ex. onto a stable step or bench), which increases serratus involvement.
When considering training economy, this exercise is PHENOMENAL for killing two birds with one stone, especially when working with an athlete who needs special consideration with regards to his or her shoulder health. For those simply looking to spice up their training with something different, this will fit the bill, too.
5. Chaos Training: Supine Bracing with Partner Disruptions
I honestly don't know how to name this exercise in a concise fashion. I do know that it originally came from Diesel Crew, so props to them for coming up with a devilish exercise. This exercise isn't really practical for most because of equipment limitations (although there are creative ways to still get the same effect), and it's an illogical exercise for beginners, but I'd like to share it nonetheless.
Simply lock your feet in under a stable surface, lean back, and BRACE. Hold one end of a rope, and have a partner hold the other end. Be sure to have your arms extended, as this increases the lever arm that your core has to work through - essentially making the exercise more difficult. As you can see in the video, Kelsey just pulls that rope in an unpredictable fashion: up, down, left right, away from me, etc. If you never knew your core was designed for dynamic stabilization, you will know shortly into this exercise as it will feel like your abs are being torn in half.
PUPP: The Most Simple (Yet Difficult) Exercise You're Not Doing
Want a surefire yet simple method of making your current workout more challenging, while simultaneously improving your core stability and shoulder endurance? Instead of walking around (or checking your cell phone) during your rest period, get into the top of a pushup position, and hold it right there while keeping your body stiff as a board. Do this for 30 seconds, and then return to your next exercise. Dan John calls this a “PUPP” (Push-Up Position Plank).
Give it a shot for a few rounds. You'll quickly begin to feel your abdominals, chest, and shoulders burning like crazy.
A few months ago I put together a video of enough anti-extension core exercises to last you a lifetime:
However, most people (and I'm no exception), could really just use PUPP for a loooongg time and continue to garner the benefits from it. After a while, you can elevate the feet, place your feet in suspension straps, or place a weight on your back. The progressions are nearly endless, and believe me when I say you don't need to progress too quickly.
 Above is a picture of Kelsey and Carson both performing a PUPP. Kelsey is using the method I described above, and Carson is doing it as an actual exercise in his training program, holding it for 60 seconds (when you have your feet in TRX straps, you won’t want to do it more than a few times).
Note that this exercise is only as challenging as you make it. Sure, most people can hold themselves up for a minute. But few can do it correctly, and thus reap the full benefit of it. Your glutes should be squeezed so tight that a walnut would be cracked between them. Your stomach should be maximally braced to the point that if I were to suddenly punch you in the gut, you wouldn’t feel it. No sagging of the low back, and you should be able to draw a perfectly straight line from the top of your head through your heels (no reaching forward, or looking up, with the head).
Try it. That shaking throughout your torso occurring at the halfway point is your body telling you that you’re not too advanced for planks.
Other Applications Moving along a similar thread, I’ve found that the PUPP also makes an excellent exercise for those struggling to either:
a. Do their first perfect pushup b. Improve their max number of bodyweight pushups (ex. as in a military challenge)
A lot of people go up in smoke when they attempt the pushup because their core musculature fails in its role as a stabilizer, as opposed to the primary movers (ex. chest, shoulders, and and triceps) failing. By the way, by “core” I’m referring to the 30+ muscles that attach to your pelvis, not just your abs! All of these muscles must learn to work as a unit, and the pushup position hold aids you in your quest to achieve this.
So get to work, and enjoy some newfound stability and strength-endurance in your upper body and lumbopelvic regions.
-Stevo
SAPT's Top 5 Exercises for New Moms
Happy Birthday Arabella!
I’ve always heard a lot about how hard it is for a new mom to find time to exercise. But, I’m now living it and I’m here to tell you it’s a bunch of hooey. Regardless of time, here are my top 5 best exercises that ALL new moms are already doing in some form or fashion. So why not make them an actual workout?… you’re doing them anyway!
My Top 5 Exercises for New Moms
- Baby Goblet Squat (Ass to Grass) - I can’t even begin to guess the number of deep squats I’ve done over the last 12 months. This is a legit exercise that allows mom to work on ankle, hip, and thoracic mobility along with quad, hamstring, glute, CORE musculature, and upper back strengthening. Start with just a couple sets of 3-5 reps and work up 10, 15, or even more reps.
- Stairs – This one’s easy and obvious. That sweet little baby wants to be held all the time and mom wants to finish losing those last few LB’s, so why not take advantage of the situation and do a little low impact cardio on your household’s stair case?
- Baby Clean and Press – This one is fun for mom and baby and, as is common for all these exercises, occurs naturally. Hold the baby about mid-torso level and hoist her up overhead. This will work on a touch of posterior chain power development and get mom some much needed upper body strength and stability! Stick with just a handful of reps (3-6) for multiple sets.
- Baby Gate Hip Mobility – If the Ass to Grass Baby Goblet Squats aren’t getting it done for the hip mobility, then inevitably mom will have the benefit of crossing over a baby gate about 3 zillion times a day. I started enjoying improved hip mobility around 7 months when Arabella began crawling and suffered two cracked toenails to prove my hip mobility could, in fact, use improvement. You can’t do to many of these, just try to keep good form (chest up, lift you knee, no hip drop) and enjoy the benefits!
- Baby Carrier Household Chores – Talk about great for improving general physical preparedness (GPP)! Last summer Arabella and I spent many hours together with her strapped on my chest in the baby carrier while I did everything from dishes to laundry to vacuuming. You quickly learn if your core is strong or not. This one crushes the lower and upper back, in particular, but is excellent for rebuilding stabilization strength in mom’s midsection.
Here are a few more advanced exercises you can give a try if you’re feeling “froggy.” I should note that my baby is not old enough to reliably stay on my back for the plank or push-ups, maybe in a few more months!
- 1-Arm Baby Cradle Carry + Full Laundry Basket Carry – An advanced technique for the busy mom. Grab baby in one arm and full laundry basket in the opposite arm. This exercise is very similar to some of the Mis-loaded bracing/farmer’s walk variations we do at SAPT. Great for improving core strength and stability!
- Baby Plank – Use baby’s body weight to increase the difficulty of a standard prone plank.
- Baby Pushups – Again, using baby’s body weight to increase the difficulty of a push-up. Although we haven’t tried these yet, I’m pretty sure she’ll be having a pretty good time sitting on my back while “the ride” takes her up and down!
I’ll admit when I got the idea for this post it was designed to be “tongue in cheek,” but as I got to thinking about all the ways having a baby challenges new moms physically, I realized that these are some pretty darn good exercises. Not only are they fun, but they are also very productive if you just focus on doing a few things correctly and accumulating a bit of volume.
So to sum up, today is Arabella’s first birthday and I find myself exceptionally happy. I’m completely in love with my daughter and have found that my husband and I truly work well together. I’ve managed to lose all my “baby weight” and even a few more pounds to boot. And the icing on the cake? I’m working less and earning more.
If you know any new moms who might find this post motivational or inspirational, please forward it to them and don’t forget we offer comprehensive distance coaching to help moms all over the country lose those last few baby LB’s!
The Perfect Pushup: Diagnosing the Pushup
Pushups are probably looked down upon so often because they're the first exercise most people learned in grade school during gym class. They're often viewed as elementary and "too easy" for most, likely because they're not seen as sexy as another popular exercise: the bench press.
The funny thing is, the pushup seems to be one of the most frequently butchered exercises I see on a regular basis. When I walk around most gyms , I cringe at the form I see people using it's honestly very difficult to stop myself from running around like a Form Nazi in order to keep people from injuring themselves.
Today, I'm going to give the most common technique flaws I see take place during the everyday pushup, and some corrections on how to get much more "bang for your buck" from this exercise. The pushup is an AWESOME tool in your training arsenal, but the problem is it frequently isn't executed in a manner that will give people the results they're seeking.
I'll be giving video demonstrations of how NOT to do them, and then a video of what a real, perfect pushup looks like. All this on top of showing a few other pushup variations you can toy with once you master the perfect pushup. Aren't I a nice guy? You can buy me a cup of coffee later, no worries.
Anyway, let's get the geeky side of things out of the way. Here's where I'll be explaining the "why" behind pushups.
Why Perform Pushups?
* They teach you to control your body from head to toe. When performed correctly, they engage countless muscles in the pelvis, abdominals/low back, upper back, and then of course the chest, shoulders, and triceps. The nerdy way to describe the stabilization required during pushups is "lumbo-pelvic stability" which teaches you to control your core in a functional manner, leading to benefits both in and out of the weight room (I'll let you use your imagination here).
* It effectively trains movement of the scapulae (shoulder blades), giving you healthy shoulders for the long haul. Unlike the bench press, a pushup allows the shoulder blades to glide freely. When pushups are performed correctly (i.e. "pulling" yourself to the floor, and pressing yourself all the way up so your shoulder blades protract at the top) you engage the serratus anterior, a key player in shoulder health and function. The serratus, along with the lower trapezius, are two muscles that are pervasively dormant in our population. These two muscles work synergistically with the upper trapezius to upwardly rotate the scapula when your arm moves overhead (think: throwing a ball, or performing an overhead press). In fact, when I worked in the physical therapy clinic, the most common denominator in the patients with shoulder problems was weakness in both the serratus and the lower traps.
* They're a closed chain exercise, essentially making them more shoulder-friendly than the bench press (an open-chain exercise). * When done properly, they'll help boost your bench press, squat and deadlift numbers. Not to mention: aid you in your quest to achieve the look and function of a physical specimen. Hah! Now you're listening.
Anyway, below are videos of me performing various incorrect pushups. The technical flaws may evade you initially, but look closer, and you'll see them. You'll probably see some pushups that you weren't aware were even considered erroneous!
Note: The following 6 videos demonstrate INCORRECT form.
Error #1: Forward Head Posture
This is the most common error that people are unaware of, I believe. You'll see that my head juts forward, hitting the ground before my chest makes contact (the chest should touch the ground FIRST in a perfect pushup).
Error #2: No Scapular Retraction (aka "loose upper back")
Another common flaw most people are unaware of. You'll notice in the video that I "fall" to the ground, instead of intentionally "pulling" myself to the floor. The upper back is loose, there's no scapular retraction (think: pinching a pencil between your shoulder blades), and I'm essentially just letting gravity drop me to the floor.
Error #3: Excessive Elbow Flare
You'll see the elbows make a 90 degree angle with my torso (they should be tucked at roughly 45 degrees).
Error #4: Hip Sag
This is where the person lacks the "anterior-posterior" engagement of the core and the hips/low back sag to the floor (the body should form a completely straight line from head to toe, remaining stiff as a board).
Error #5: Elevated Hips
This is where the butt sticks up in the air. It's another compensation pattern (similar to #4) people slip into when they lack the core strength to effectively resist the pull of gravity throughout their entire body.
Error #6: Looking Straight Ahead/Looking "Up" (no video shown).
This is where people tilt their head up and look straight ahead as they perform pushups. It seems every sports coach tells their kids to do this! Look straight down at the floor when you do your pushups (unless you desire cervical problems down the road...be my guest).
So, what does a Perfect Pushup look like?
Here (at last!) is the correct version:
Key Coaching Cues:
* Hands just be just outside shoulder width, and the elbows tucked at 45 degrees (or less) to the torso. Don't listen to people who tell you that placing your hands wider will give you better chest development! All that will do is fast-track you to shoulder pain and a subsequent physical therapy appointment. * "Pull" yourself down to the ground, actively engaging the scapular retractors and essentially the entire upper-back musculature. * Keep your chin tucked (think: give yourself a "double chin") so you don't "reach for the ground" with your head. * The chest should touch the floor first (i.e. not your hips or your head) * Squeeze your abs and glutes tight throughout the entire movement * Entire body should be perfect alignment, and you should remain as tight as if someone were about to come along and try to knock you over.
Once you master the basic perfect pushup (it will take longer than you think: you should be able to do at least 20 before progressing further), there are a number of ways to increase difficulty. One way is wrap a sturdy resistance band around you, so that the movement will become harder as you reach the top portion of the pushup (as the band tension increases). You can elevate the feet as well.
Both versions are combined and shown in the video, here:
There are a million different variations you can use (in truth, you really don't need many, but it's always nice to spice things up from time to time). You can do walkover pushups, as shown here (much harder than they look!):
Or tempo pushups, in which you perform both the eccentric and concentric slowly:
Or suspended pushups, as Kelsey (my lovely fiancee) is demonstrating here:
The list goes on, but this is more than enough to get you started!
Take home message: you'll receive far greater benefit from performing 5 perfect pushups then you will from performing 20 incorrect pushups. - Steve


